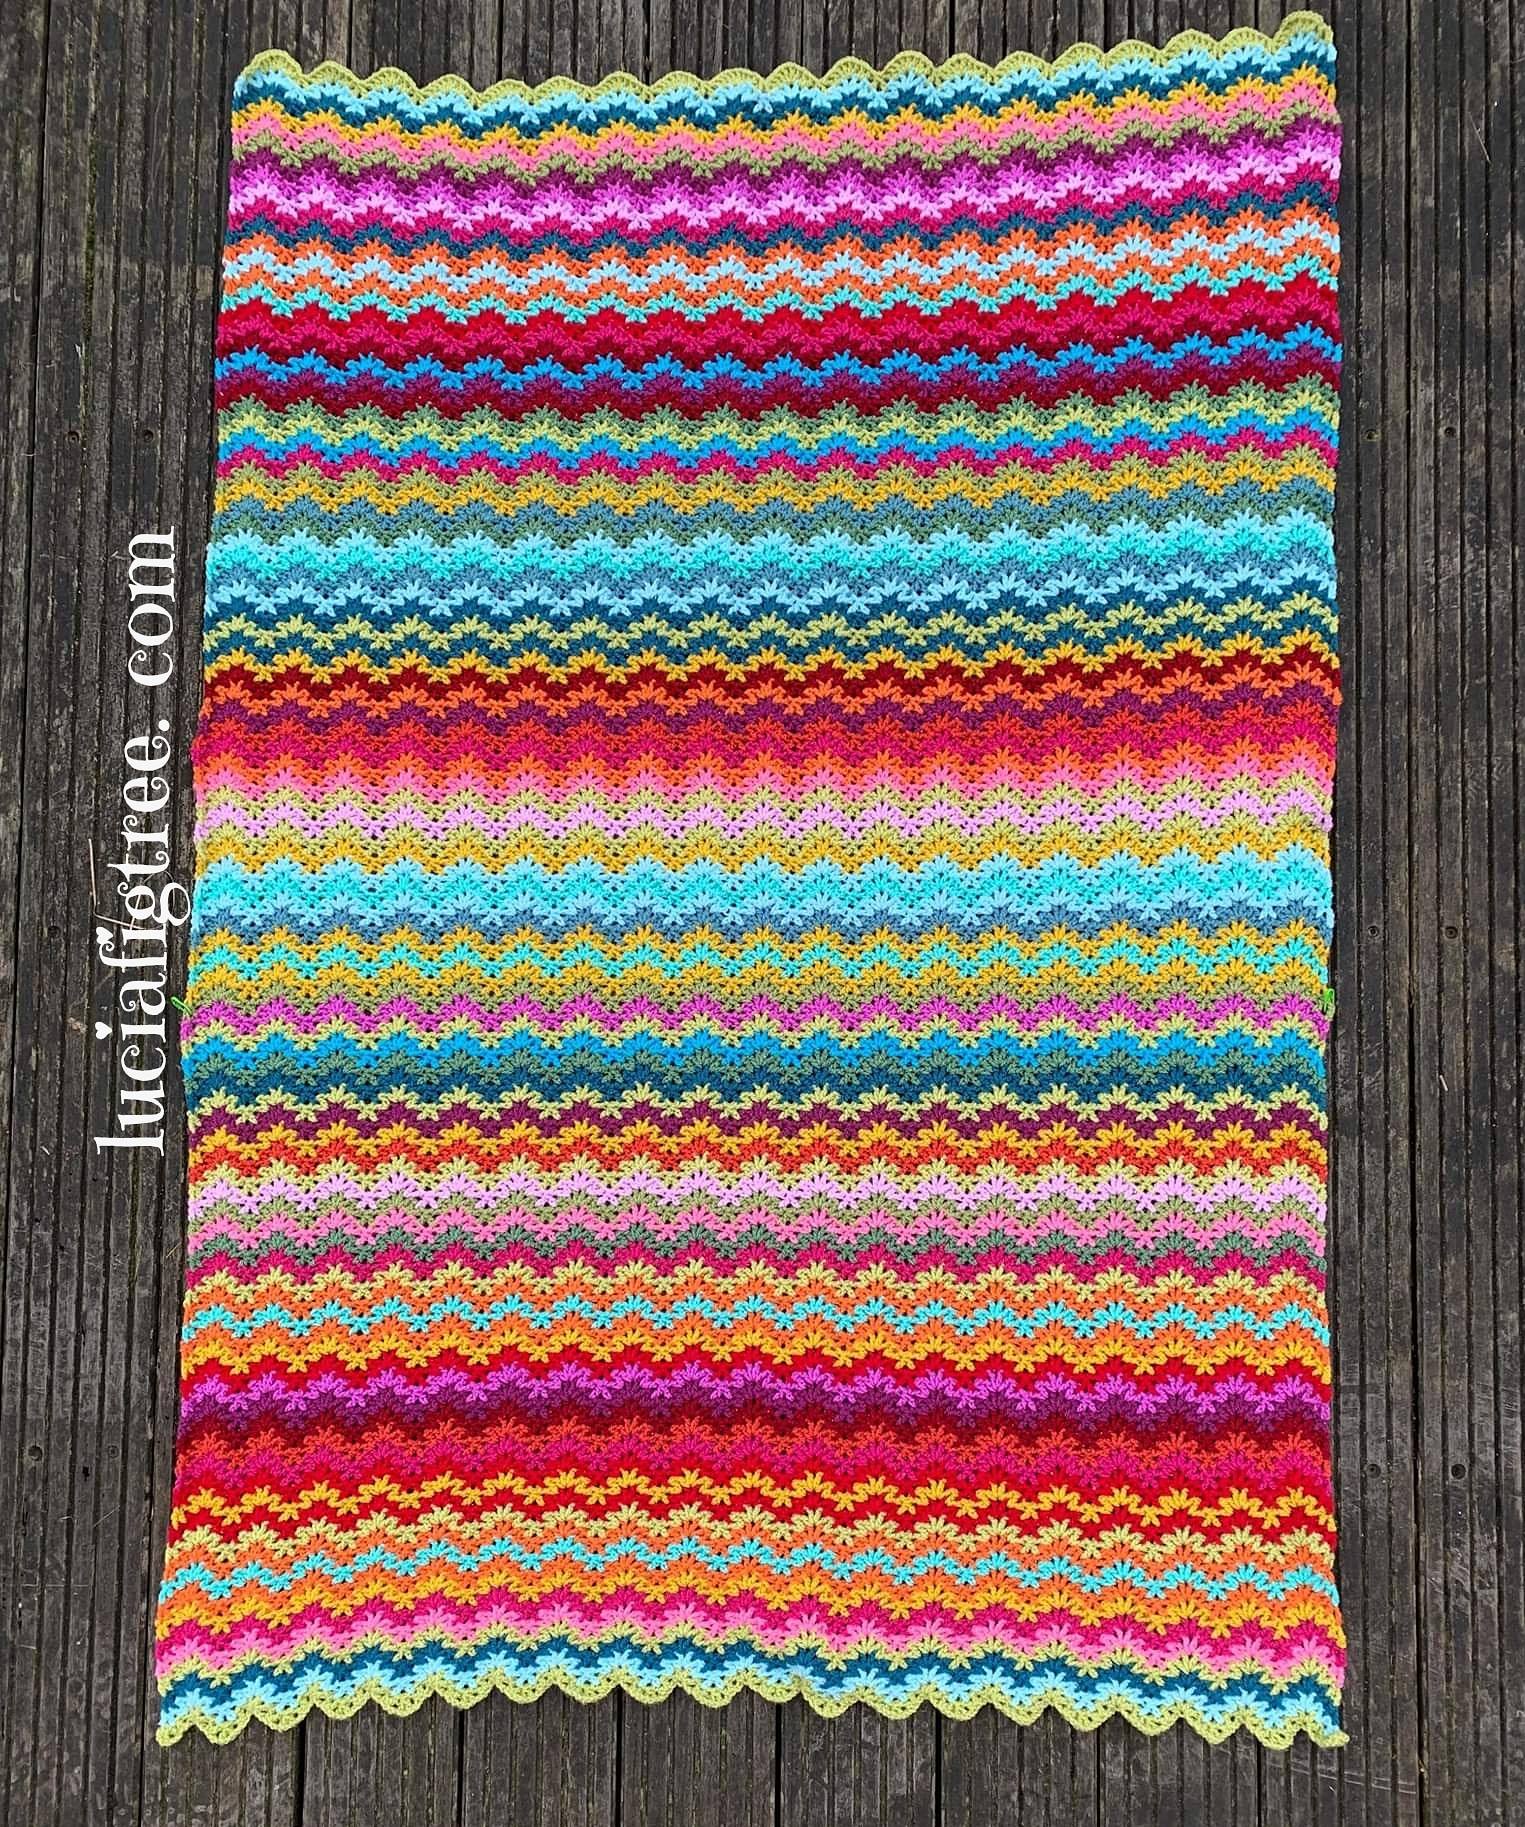
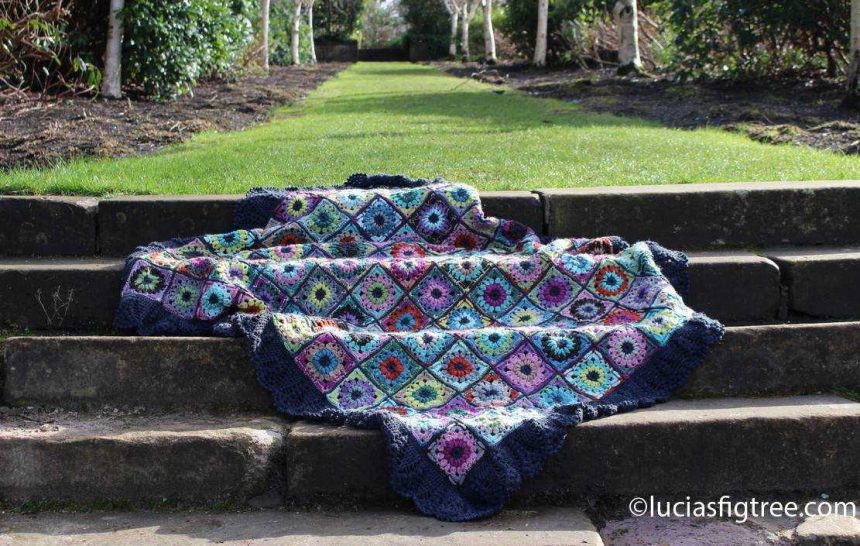
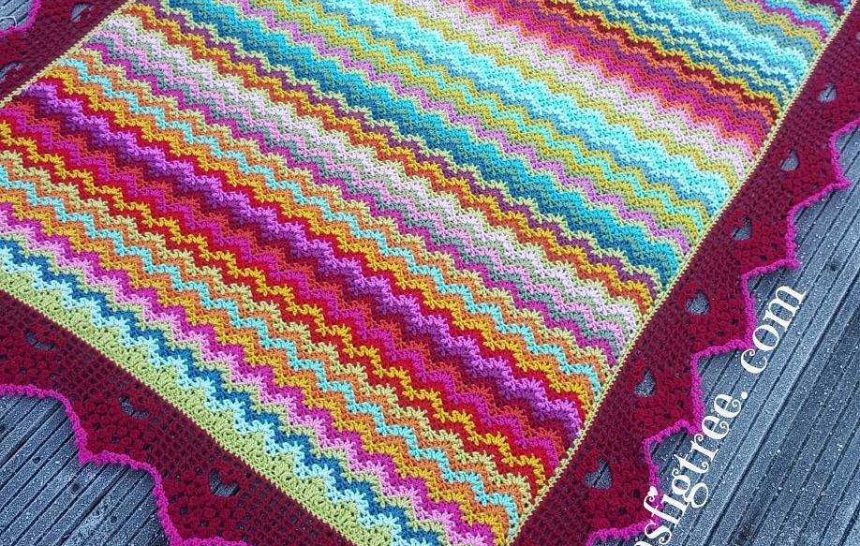
Last chapter on the January ‘s blues blanket.

I can not believe we are already in February!

Normally January drags a bit on for me but this year has definitely not been the case.

I guess I have been very busy with work and with “non-crochet “related stuff but I still managed to add a border and finish the blanket.

Today I can give you the last pieces of information so, if you like, you can finish your blanket in the same way.

About the border, I am going to digress a little bit and give you some thoughts.

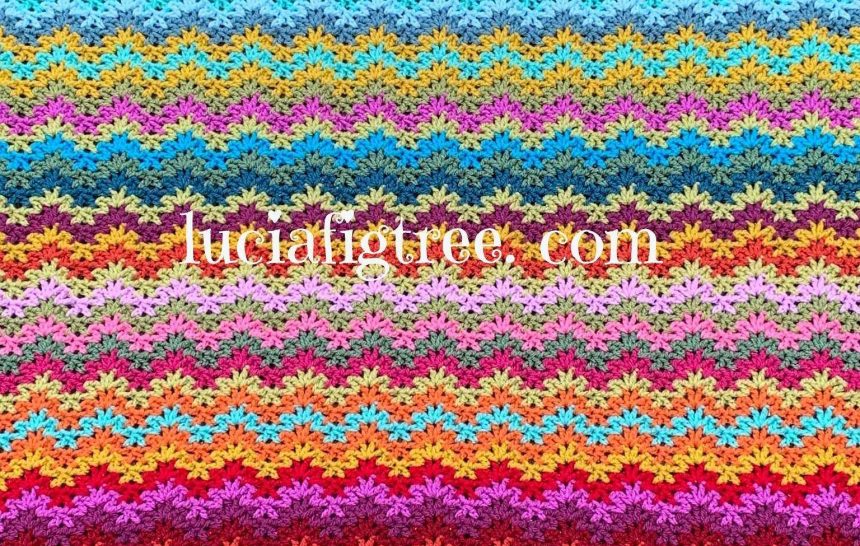
I personally love borders very much especially if they are big and bold!

That works even better if you have a simple pattern throughout the main body of the blanket as we have in this case. Maybe my propensity for statements borders is due to the fact that my first attempts on crochet, many years ago, were cotton’s tread fancy borders for linen towels!

If you are Italian or Spanish or just Mediterranean in general you might are very familiar with them.

another picture this time from the oldest and most famous creative magazine in italy called “Mani di fata” which translate very appropriately in “Faerie hands” !!

It used to be a great test for beginners to master crochet without embarking in something too challenging or time-consuming, even if, I have to admit, it still took a fair amount of time to make them as the cotton yarn was at least a 4ply but often much thinner than that.

I have a few stashed in a drawer somewhere in the house, I use them seldom as they are delicate and definitely not tumble-driers proof!!!

If bold and big is not your style, it doesn’t matter as a ripple pattern can look just beautiful as it is! the little scallop at the top and end can be left as it is and still look fabulous so do not panic if you cannot be bothered doing the border your blanket will still look lovely. Just surf the internet or Pinterest for inspirations, and remember it is YOUR blanket so don’t be afraid to go off-piste! actually, I love if you go off-piste and you put your input! it makes your blanket more personal.

Back to what I have done… some pictures to start with:

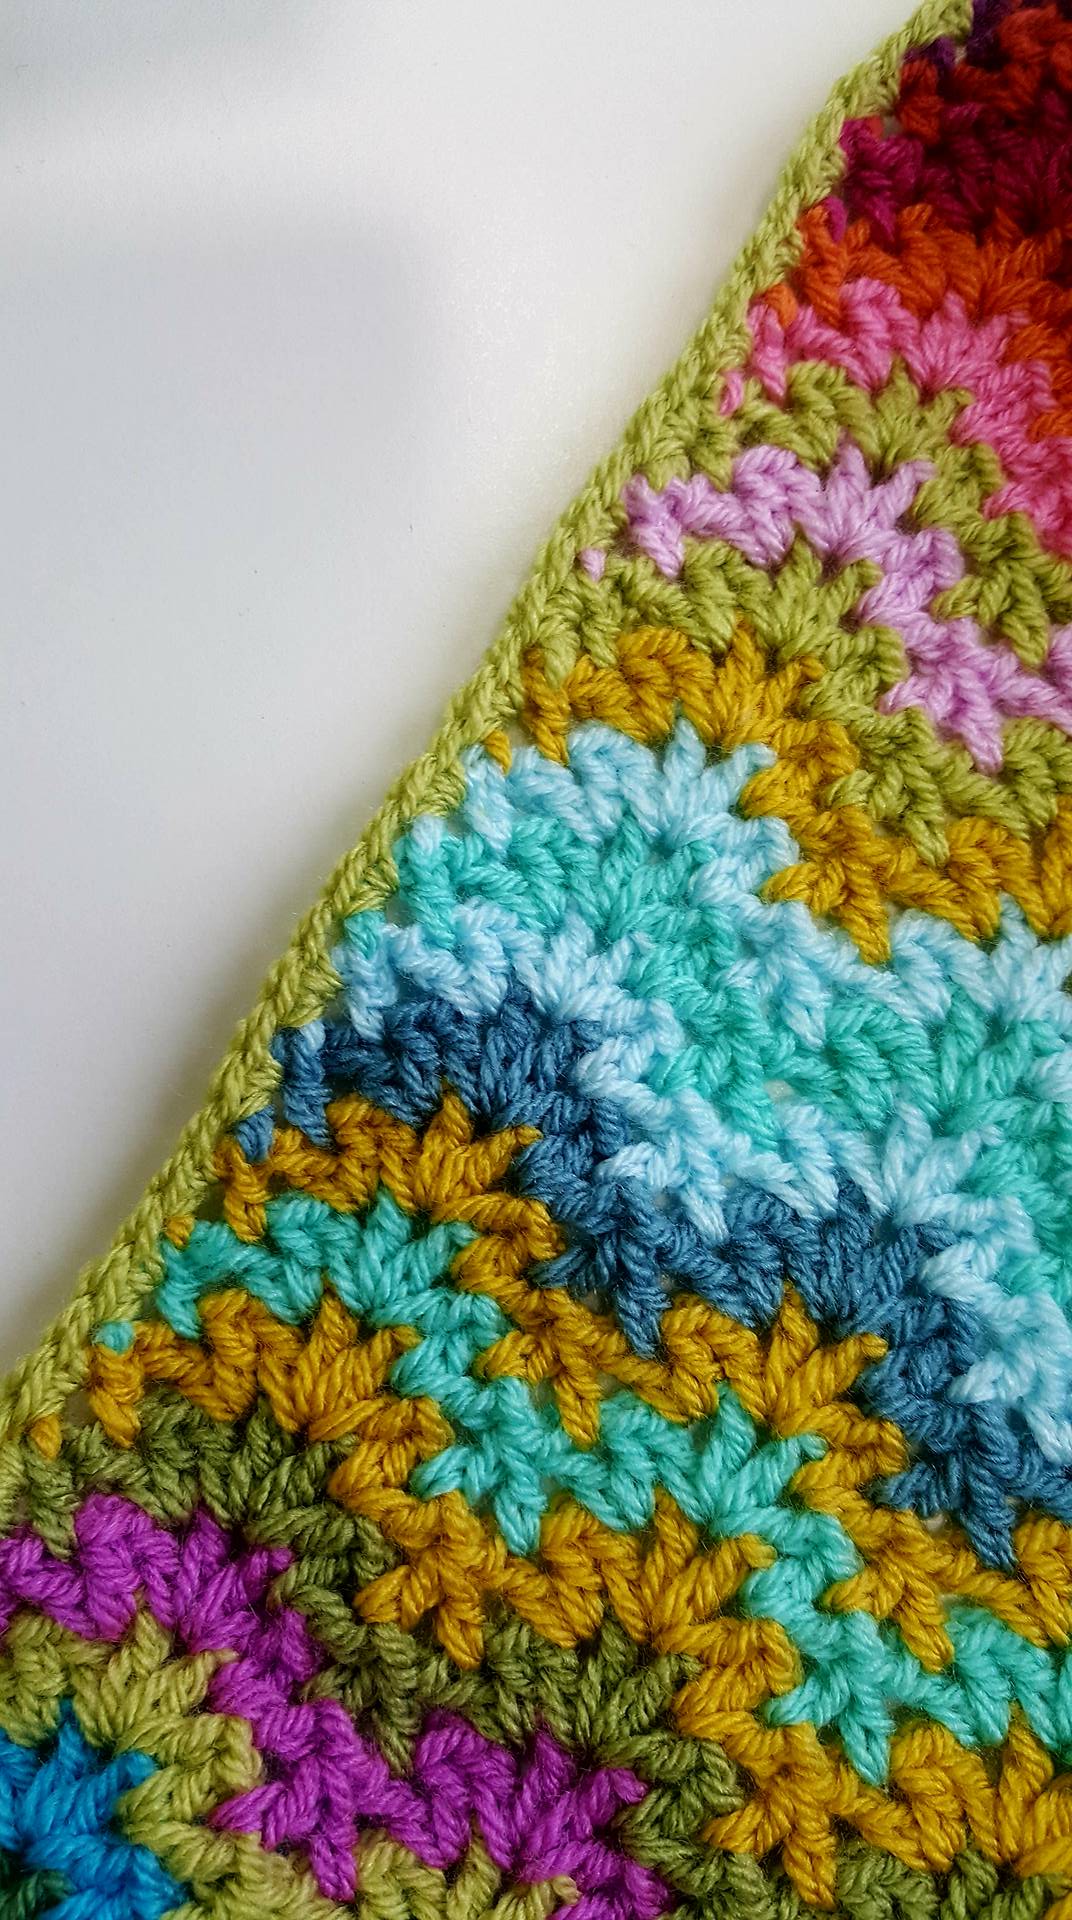
In my case, I filled the ripple because I prefer straight edges especially if you are opting for a more challenging border.

I draw the distribution of the “filling” stitches for the top and bottom of the blanket.

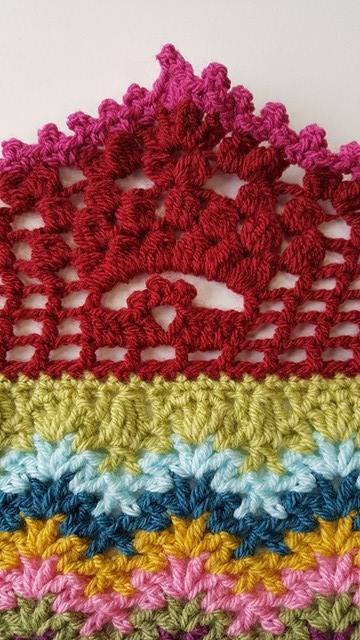
I started my foundation round with the Pistachio on the corner ( now you can see why it is good to start and finish the blanket with the same colour. it brings continuity on your foundation  round, which means when you start the next round of the border with a contrasting colour ( in my case is the claret) you have a solid even base to work with)

on the side I worked 2 dc in the space created by each tr at the beginning and end of each round .

I have in my case 195 stitched in each of the vertical sides of the blanket and 114 on each of the horizontal for the 4 corners we have :(1dc-ch1-1dc) repeated 4 times.

so the foundation round is made of (1dc-2ch-1dc)+ 114 +(1dc-2ch-1dc)+195+ (1dc-2ch-1dc)+114+(1dc-2ch-1dc)+195.

the border is done with Claret and a 3.5 hook

I have chosen for the border  again a diagram I found on Pinterest this is a picture of it. I made some minor adjustments to the last couple of rounds to simplify it mainly because the pattern is written for a cotton thread and not DK yarn.

Ther repeat of the pattern is on a multiple of 10 so on my first round of claret I added 4 stitches in the each of the short sides and 3 on each of the long sides.

If you use another pattern for the border please consider adjusting the number of the stitches according to the repeat!

I posted a couple of close-up so you can see better how the pattern develops. It has a fair amount of rounds but it is pretty fast.

my last round is a contrasting one done in Fuchsia purple.

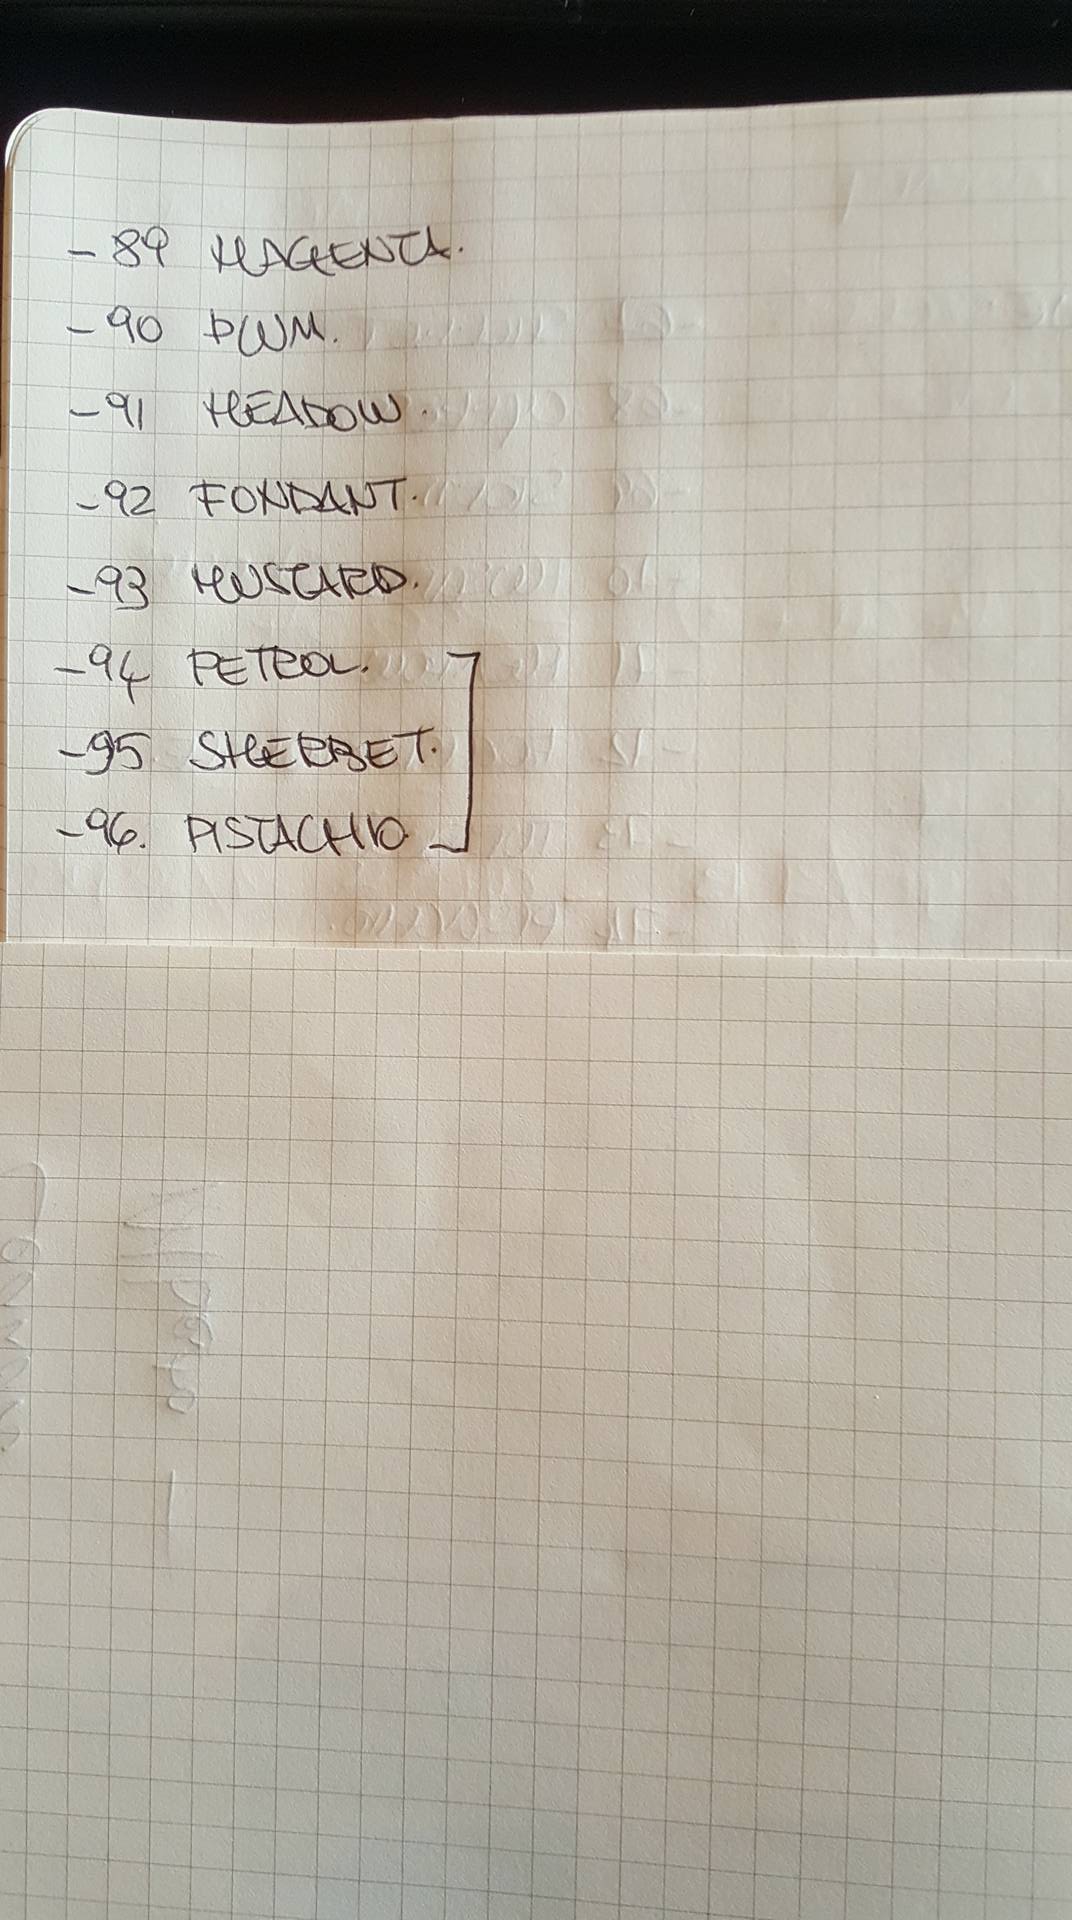
YARN QUANTITIES USED for the border:

for the Filling round and foundation, I used 35 grams of  PISTACHIO

for the BORDER:

  • ROUND 1 TO 7 : I used  150 grams of CLARET
  • ROUND 8 : I used 30 grams of  FUCHSIA PURPLE

last but not least….

I have been asked if I can transcribe the diagrams into words…. I know for many of you it is easier to use written instructions but I wish you tried ( NEW YEAR’S RESOLUTION !!!) to use a diagram!! It will open you amazing opportunities! this blanket, in particular, has such an easy diagram so please give it a try trust me you will never look back! there are loads of tutorial on you tube to learn how to read a diagram, do have a look and see which one suits you better.

love to you all…

I have something new I am working on so I will post again very soon,

lucia xx


A little bit more about the January’s blues blanket

Firstly sorry this blog entry is a bit late, finally, after a very frustrating weekend, I got my blog back!

I am quite impressed with myself for sticking to my new year’s resolutions ( or trying to) …I am back writing again!…( mind you it is early days…) nevertheless it feels good!

One of my children bought me a planner this year, I don’t know if it is meant to be a gentle hint to get better organised as I failed completely last year trying to ‘get organised’ using an App on my phone!

So on 2019, we go back to basic! Hoping that pen and paper might do the trick for me …

Do you have a planner too?

I still have to get used to these little snippets of encouragement that are keeping appearing randomly on this planner ..they make me giggle. I just discovered that there are stickers too! Probably those are a step too far for me🤣🤣🤣

I will keep you posted!

Let’s get back to the blanket.

I finished the main body a couple of days ago and I have been gathering the details so you can make one yourself.

As you know the blanket is not completed but I think it could be interesting for you to follow me “in real time” and see the blanket coming along, a bit like being behind the scenes.

The pattern is really simple, that was the point of this blanket in the first place,  to do something really easy and relaxing.

I used a V-STITCH RIPPLE for my blanket. As said on Facebook there are several versions and options for the stitch available out there.

The version I used I found it on Pinterest. Just a diagram nothing more here is the picture I have used.

.

I like to give credit to the designers even if  I think this is just a diagram of something that has been out in the open as a free pattern.  All I got is a watermark which said Tejiendo Peru’  I have also tried to get in touch with them but with no joy. so I assume it is ok for me to share with you as it is in the public domain already..

I  used the diagram above as a guide but  I did an alteration to it.

If you read the diagram you noticed that the rows are worked on the front (RIGHT side ) , then you turn your blanket and you work on the back (WRONG side). If you follow the diagram as it is in the picture below  you can see  the result:

I didn’t like the results on turning your work after each round, as I think it muddles the effect of the stitch so I opted for working just on the RIGHT SIDE ONLY! you can see the difference in the picture here:

The blanket is even, each round is exactly the same, no difference either in size or texture. Also because I change yarn every row it makes no difference of whatsoever if I  work always in the front.

Maybe you are all thinking I can’t see where the fuss is all about, but believe me when you work the all blanket you definitely will be able to see the difference between the two options. working just on the front makes a much better-looking blanket.

The blanket still doesn’t have a border but the main part measures 90 cm wide by 140 Cm long

the yarn used is STYLECRAFT SPECIAL DK . the hook size is a 3.5 mm (E).

Here the list of the colours I used:

The number between brackets refers to the quantities of yarn used in grams. obviously, do bear in mind that the yarn usage is just an indication based on my tension and a 3.5 hook used.

So dig out your leftovers from your stash as you might be able to use them and plan the blanket.

  • LIPSTICK (13)
  • SPICE (53)
  • CLARET (29)
  • MAGENTA (17)
  • PLUM (29)
  • FONDANT (27)
  • CLEMATIS (29)
  • MUSTARD (71)
  • PISTACHIO (90)
  • SHERBET (51)
  • ASPEN (33)
  • TURQUOISE (23)
  • STORM BLUE (10)
  • PETROL (34)
  • CYPRESS (25)
  • TOMATO (25)
  • MEADOW (71)
  • FUCHSIA PURPLE (52)

The pattern is based on a 14 stitches repeat plus 3. I started with 269 chain stitches that gave me 19 REPEATS ( 90 cm wide) it is very easy to adjust the size by adding or subtracting repeats to get to the size that you want.

I also took note of the colours sequence I used. there are 96 rows.

a  couple of HINTS :

  • if you look at the blanket I have repeated the first 3 rows in reverse order at the end. that will finish your blanket much better, it is like a visual frame which works beautifully not only for this blanket but in any you might want to do at home.
  • I also started each row with a self-standing treble and NOT 3 chains as in the diagram ( simply because I feel is a more sturdy way to start and it will work better when we will add the border.

that is all for today

thank you for reading,

Lucia xx

A little catch-up!

A little catch-up… I know it has been AGES!

I don’t know about you but time has passed me by in a whirl of yarn, patterns, ideas, pictures, stories and the odd family commitment or two..lol

So where to start…

I have pulled together very basic information about the Wreath because I know quite a few of you are interested in it.

I made it, as said, a couple of years ago, I guess I must have been a bit bored and when I am bored of my current WIPs or I am tired, I always look for something reasonably small and quick to make. I call it “instant gratification”

It turns out that in these 2 years I found my wreath really useful, I never, as said on Facebook, stitched the pieces permanently on the ring but I left them pinned down with these little white headspins.  I have used that wreath many times, for trying different colour combinations or using some of the flowers as decoration in pictures of other projects.

So if you need to test some colours instead than doing a lot of boring squares, make some flowers!! Then you can play with them!

There are many wreaths available in both Ravelry and Pinterest that can help you to decide how to make yours, for me, my initial inspiration was seeing the most amazing, beautiful and complicated wreaths that Lucy @attic24 had made and that what spun me making one.

Mine is much more simple in comparison with Lucy but .. did I mention, instant gratification??? LOL

I love small projects that can be made in a day or a weekend!

I have been looking throughout the past couple of days if I had saved any pattern or link or reference, but all I found were a couple of pictures. So for the purpose of this blog I pulled my wreath down and I made a 3D daisy and the 5 petal flower again so I can jot down the details.

so let’s start :

what do you need?

  • 1 half rounded polystyrene ring – 35cm in diameter. It has to be flat in the back and rounded in the front. (you can get them from crafts shops or Amazon)
  • leftover yarns.


Please look at Lucy’s wreaths, she has a very comprehensive tutorial on how to cover up your polystyrene ring and also there are some lovely patterns for the leaves too, which I used in my wreath. this is the link to Lucy’s blog wreath :

http://attic24.typepad.com/weblog/2015/03/winter-wreath-ta-dah-1.html


for the base of my wreath, I used some Lopi’s ALAFOSSLOPI  yarn left over from a jumper it is a chunky yarn, the colours are:

  • 0085 OATMEAL HEATHER
  • 0867 CHOCOLATE HEATHER.


I love this Icelandic 100% yarn because has a rustic, organic feeling, and it makes the most amazing super -toasty jumper ever!

I can’t remember exactely what hook I used but I guess must have been either a 4.00 or a 4.5 mm, you want your fabric to be dense so it covers the ring beautifully. So make a small section and see if it covers up the ring neatly. Mine worked, like Lucy’s, in rows of double crochet stitches (Uk terms)  22 stitches wide and 112 rows alternating 2 rows in oatmeal and 2 in chocolate.

To help to keep the strip in place as well as the sewing in the back I sprayed my ring with some SprayMount Yp208060506 adhesive spray, I use it in the office for my mood boards, it is great, but make sure you spray lightly!

now to the FLOWERS:

the yarn is leftovers of STYLECRAFT SPECIAL DK in:

  • storm blue
  • duck egg
  • mustard
  • camel
  • grape
  • lime
  • pale rose
  • parchment
  • gold

you also need some polyester toy filling for the centre of the daisy. If you have none, ordinary cotton wool balls will do.


I made 2 types of flowers :

-10  Hellebore flowers from Lucy’s wreath, pattern link here:

http://attic24.typepad.com/weblog/crochet-hellebore-flower.html

-12  three dimensional  daisies:

the pattern as follow:

The centre of the daisy is done with the same principle of amigurumi, crocheting in a spiral, without joining in the round and without turning the crochet work,

Start with any yarn and a 4.00mm hook and make a magic ring

Rnd1 :

Work 6 dc in a magic ring. ( 6 dc)

Rnd2:

work 2 dc in each stitch. ( 12dc)

Rnd3:

work [dc in next st, 2 dc in next st] repeat [ ] 6 times ( 18st)


Rnd4:

work 1dc in each st. ( 18dc)

Rnd5:

as Rnd 4 (18 st).

Rnd6:

as Rnd4 (18st) put a marker in any of those stitches as a reference for the petals we are going to do after.

Rnd7:

as Rnd4. (18 st).

Rnd8:

we start the decreasing now and your work will start to looks like a little cup.

work [1dc, 2dc together] 6times . stuff your little cup with the filling.

Rnd9:

work 2dc together all around, add some more stuffing and close the bud. ( if you want you can leave a long tail to sew the flower to the wreath later).


PETALS:

with a different yarn work on the side ( rnd6) , using the picture as a reference,

1st ROUND OF PETALS

work :

[1dc, ch3,skip 1 st, 1dc ] all around that should give you 9ch3 loops that we are going to fill up to make the first ring of petals.


in each of the ch3 spaces work: 1dc-1htr-2tr-1htr-1dc.


2nd ROUND OF PETALS

work:

1dc in the skipped st above, 5 ch, skip 1 dc and repeat that makes another round of  9petals  staggered from the petals before the previous round. In  each of the ch5 space we work: [1dc-1htr-4tr-1htr-1dc ]


that makes our 3D DAISY!

LEAVES:

makes 18 ( again make as much as you like!)

the pattern is again from lucy’s @Attic24, this is the link:

http://attic24.typepad.com/weblog/may-roses.html

For my version I used some  leftovers of STYLECRAFT CHUNKY SPECIAL  and  some of the ALAFOSS LOPI I used for covering the ring in:

STYLECRAFT SPECIAL CHUNKY:

  • gold
  • camel
  • dark brown
  • lime ( stylecraft DK)

ALAFOSS LOPI

  • oatmeal heather
  • chocolate heather.

then you can take a few pins and place your little flowers and leaves all around the ring…

hope it has helped

love to you all and happy “crocheting”..( someone told me I shouldn’t use the term “happy hooking”!)

I got a few more things  coming along so stay tuned!!!

lucia xxx


The Emily’s epilogue

I finished the blanket about a week ago, but I wasn’t so pleased with the quality of the pictures I took indoor. The weather has been quite poor  (surprise, surprise) and  I couldn’t  photograph outside, but I managed a couple of hours’ window on Monday and I got a few pictures. You must be wondering why I am so obsessed with outdoor’s photography; it is because my blankets are very much just about colors, and it matters a great deal to me for the images to be as ‘real life’ as possible.

I  wish I had the time, last week, to go back to Haworth and photograph the blanket there, but I have been busy, and it is a long round trip from Glasgow. Said that the next time I am down in Yorkshire, I would!!. As an alternative location, I thought of  Pollok Country Park , Glasgow’s largest park ,which features the impressive Pollok House as well as the renowned Burrell Collection.  Both Pollok house and the Burrell collection are closed, at the moment, and under renovation, but the gardens are still open to the public. 

It is a beautiful place, well worth a trip if you are visiting Glasgow.

Anyway back to the Emily:

The blanket measures: 140cm x180 cm, in total, the border is 14cm deep. There are nine squares by 12 rows for a total of  108 squares.

The yarn used is a combination of STYLECRAFT ALPACA TWEED DK, SPECIAL DK, and  LIFE DK.

14 Colors  used which are:

ALPACA TWEED DK:  ocean, dusky pink, sea breeze, sage.

SPECIAL DK: copper,plum,mocha,pistachio.

LIFE DK: heather, stone nepp, chocolate nepp, pebble nepp, gorse nepp, mixture charcoal.

QUANTITIES:

one  100gr ball for each color plus five balls of mixture charcoal.

PLEASE NOTE:  mixture charcoal is used for ALL the first 2 rows of the squares, the joining, and the border.

CROCHET HOOK  size 4 . the squares measure 11cm

The squares measure 11cm

SQUARE PATTERN:

the square is my design:

ROW 1: 6 chains join in with an ss

ROW 2:  in the 6 chain ring work as follow: 3 chains (that makes the first treble),1 treble,1 ch  *2 trebles,1ch*   repeat ** 7 times. ( 16 trebles and 8 ch1 spaces)

ROW 3 :  *puff stitch  in each of the ch1 space of row2 ,2ch*, repeat  ** 15 times   (16 puffs, 32ch)

ROW4:  *4 trebles cluster in the ch2 space of round3,3 ch*, repeat **15 times (16 clusters, 48ch)

ROW5: we  add the corners as follow: start in any of the 3ch space of round 4 and work* 1 dc,skip the cluster,3ch,1dc in the next 3ch space of round 4.; next we make the corner: in the next ch3space work: 5trebles,3ch,5trebles;1dc in the next ch3 space of round4,3 ch* repeat ** 3 more times   (4 corners, 12 dc, 8ch3 spaces)

ROW6 and final row: start on the corner and work: 2htreble,2ch,2htreble, 5 back post half treble on the 5 trebles of row5,1 half treble in the space between the 5 trebles of row 5 and the dc of row 5, 2dc on the ch3 space,1 dc on the dc of row5,2dc on the next ch3 space,1htreble on the space between the dc of round 5 and the next corner .repeat all around.

REMEMBER ROW1 AND ROW2 ARE ALL IN CHARCOAL.

The others row, please alternate the colors, as usual, choose any of the two methods I had listed before in the past blankets I posted.

You have plenty of yarn to make the blanket, and some left too.

JOINING:

with mixture charcoal, a simple dc join.


THE BORDER:

ONE foundation row around the blanket of dc in charcoal to set the border then follow the diagram below:

a note about the pattern for the border:

I found the pattern on Pinterest. It is what I believe a shawl. I tried to go back to the source of the original designer, but I haven’t been able to find out who is. The watermark is too feeble, and I got nowhere with that either.I went as far as finding what I assume is a Japanese pattern, but again has been posted and re-posted several times on Russian/Romanian sites, and I can’t read Cyrillic or Japanese so , I am afraid, I  have no idea.

PLEASE if you do know the designer behind the diagram, let me know, and I will credit her/him. THERE IS NOTHING OF MORE ANNOYING THAN PILFERING OTHER DESIGNERS HARD WORK WITHOUT, AT LEAST, THE COURTESY OF ACKNOWLEDGE THEM!

following what I wrote above I am adding this here, on the 3rd march, 1917:

I just got a message this morning from a nice lady called Lynette Williams, she found the original designer on Ravelry. I am very happy to say it is a free Ravelry download pattern so I havent infringed any designer’rights. This is the link to it : http://www.ravelry.com/patterns/library/erigeneia

the designer is called: SILKE TERHORST, and the shawl  is called : ERIGENEIA  which  means “Early-born” and is an epithet to the greek goddess Eos – the goddess of the Dawn. How nice is that? I love the name and the story!

THANKS AGAIN LYNETTE!!!

Has the Emily  been a success? Can I imagine the blanket sitting in a corner of the parsonage? maybe yes or maybe no.  All I know is that has been a lovely journey and the blanket will always remind me of my trip to Haworth and how much I love the  Brontës sisters.

That is all, thank you for reading my blanket’s adventures, for been patient with what I believe, are quite pedestrian, and often sketchy pattern details. I will get better, I hope, with practice!

Happy crocheting!!!!

Lucia xx


My yarn room makeover

Hi, Everyone!

If you follow me on Facebook, you might know I spent the past two days trying to re-organize my studio. 

It wasn’t meant to be a big job; just assembling two small bookcases and shifting some of the books to create more space for my yarn.. because I am, as probably many of you are,  a”yarn collector”!

Some will say a “yarn hoarder,” but I don’t like the negative connotation which comes with the term hoarder.

I simply just LOVE yarn! 

I love all the all aspects of yarn; I like the feeling of it, the texture if it is a hand dyed skein, I love the story behind it and the origin of the fiber. I dabbed into spinning and hand dyeing too but again there are so many talented artisans out there that make a much better job than I do, as both dyeing and spinning require a great degree of skills.

My yarns are like color pencils, and that is why I love them displayed and divided by hue,  fiber content, and yarn weight( 4ply,DK,chunky).

You probably have spotted I have a lot of STYLECRAFT’s yarn because it is what I use mainly for my blankets.

I try to stock at least one ball for each color in the main ranges I use which are: SPECIAL DK, ALPACA TWEED DK,BATIK, LIFE DK and CLASSIQUE COTTON DK. There is a gap in the library because all this ‘one blanket for each month’ makes the yarn flying out of the shelves so quickly!  If  I might make a suggestion,  you love making  blanket ,  you do not have a stockist near you , or, you are like me, and  you get overwhelmed when visiting a yarn shop, the best way about it  is to choose a brand and a weight. Then invest in one ball for each color of the range you selected  as it makes the process to choose the colors for projects much easier, it streamlines your stash too. And  if you  have some space where to display  it is a total bonus!

I a

When come to storing or displaying yarn I  am always on the lookout for the easy and inexpensive way to do it, and  I might have a couple of tips to pass on…

My studio furniture is a mix of IKEA and some old vintage pieces.

IKEA is cheap and does the job very well. My sofa is from Ikea, has a washable cover ( very useful for the cat, and the tea and cakes crumble…) the bookcases are all Billy

http://www.ikea.com/gb/en/search/?k=billy  the big one is several years old, and I have been adding modules as I need them.

The shelving is IKEA too and so are most of the storage boxes.

My overflow of yarn is on top of the bookcases in boxes those are  DRONA boxes, http://www.ikea.com/gb/en/products/small-storage-organisers/storage-boxes-baskets/dr%C3%B6na-box-beige-art-70298813/ the retail price is  £2.50 and they come in a variety of colors. I love them because they are really cheap but well done, made of fabric they are strong enough to hold the yarn and be positioned on their side. For extra strength and stability, I  used some velcro tape so to join all the boxes together.

For the cotton yarn, have used MOPPE http://www.ikea.com/gb/en/products/small-storage-organisers/paper-media-organisers/moppe-mini-chest-of-drawers-birch-plywood-art-40216357/ 

They are mini chest drawers (42x18x32cm) made of solid plywood, perfect for storing cotton yarn and as books dividers too.

The extra vantage is that the drawers do not have a handle, so I use the frame without the drawers as a mini bookcase, then the drawers too can be filled with more yarn and positioned on their side. Doing, so I double the amount of yarn I can store and display, and I can combine the different size drawers together. the  plus side is that plywood  is a natural product  (yarn doesn’t  like plastic…)

So you can keep an eye on what you have available,  no more rummaging in bags stashed all over the place and I might be  bias, but I think they look pretty too!

have a lovely day, thank you for reading,

Lucia xx


X