A little catch-up!

A little catch-up… I know it has been AGES!

I don’t know about you but time has passed me by in a whirl of yarn, patterns, ideas, pictures, stories and the odd family commitment or two..lol

So where to start…

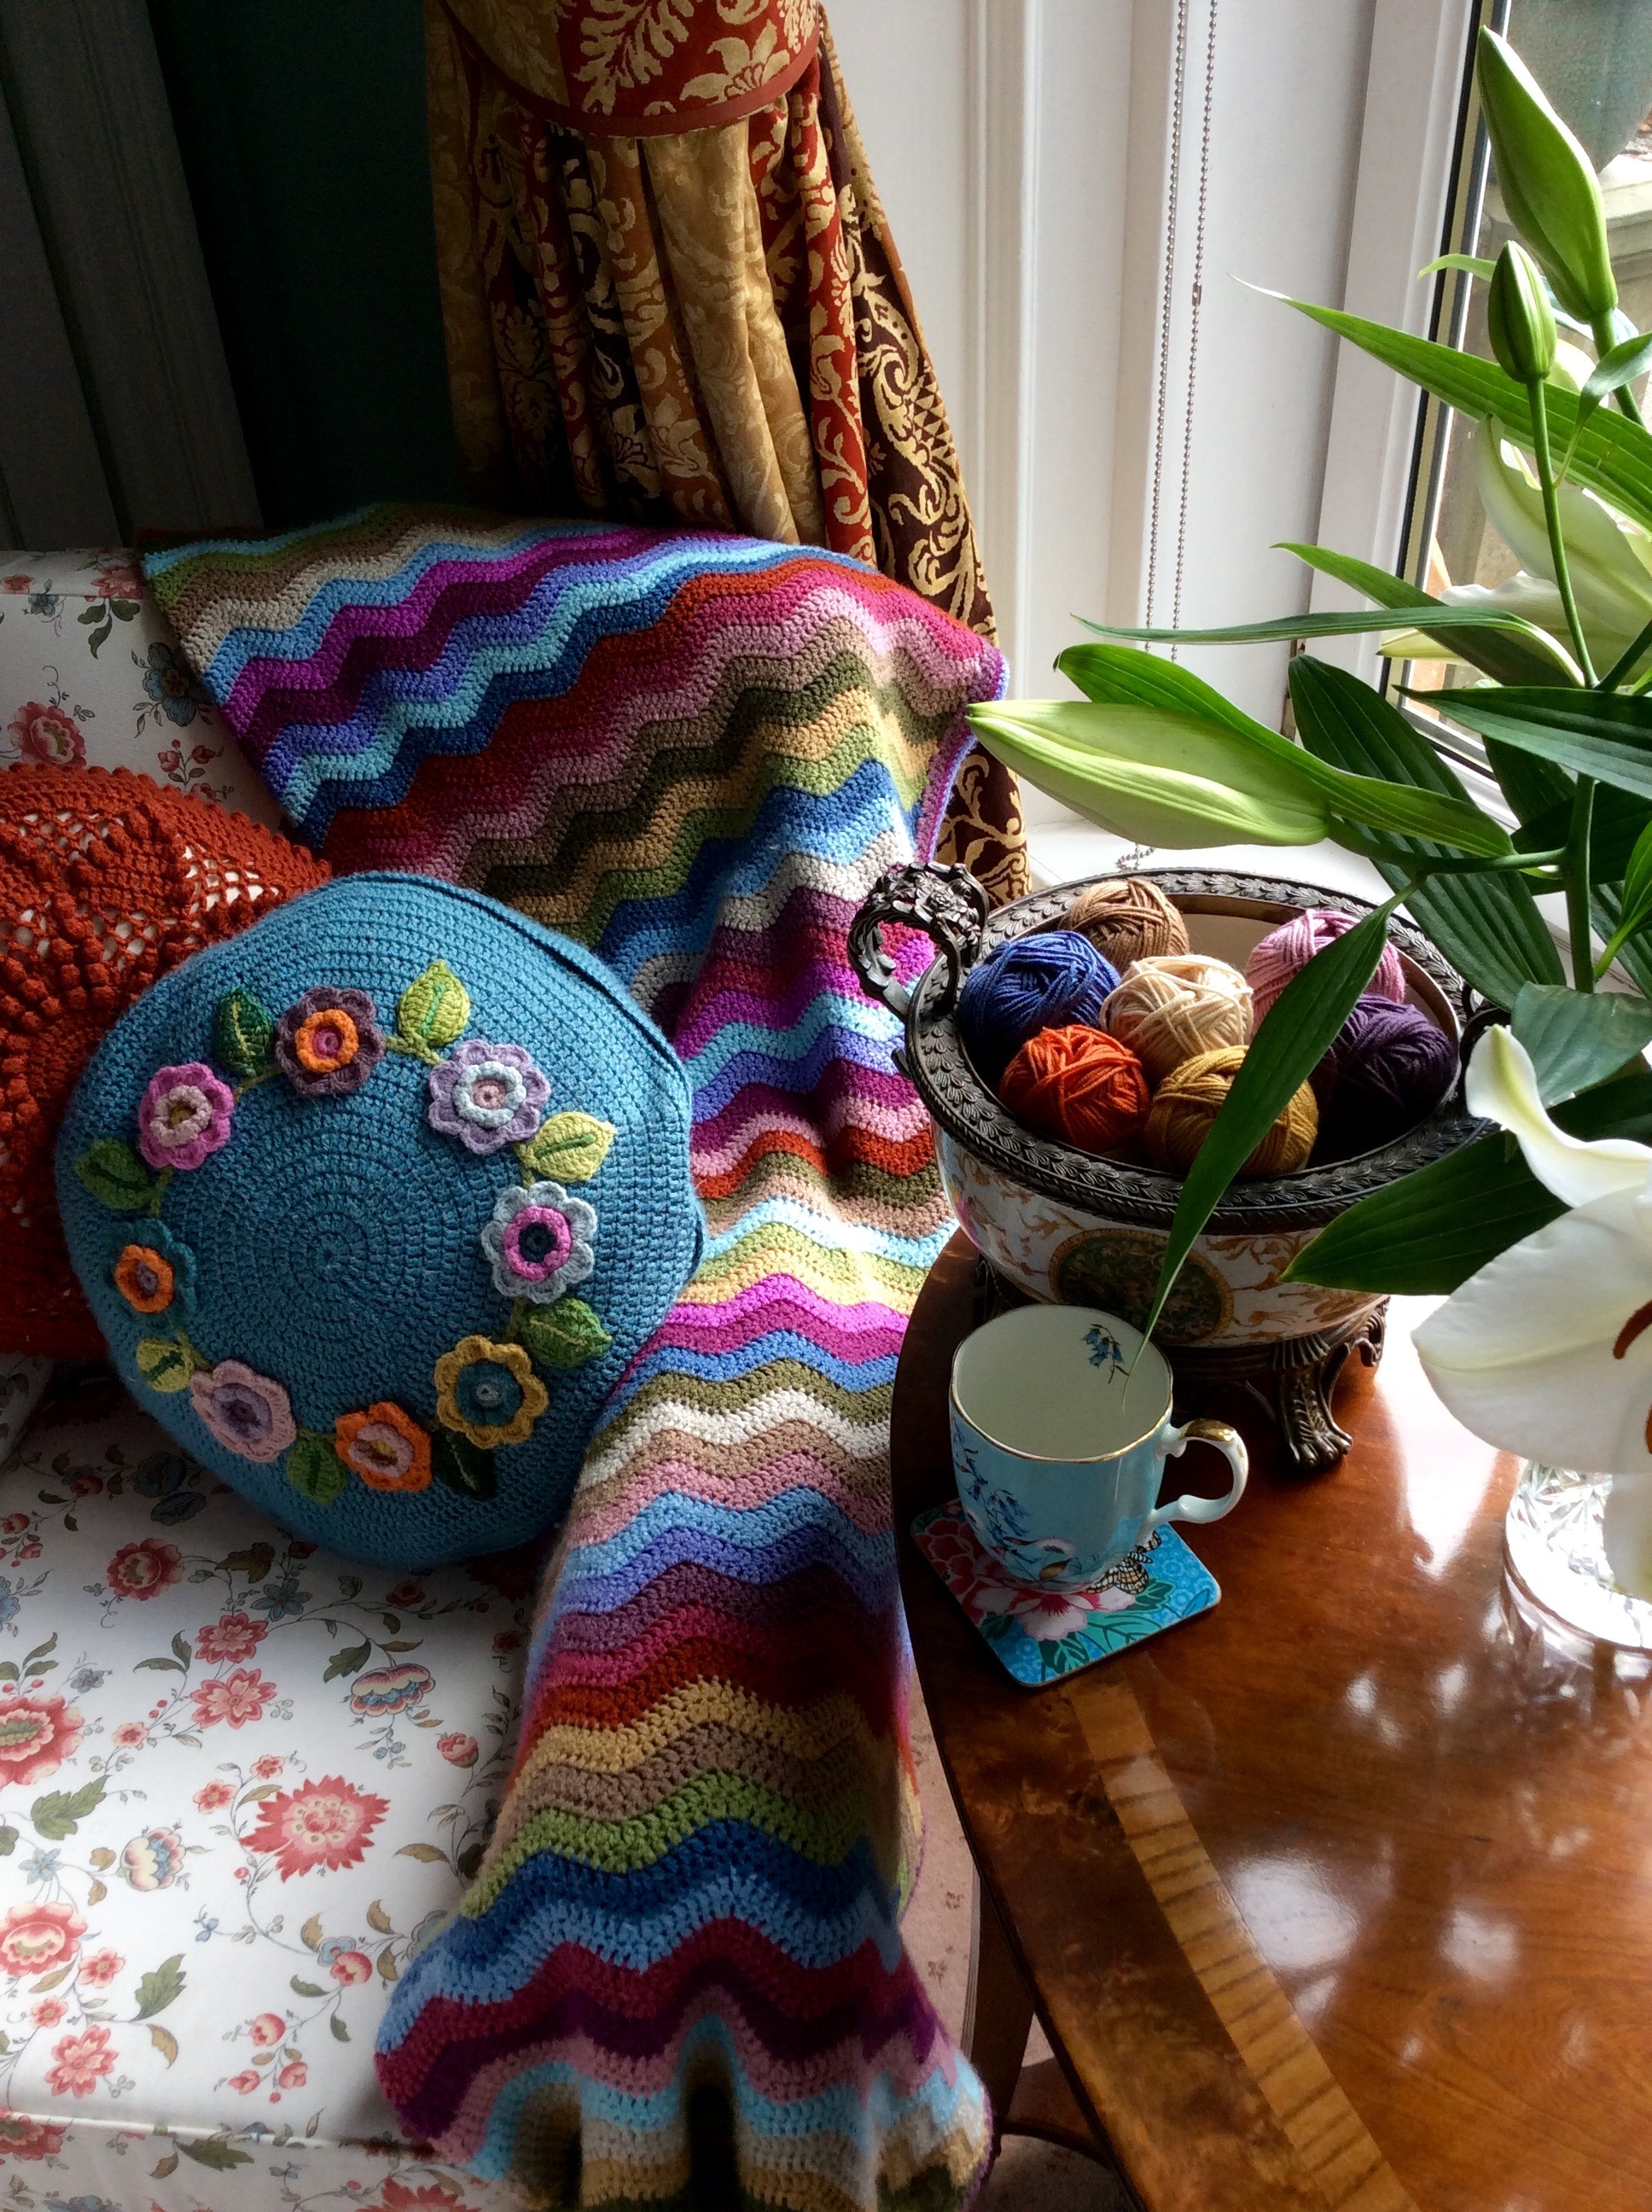
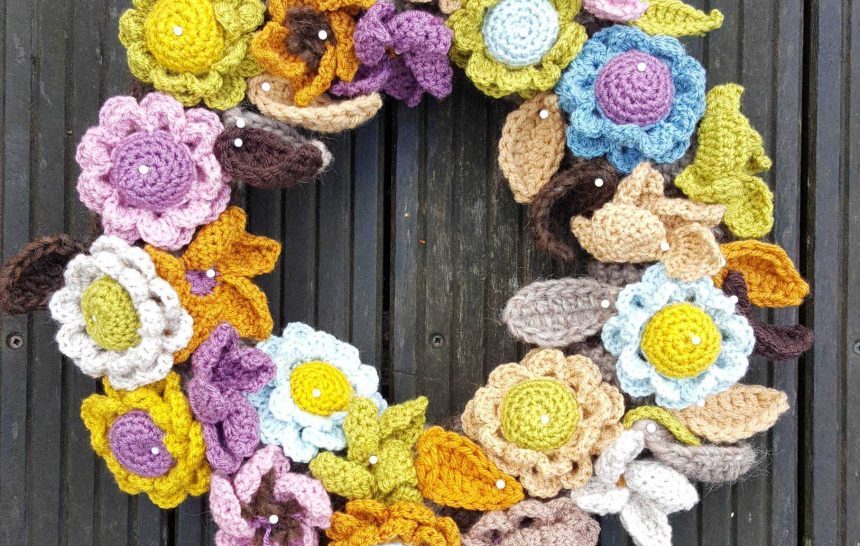
I have pulled together very basic information about the Wreath because I know quite a few of you are interested in it.

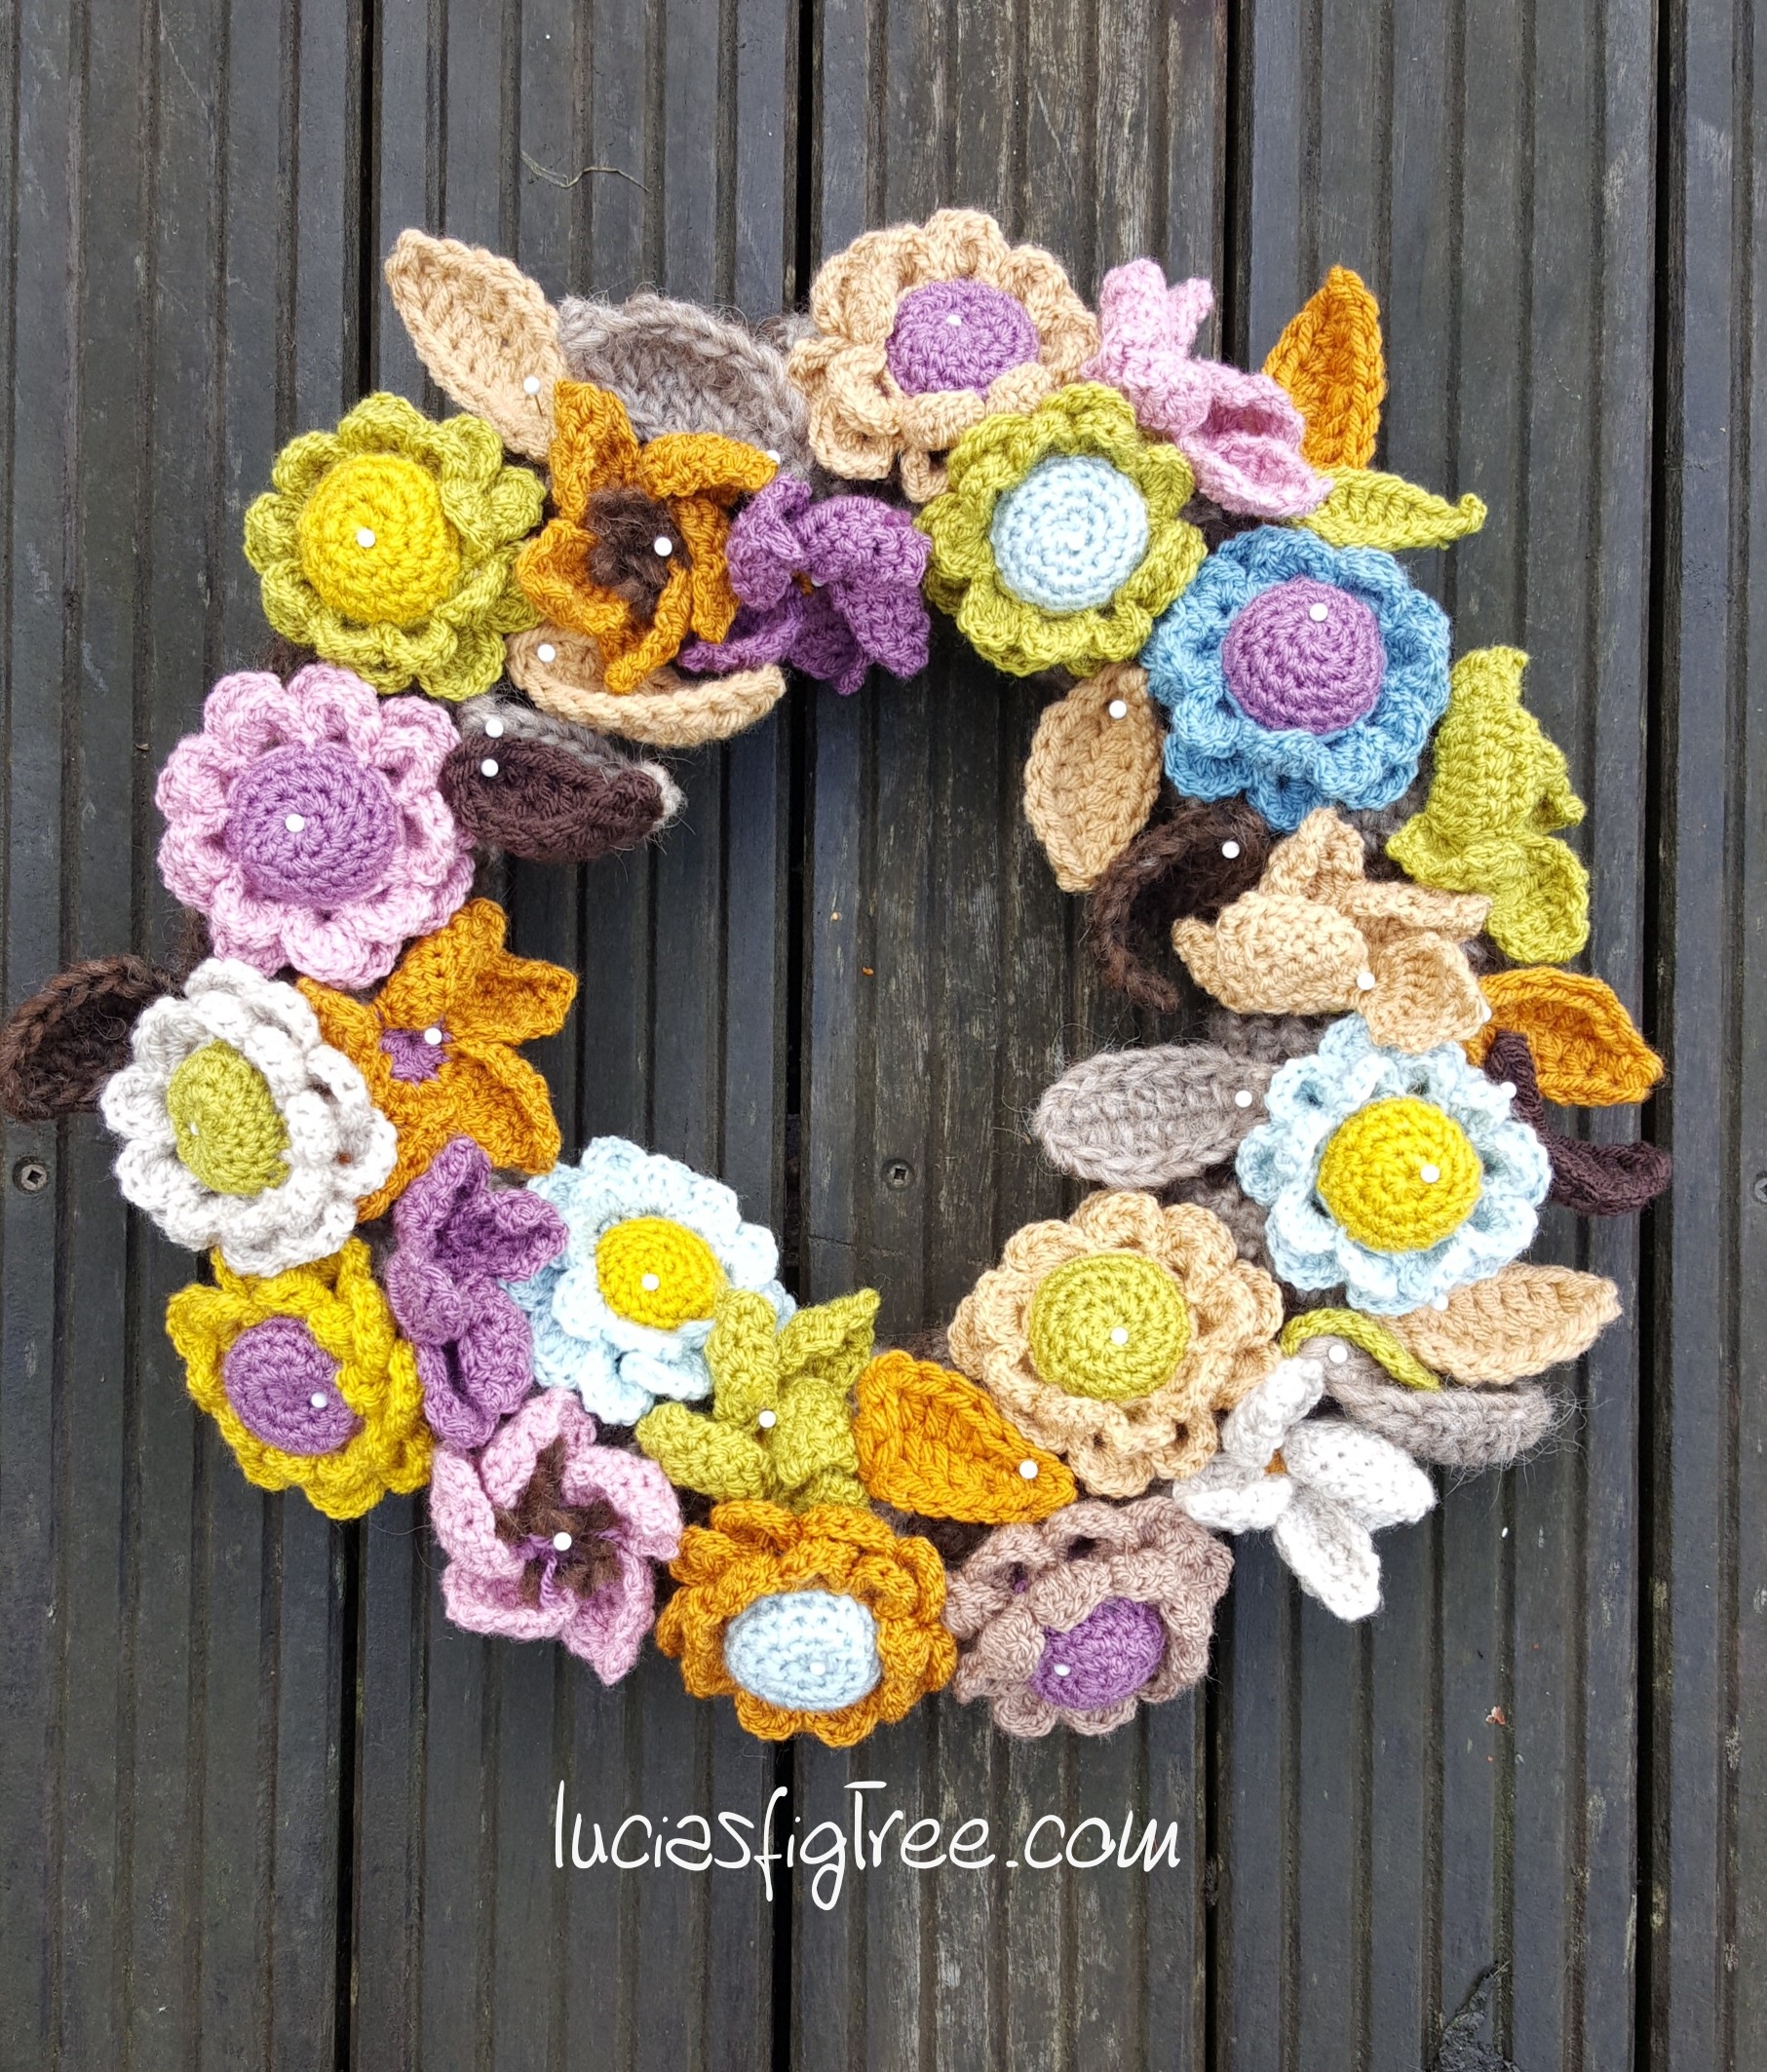
I made it, as said, a couple of years ago, I guess I must have been a bit bored and when I am bored of my current WIPs or I am tired, I always look for something reasonably small and quick to make. I call it “instant gratification”

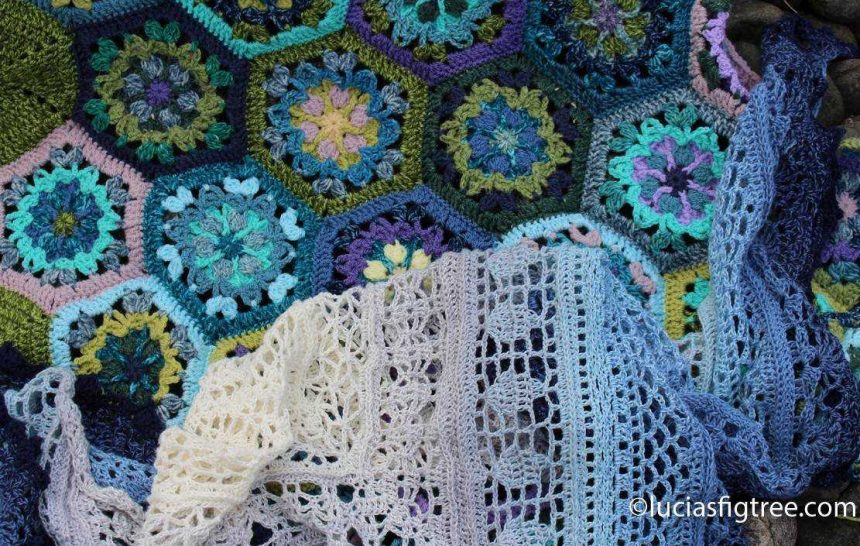
It turns out that in these 2 years I found my wreath really useful, I never, as said on Facebook, stitched the pieces permanently on the ring but I left them pinned down with these little white headspins.  I have used that wreath many times, for trying different colour combinations or using some of the flowers as decoration in pictures of other projects.

So if you need to test some colours instead than doing a lot of boring squares, make some flowers!! Then you can play with them!

There are many wreaths available in both Ravelry and Pinterest that can help you to decide how to make yours, for me, my initial inspiration was seeing the most amazing, beautiful and complicated wreaths that Lucy @attic24 had made and that what spun me making one.

Mine is much more simple in comparison with Lucy but .. did I mention, instant gratification??? LOL

I love small projects that can be made in a day or a weekend!

I have been looking throughout the past couple of days if I had saved any pattern or link or reference, but all I found were a couple of pictures. So for the purpose of this blog I pulled my wreath down and I made a 3D daisy and the 5 petal flower again so I can jot down the details.

so let’s start :

what do you need?

  • 1 half rounded polystyrene ring – 35cm in diameter. It has to be flat in the back and rounded in the front. (you can get them from crafts shops or Amazon)
  • leftover yarns.


Please look at Lucy’s wreaths, she has a very comprehensive tutorial on how to cover up your polystyrene ring and also there are some lovely patterns for the leaves too, which I used in my wreath. this is the link to Lucy’s blog wreath :

http://attic24.typepad.com/weblog/2015/03/winter-wreath-ta-dah-1.html


for the base of my wreath, I used some Lopi’s ALAFOSSLOPI  yarn left over from a jumper it is a chunky yarn, the colours are:

  • 0085 OATMEAL HEATHER
  • 0867 CHOCOLATE HEATHER.


I love this Icelandic 100% yarn because has a rustic, organic feeling, and it makes the most amazing super -toasty jumper ever!

I can’t remember exactely what hook I used but I guess must have been either a 4.00 or a 4.5 mm, you want your fabric to be dense so it covers the ring beautifully. So make a small section and see if it covers up the ring neatly. Mine worked, like Lucy’s, in rows of double crochet stitches (Uk terms)  22 stitches wide and 112 rows alternating 2 rows in oatmeal and 2 in chocolate.

To help to keep the strip in place as well as the sewing in the back I sprayed my ring with some SprayMount Yp208060506 adhesive spray, I use it in the office for my mood boards, it is great, but make sure you spray lightly!
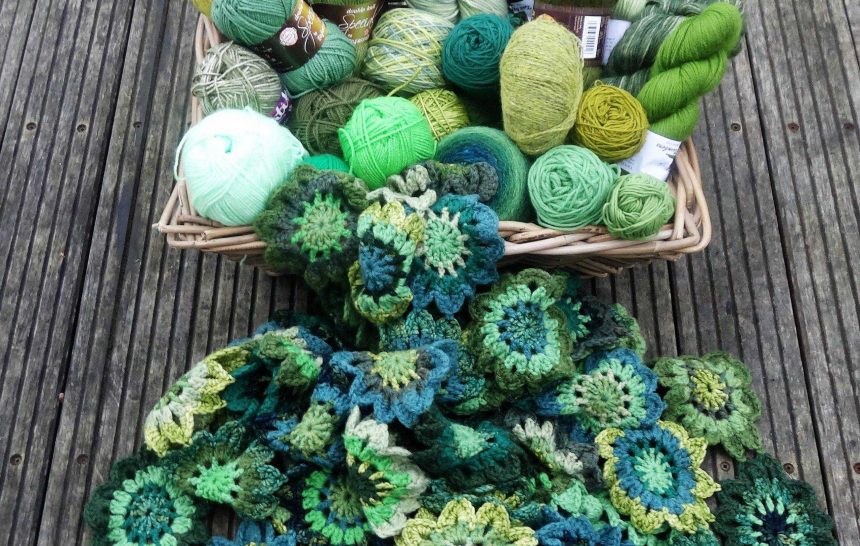
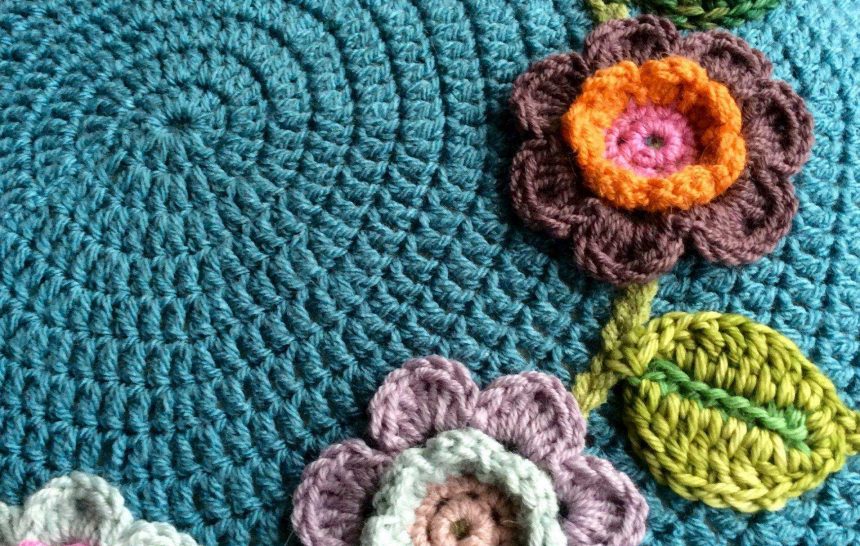
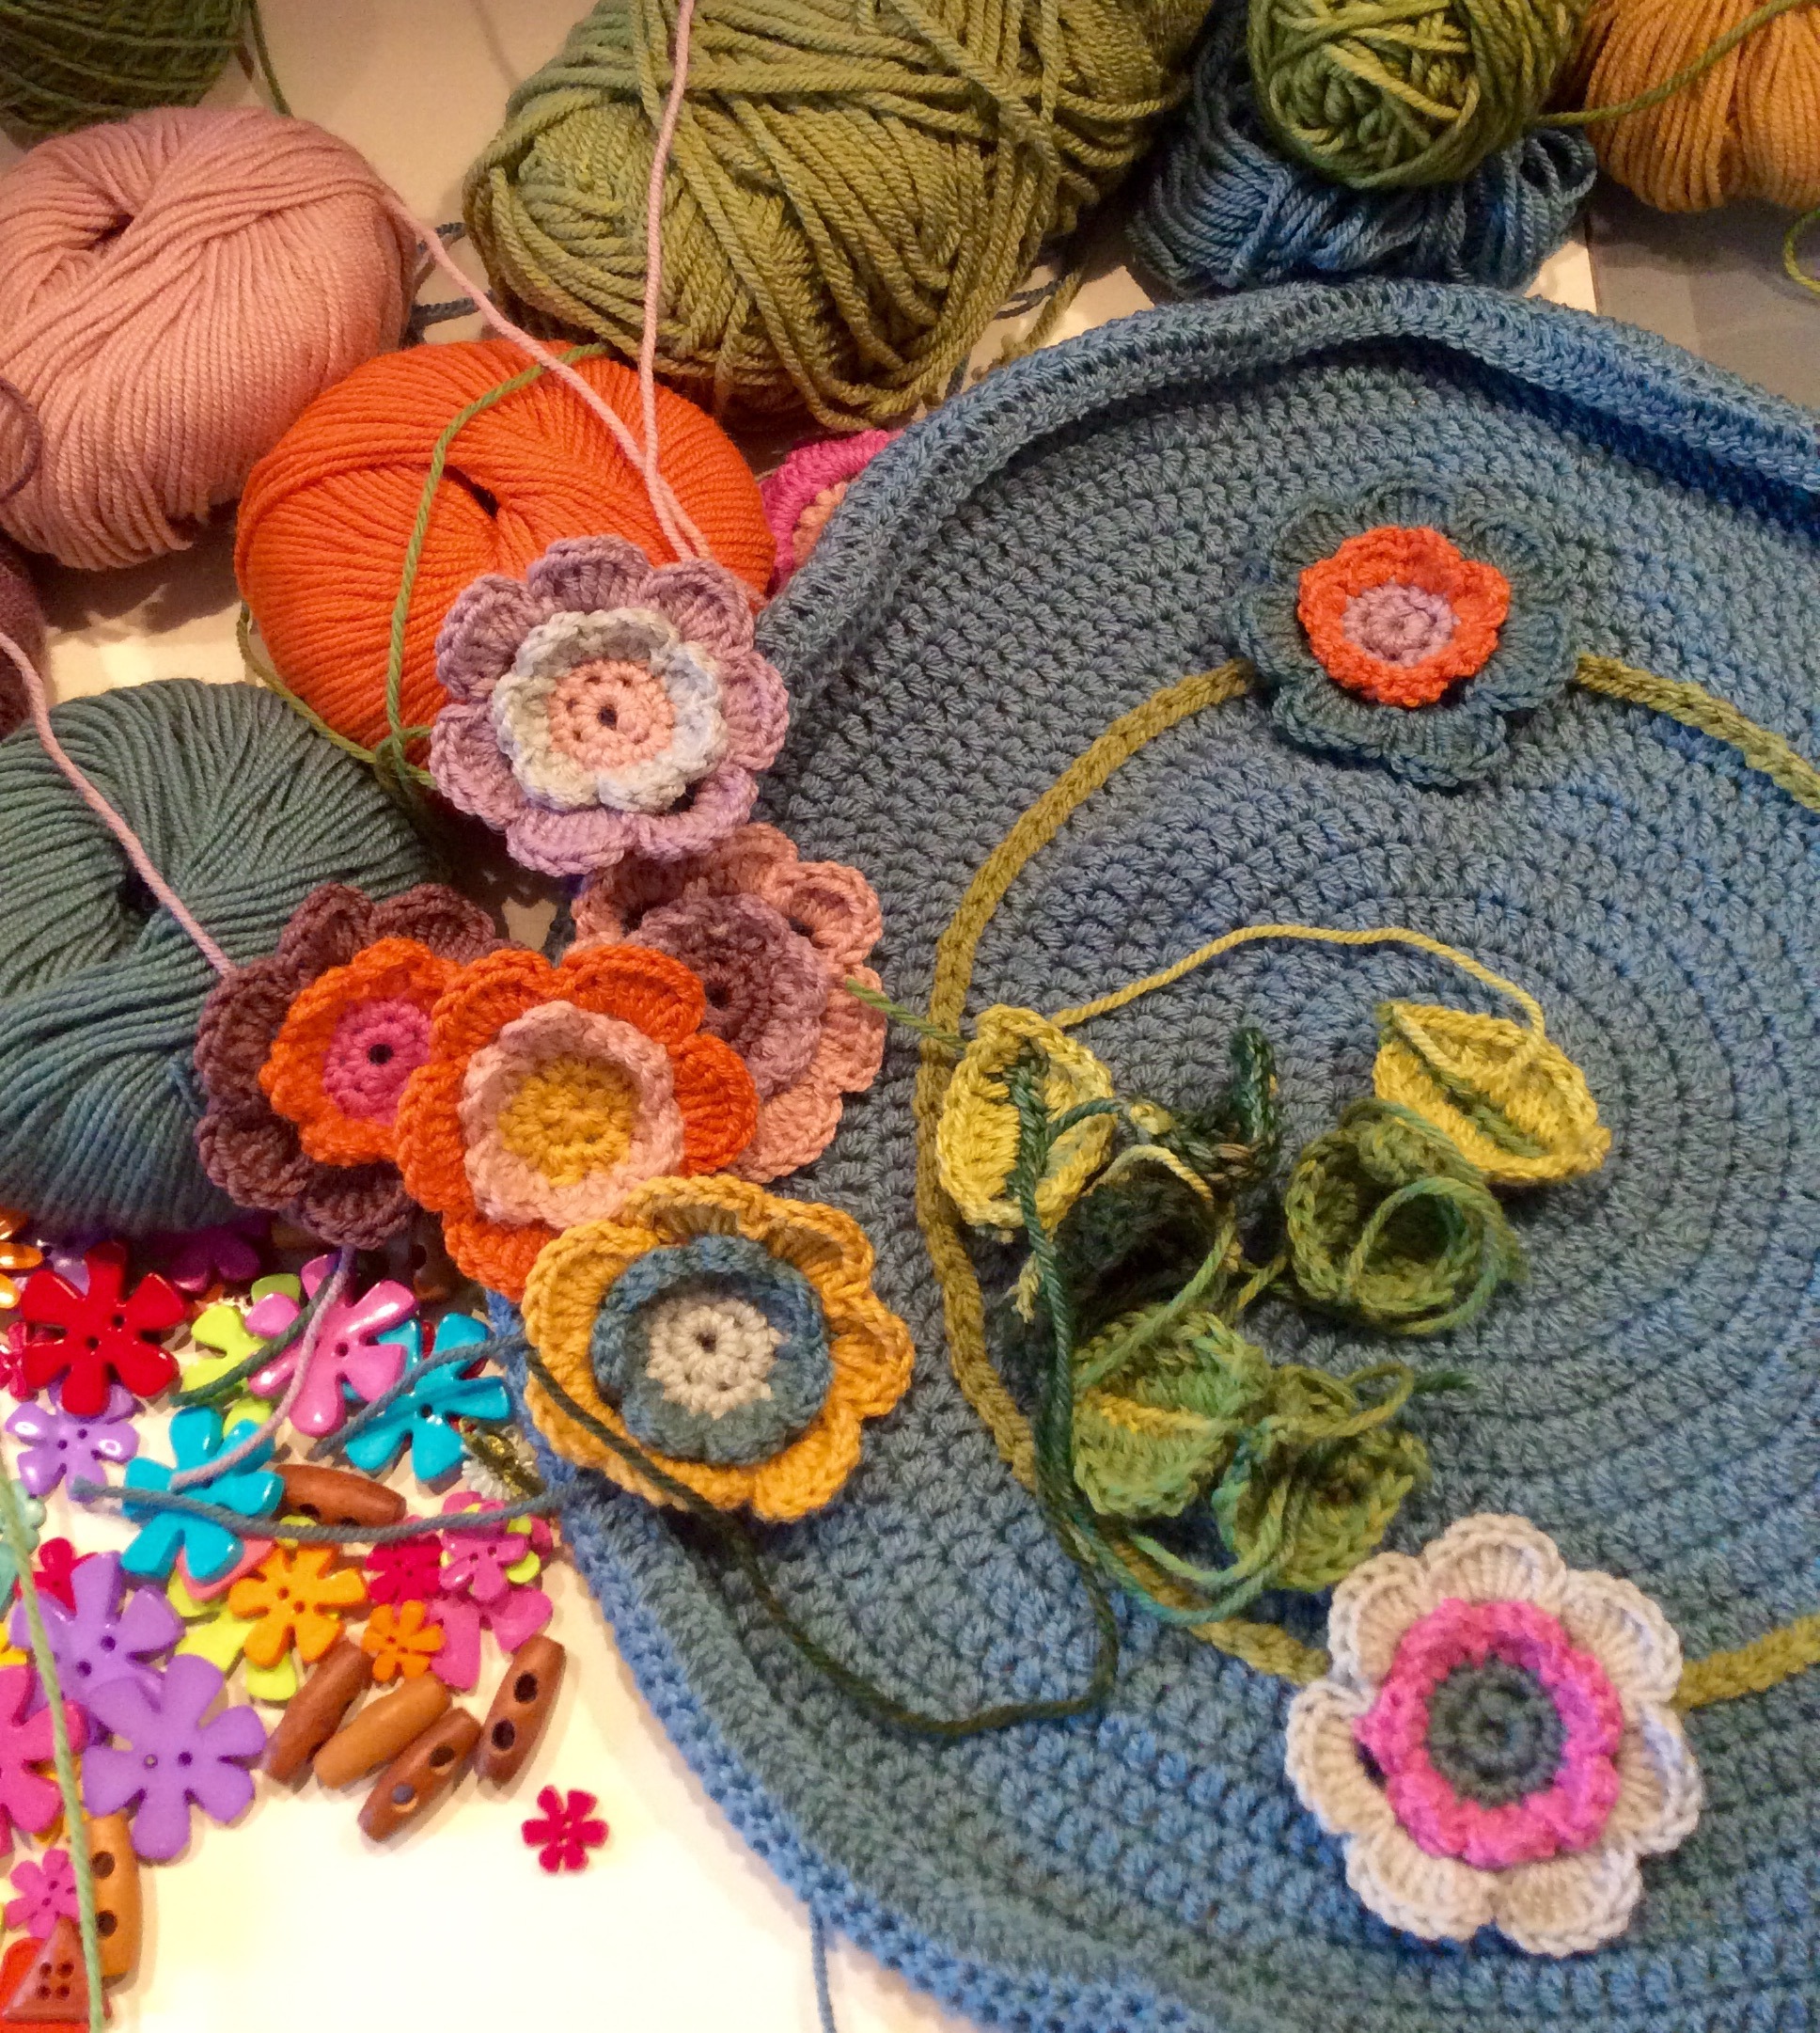
now to the FLOWERS:

the yarn is leftovers of STYLECRAFT SPECIAL DK in:

  • storm blue
  • duck egg
  • mustard
  • camel
  • grape
  • lime
  • pale rose
  • parchment
  • gold

you also need some polyester toy filling for the centre of the daisy. If you have none, ordinary cotton wool balls will do.


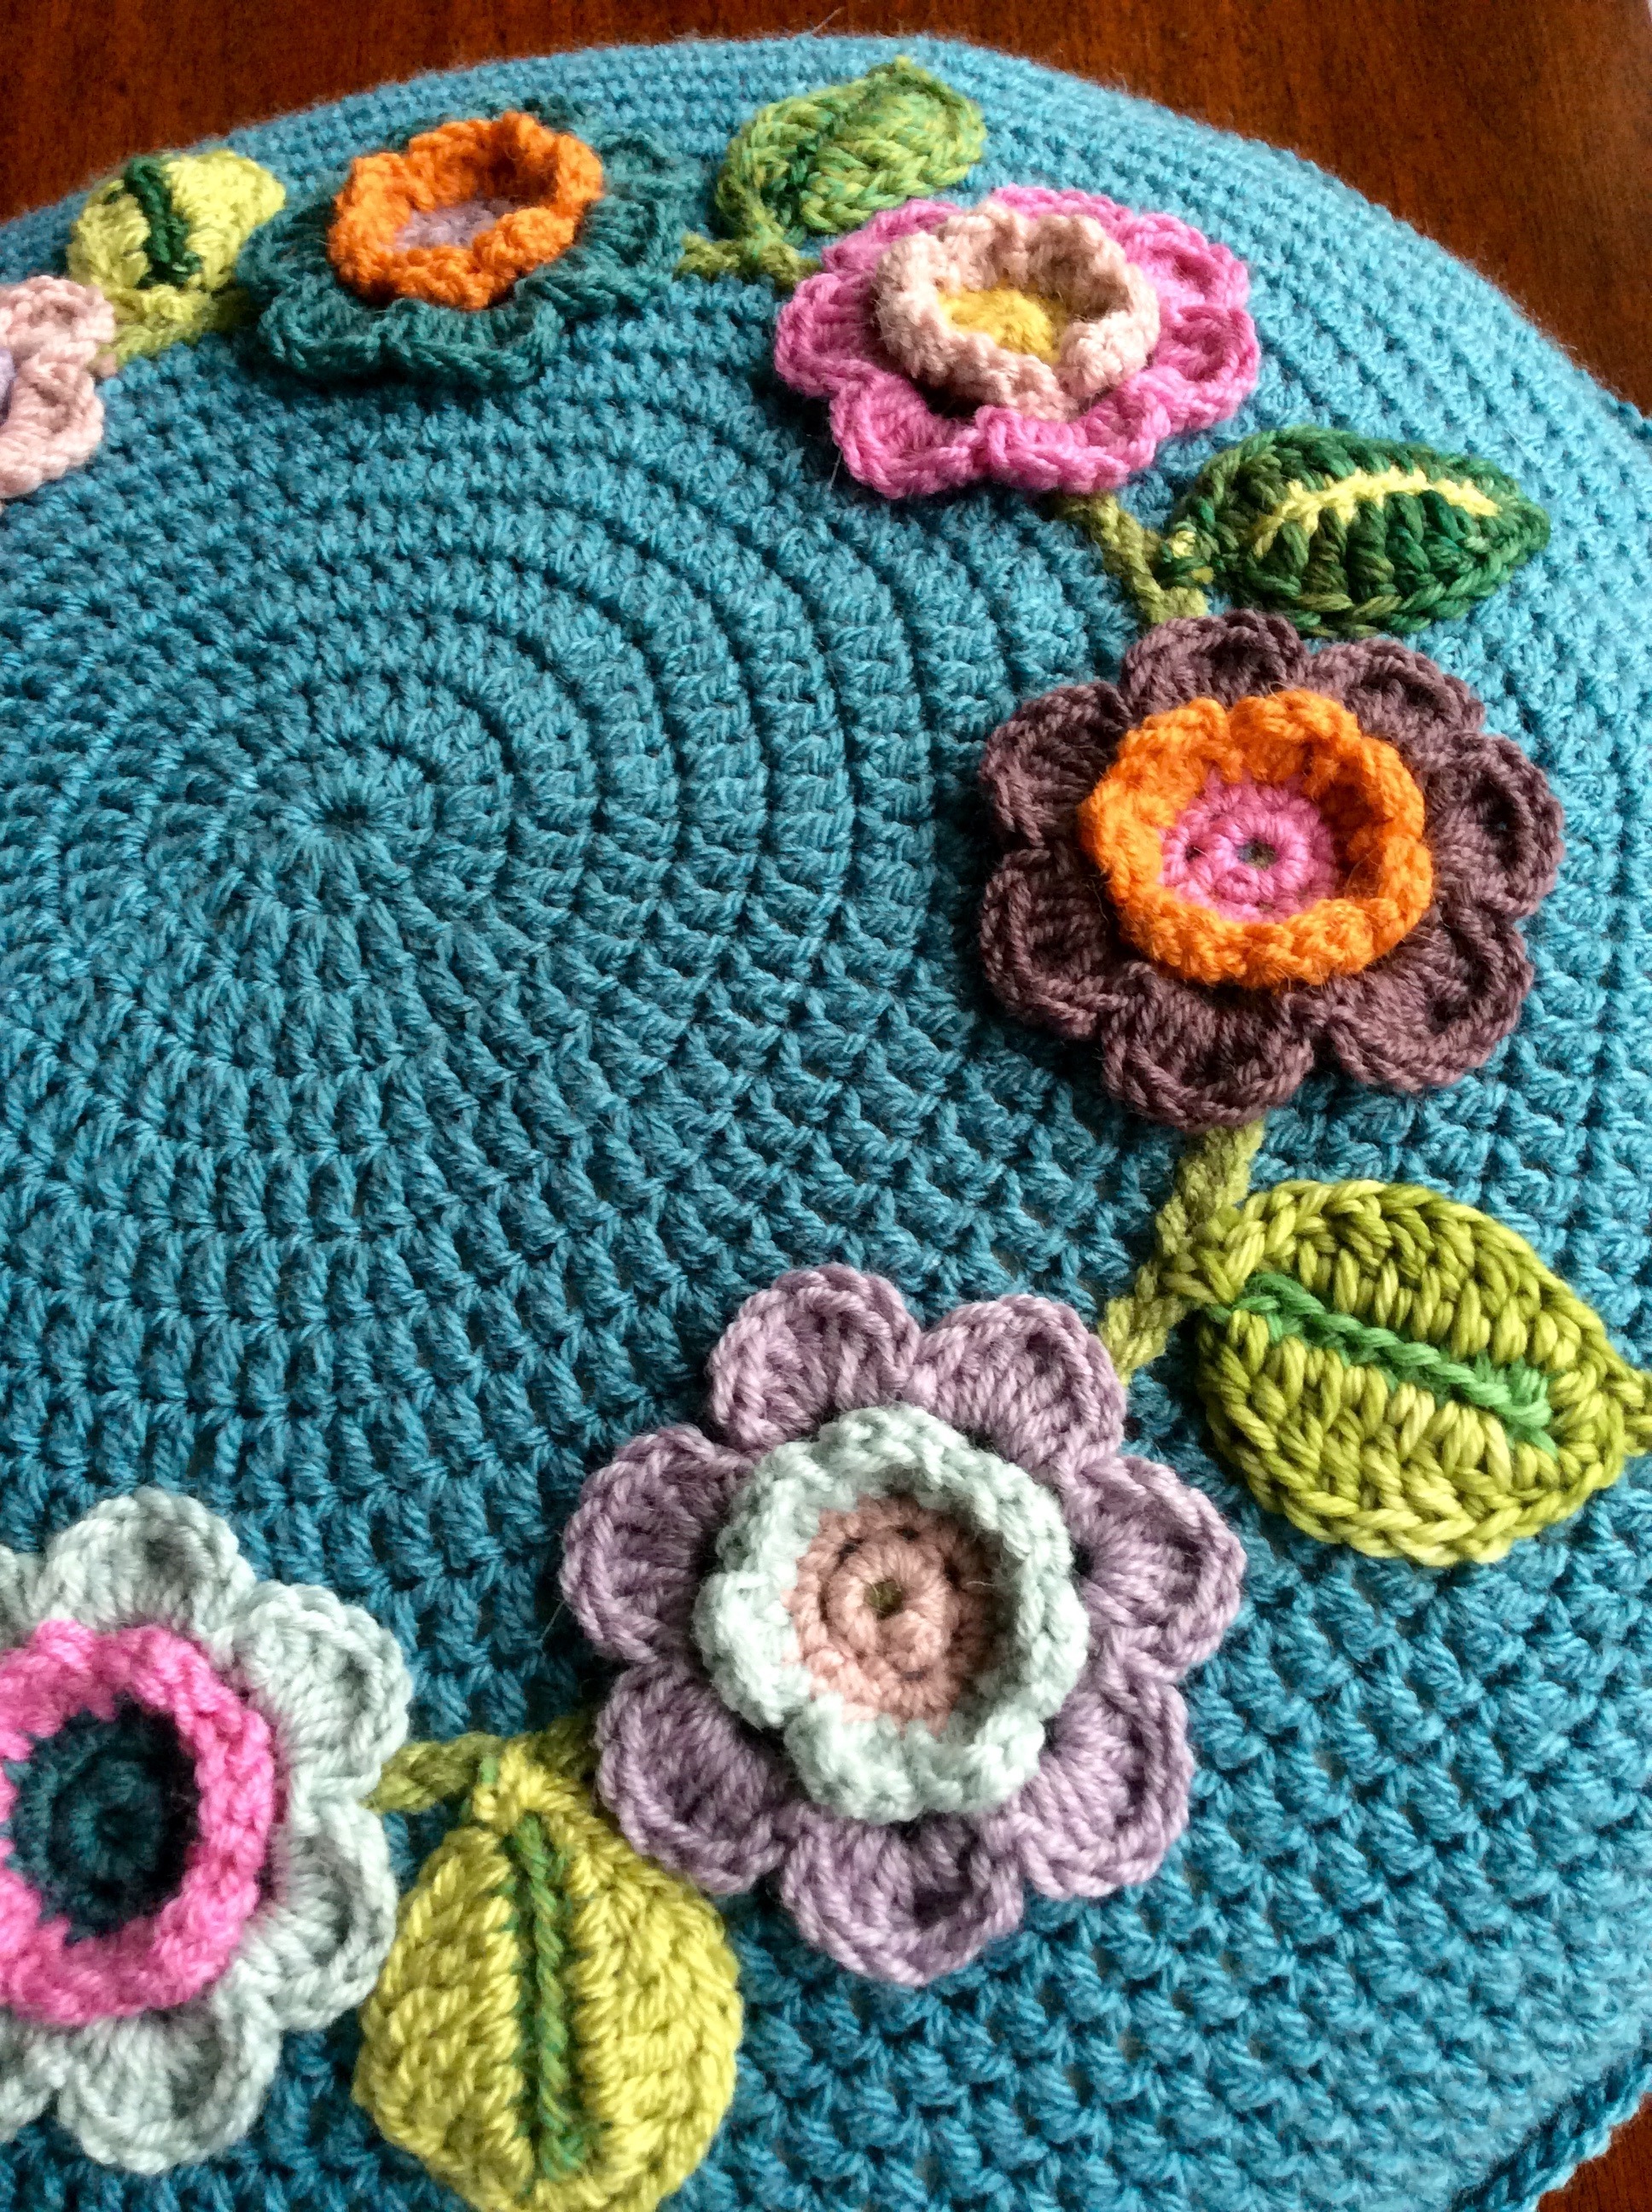
I made 2 types of flowers :

-10  Hellebore flowers from Lucy’s wreath, pattern link here:

http://attic24.typepad.com/weblog/crochet-hellebore-flower.html

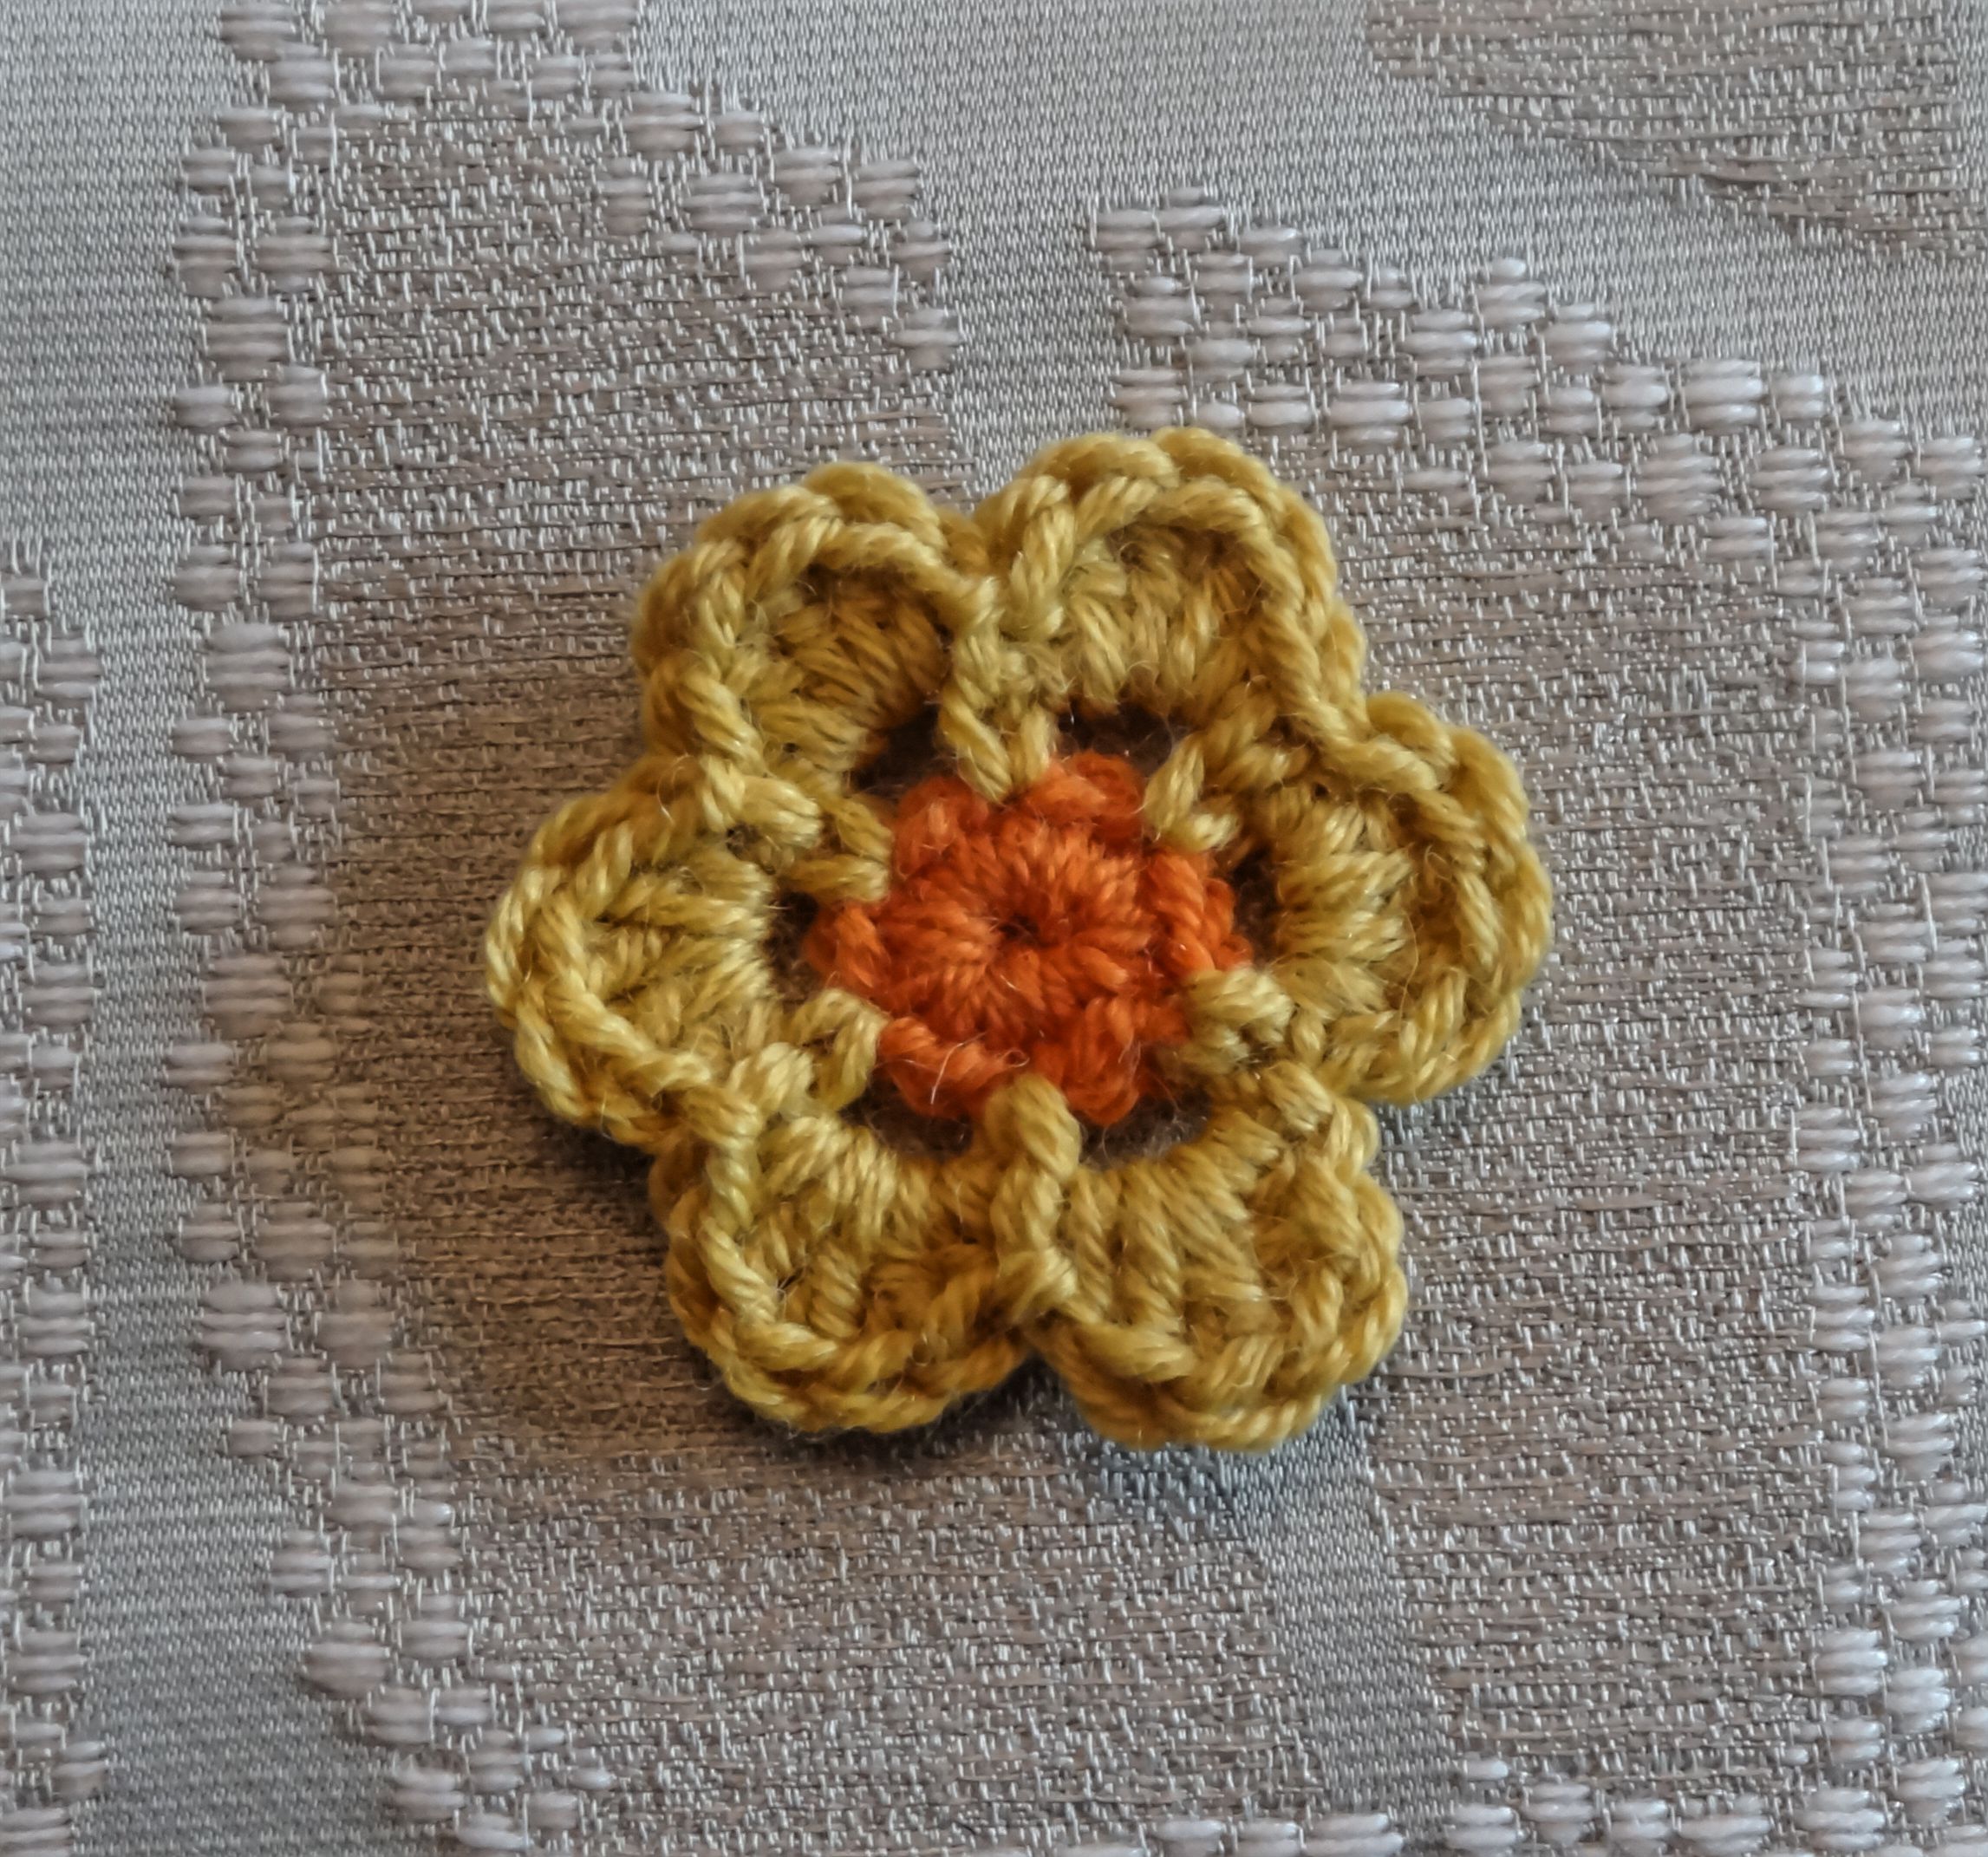
-12  three dimensional  daisies:

the pattern as follow:

The centre of the daisy is done with the same principle of amigurumi, crocheting in a spiral, without joining in the round and without turning the crochet work,

Start with any yarn and a 4.00mm hook and make a magic ring

Rnd1 :

Work 6 dc in a magic ring. ( 6 dc)

Rnd2:

work 2 dc in each stitch. ( 12dc)

Rnd3:

work [dc in next st, 2 dc in next st] repeat [ ] 6 times ( 18st)


Rnd4:

work 1dc in each st. ( 18dc)

Rnd5:

as Rnd 4 (18 st).

Rnd6:

as Rnd4 (18st) put a marker in any of those stitches as a reference for the petals we are going to do after.

Rnd7:

as Rnd4. (18 st).

Rnd8:

we start the decreasing now and your work will start to looks like a little cup.

work [1dc, 2dc together] 6times . stuff your little cup with the filling.

Rnd9:

work 2dc together all around, add some more stuffing and close the bud. ( if you want you can leave a long tail to sew the flower to the wreath later).
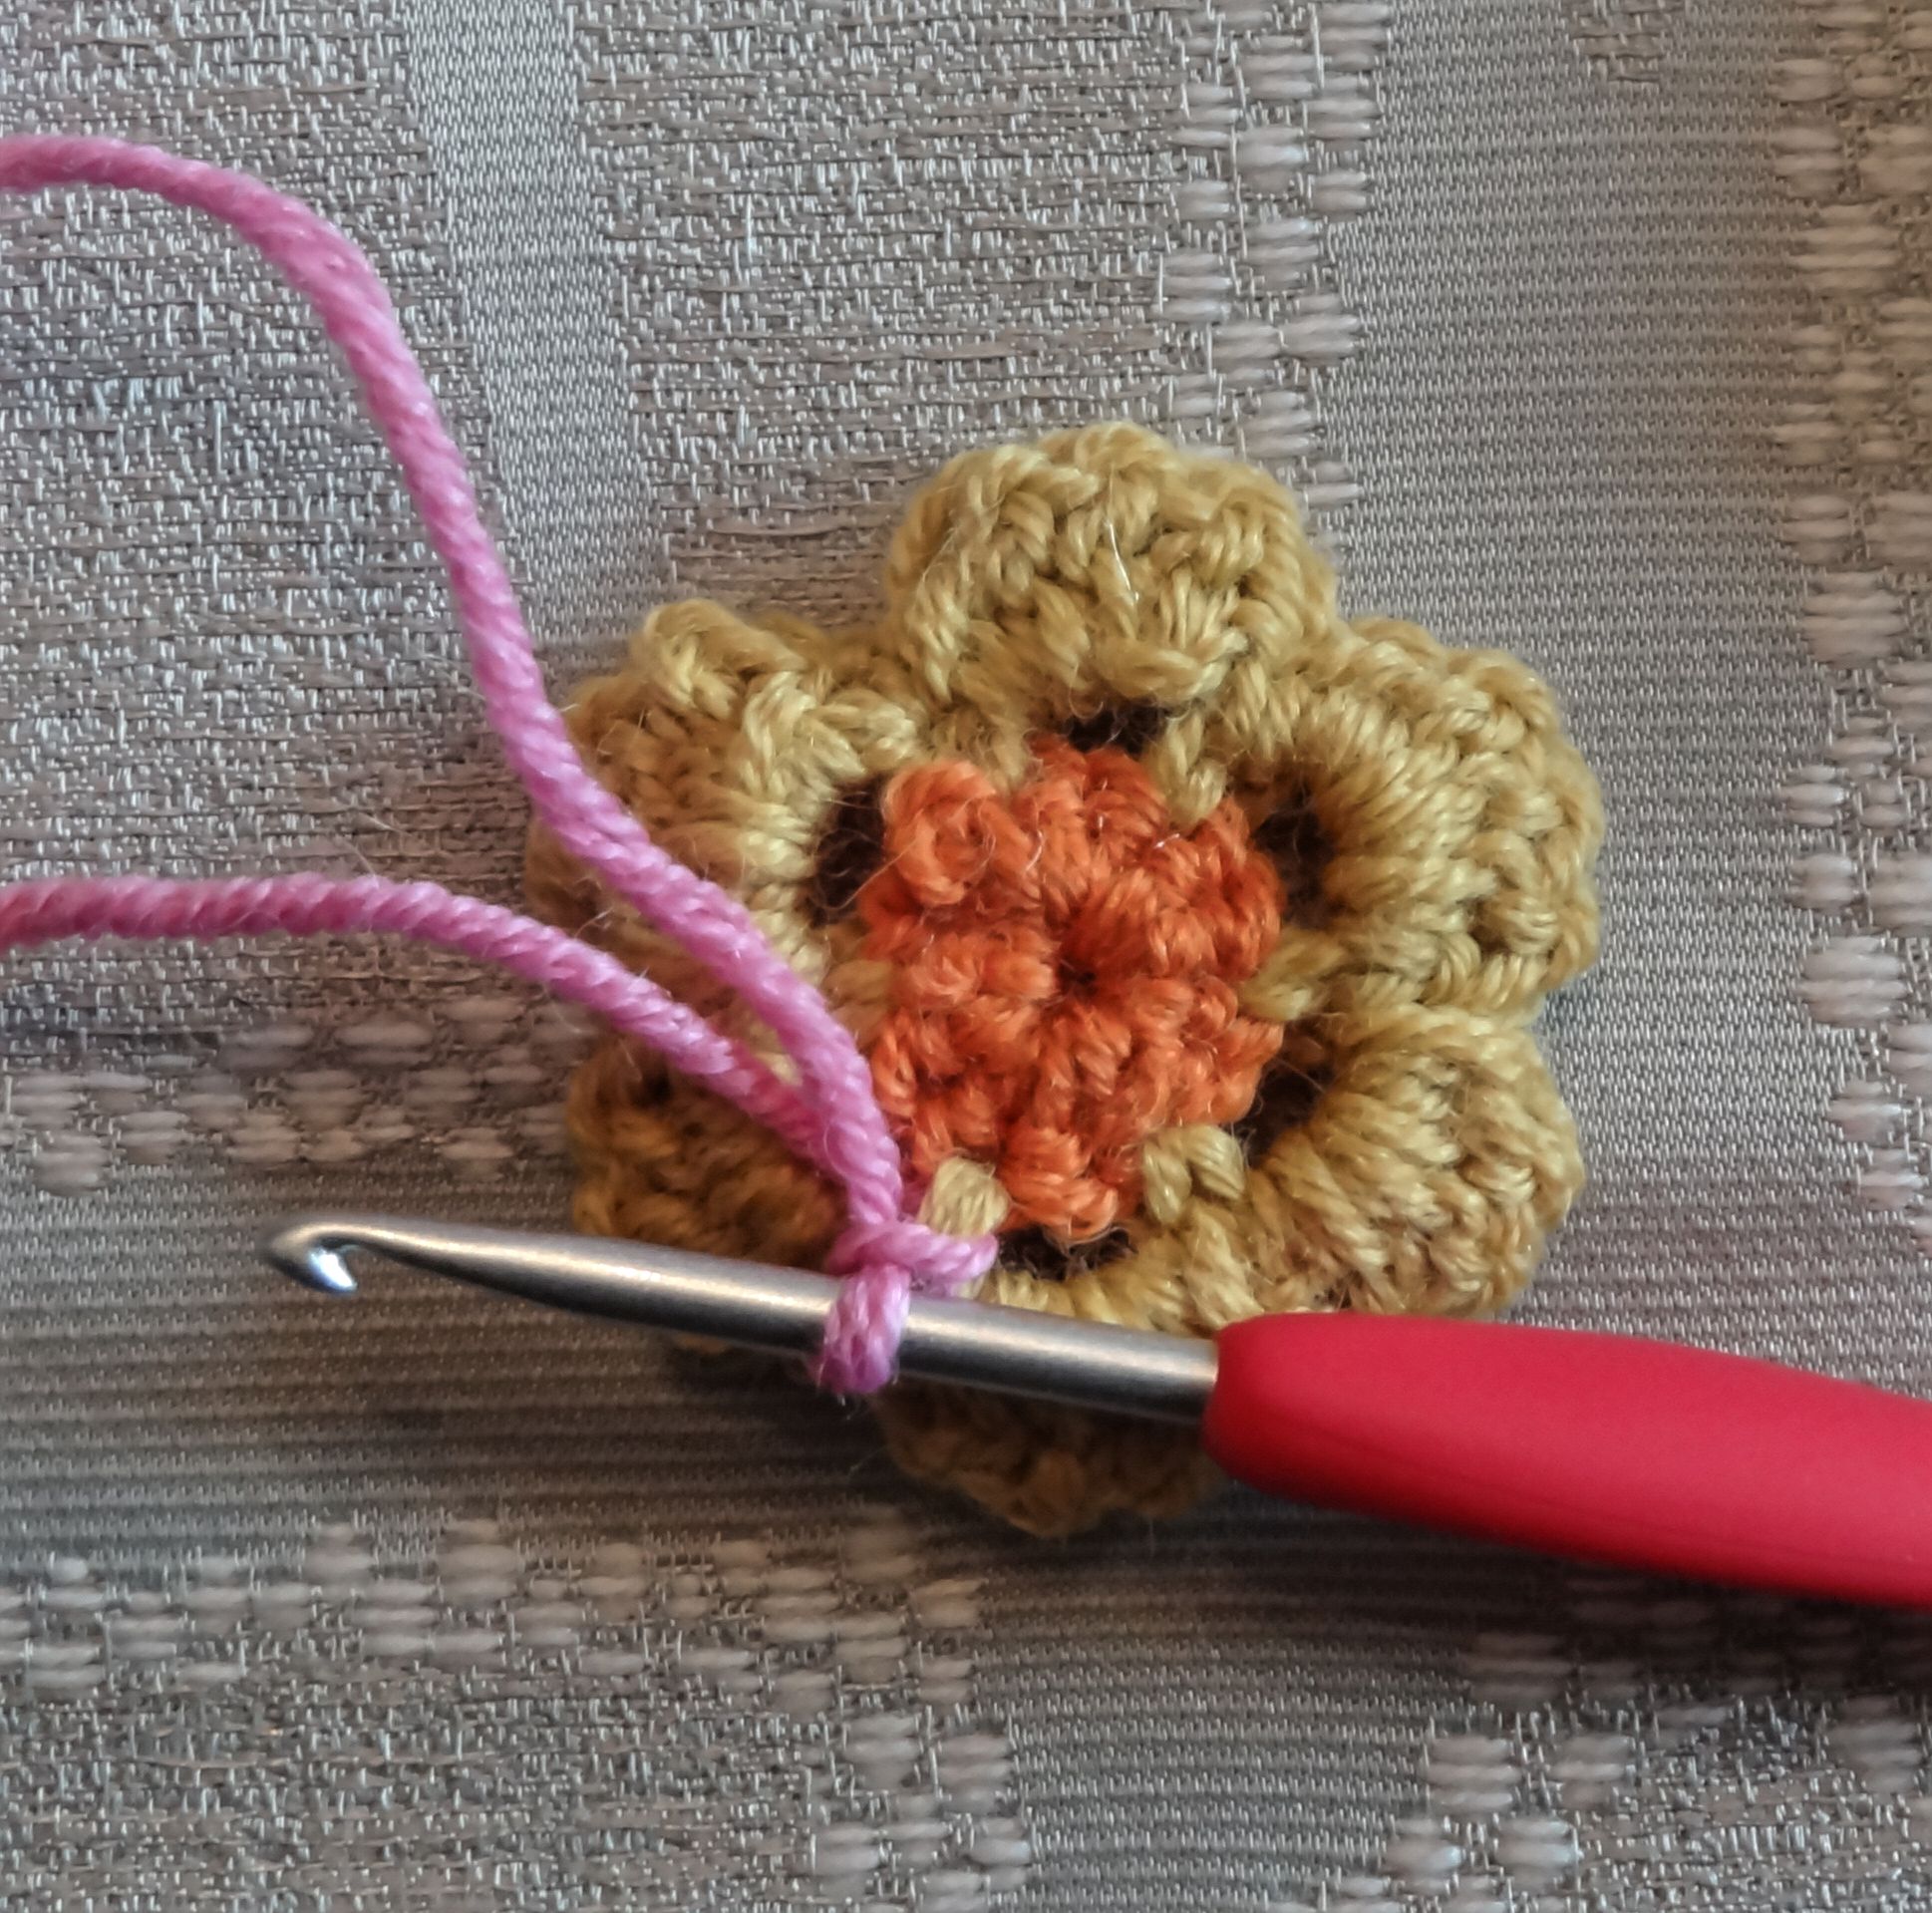


PETALS:

with a different yarn work on the side ( rnd6) , using the picture as a reference,

1st ROUND OF PETALS

work :

[1dc, ch3,skip 1 st, 1dc ] all around that should give you 9ch3 loops that we are going to fill up to make the first ring of petals.


in each of the ch3 spaces work: 1dc-1htr-2tr-1htr-1dc.
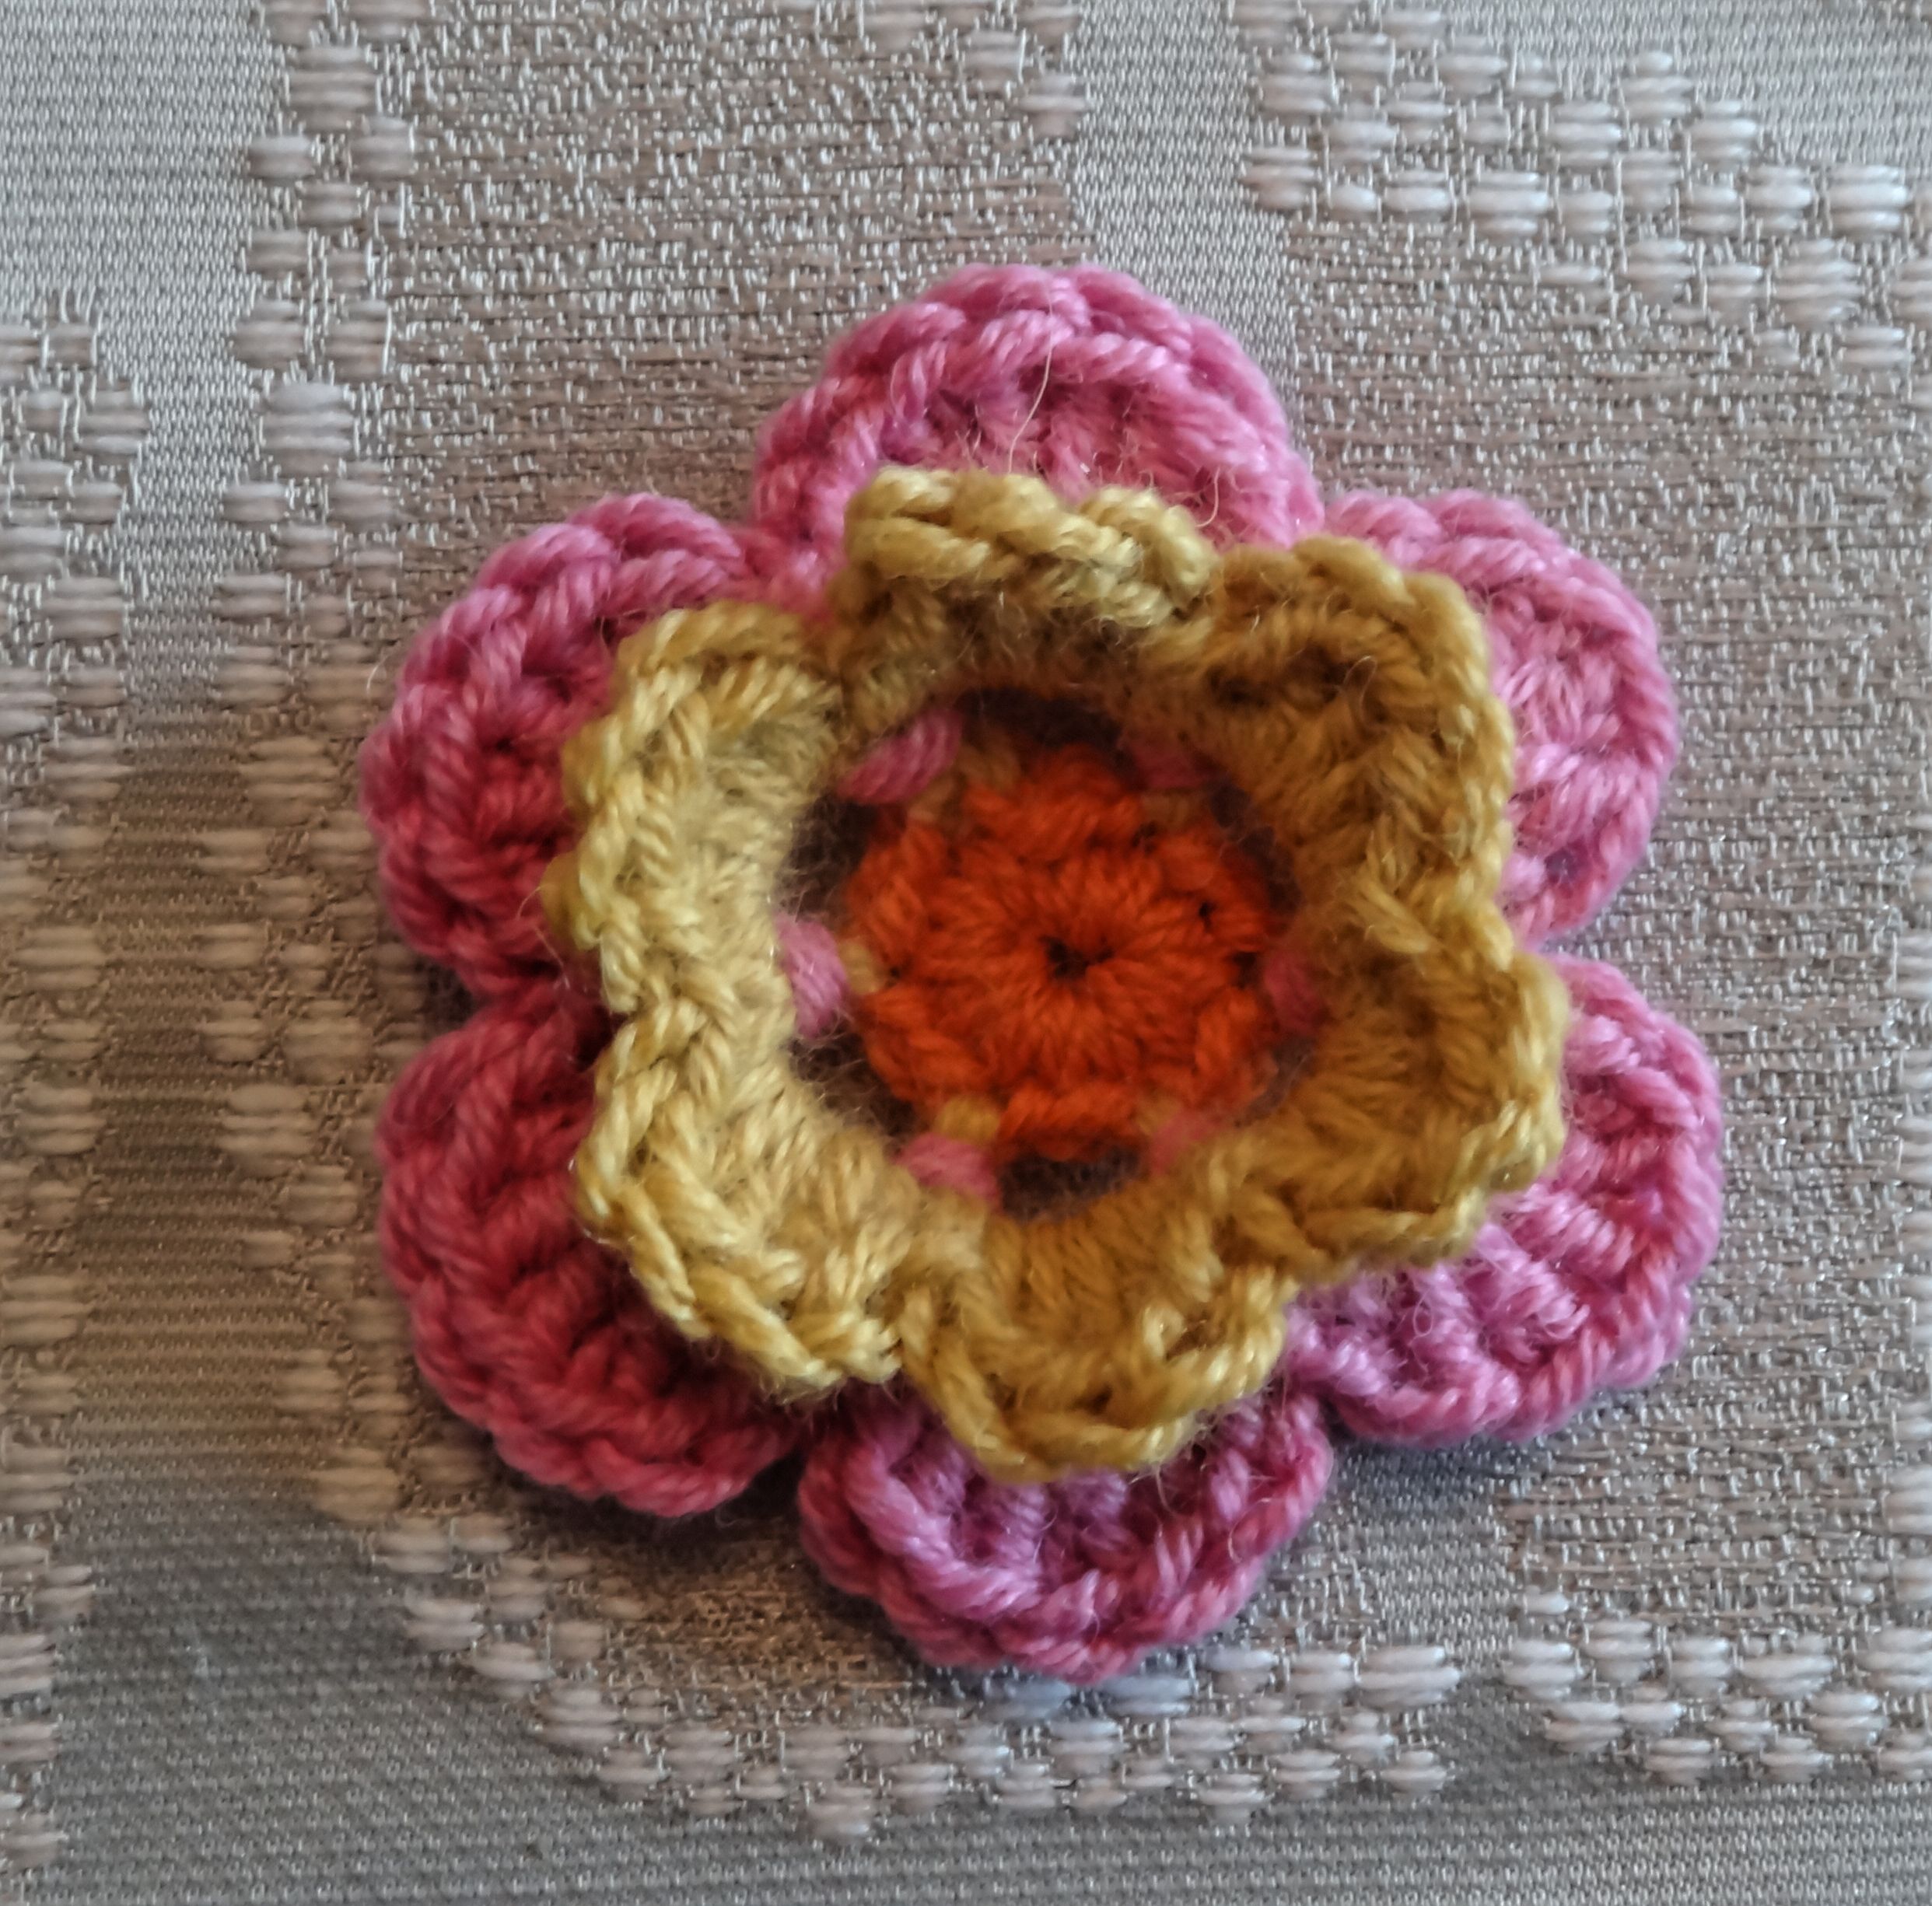


2nd ROUND OF PETALS

work:

1dc in the skipped st above, 5 ch, skip 1 dc and repeat that makes another round of  9petals  staggered from the petals before the previous round. In  each of the ch5 space we work: [1dc-1htr-4tr-1htr-1dc ]


that makes our 3D DAISY!

LEAVES:

makes 18 ( again make as much as you like!)

the pattern is again from lucy’s @Attic24, this is the link:

http://attic24.typepad.com/weblog/may-roses.html

For my version I used some  leftovers of STYLECRAFT CHUNKY SPECIAL  and  some of the ALAFOSS LOPI I used for covering the ring in:

STYLECRAFT SPECIAL CHUNKY:

  • gold
  • camel
  • dark brown
  • lime ( stylecraft DK)

ALAFOSS LOPI

  • oatmeal heather
  • chocolate heather.

then you can take a few pins and place your little flowers and leaves all around the ring…

hope it has helped

love to you all and happy “crocheting”..( someone told me I shouldn’t use the term “happy hooking”!)

I got a few more things  coming along so stay tuned!!!

lucia xxx


April blanket: ‘the Norian blanket’

My belated Easter post…I have been sitting on this blog entry for 10 days…the plan was to get it published before Easter, but things have gotten in the way so I am just now making the final touches to the post.

So I hope all of you had a lovely Easter or spring break with your families, loved ones and maybe with some crochet too!  Whether you managed to find some free time for starting a new project or continuing with some WIPs.

I had a bit of extra time to surf the net last weekend and I saw there are a lot of new CAL’s that have started.

I  like Esther @https://itsallinanutshell.com/ new CAL , have you seen it? it is called the ‘nuts about squares ‘ it looks really interesting I love week2 block!

https://itsallinanutshell.com/2017/02/17/announcement-nuts-about-squares-cal/

I also saw that quite a few of you had started the  Hydrangeas’s blanket, Lucy’s @attic24 new creation.

http://attic24.typepad.com/weblog/2017/04/hydrangea-stripe-blanket-ta-dah.html

I really like the colours she has chosen for her latest project, the pattern is beautifully simple but so effective and I am sure it will bring hours of joy to many people.

So many temptations and I wish I had loads of hours and try them all!

Anyway let’s get back under the Fig tree, so I can update you on what I have been doing…


The April blanket now has a name, it is called  ” the Norian blanket” you will see why pretty soon, I am very happy with my block it is an original design of mine and it is a lovely hexagon that I hope you will like.


I know in the past I have been outsourcing patterns or partial patterns mixing with something original designed by me, but this blanket will be just my design, that will make the pattern details much easier for everybody to outsource and follow by having it all being written down in one place. I have been getting some help so I can create as clear a template as possible for the pattern and, assume everything go smoothly, I should be ready to publish it in the next few weeks.


Here is a picture of the block, I’d love to hear your opinions! The idea is obviously Bee related, and it should look like a bees’ friendly meadow with loads of pretty flowers in bees favourite colours!.

now you wondering why Norian?

well there is an article I am going to link you to:

The Beekeeper Who Craved a World Without Right Angles

http://vernon.npdc.govt.nz/search.do?view=detail&page=1&id=269200&db=object

It tells the story of a very keen Kiwi Beekeeper called Roy Brewster. Roy and his wife Nettie built a  house in the 1950s in New Plymouth, NZ , where nearly everything was hexagonal, from its floor plans to its windows to all of its interiors and furnishings. They also had a hexagonal quilt on their bed too.

the name Norian is short for:  “NO RIght ANgles.”

I love the story and I love the house and I thought my April blanket could fit quite nicely in their home.

more about Norian blanket:


The block and the yarn and colours selection were the easy part, and I fired away pretty quickly all those hexagons. The problem started when I had to figure out how to join them together…You might think the joining is the easy part but actually often is not, and It has taken me several attempts and a lot of unraveling but, after a few frustrating days, I have hopefully got it now, I don’t know yet, the joining is still in its early stages, so I will let you know in a week or so..hence why at Easter I decided to leave the blanket on a side and make something else.


If you follow me on Instagram and facebook you might have seen some pictures I posted earlier in the week.

https://www.facebook.com/luciasfigtree/

https://www.instagram.com/luciasfigtree/

you might have seen some pictures I posted earlier in the week.

The shawl is called Edlothia, the designer is  Jasmin Räsänen , and this is the link: http://www.ravelry.com/patterns/library/edlothia

I loved the fact that this pattern has charts.   I found charts so much easier to follow, it might look complicated but it is surprisingly easy to crochet and the results! It is not blocked yet as I hope on a nice dry day for it, but it looks good and I think the Scheepjes whirl I have chosen does it justice. I bought a couple of those cakes a few weeks ago and I was waiting to find a project that used most of it if not all of a cake, so to show off the gradients effect to its best.


First time using Whirl I found the yarn a bit splitty at the beginning but then I got the hang of it, it is lovely to work with and I  love how gradual the change of colours is I hope will block well, I will let you know as soon as I am done.


that is all for today, wish you a happy weekend,

all the best Lucia xx


The blogstars weekend…

Overdue post…

As usual, I am always the last one writing, all the other bloggers have uploaded their take on the weekend, and Kathryn  (http://www.crafternoontreats.com)  has also uploaded a podcast which is very good and informative and I would highly recommend it.

http://www.youtube.com/crafternoontreatscrochet

Here are the links to the other Blogstars if you want to listen or read more:


http://emmavarnam.co.uk/stylecraft-blogstars-a-little-bit-star-struck/

http://sandra-cherryheart.blogspot.co.uk/2017/02/stylecraft-blogstars-meet-again.html

http://zootyowlcards.blogspot.co.za/2017/02/yarn-yarn-and-more-yarn.html

http://getknottedyarncraft.blogspot.com.au/2017/02/blogstars-meet-up-february-2017.html

http://handknittedthings.blogspot.co.uk/2017/02/stylecraft-blogstars-meet-up.html

http://attic24.typepad.com/weblog/2017/02/yarny-happenings.html

http://thetwistedyarn.com/2017/02/05/stylecraft-blogstars-meetup-aka-not-too-shabby-a-weekend/

http://theknittingexploitsofjosiekitten.blogspot.co.uk/2017/02/stylecraft-blogstars-blogging-all-over.html


What did I bring back home from the weekend? (besides a big bag full of new yarns and colors to try of course!)

I think I brought back quite a few things that slowly have decanted down after the excitement of the weekend.

Below are some pictures I shall start with some pictures because to me images speak 1000 words and also do not make spelling mistakes!

The pictures are not mine they are a few of Helens http://www.theknittingexploitsofjosiekitten.blogspot.co.uk  and Sofie http://www.Stylecraft-yarns.co.uk) uploaded on our chatroom and I’m so glad they were taken because I was far too busy chatting and doing things! Helen and Sophie did capture beautifully what for me was the spirit of the weekend.


So what do you see?

You see colors, a table full of yarn, lots of sample garments, coffee, a beautiful sunny room with brick walls and a high ceiling and some very happy, busy, crafty ladies!

If you can get a feeling for this atmosphere, it is because that is what we all got in common not only us at the weekend but all of you out there that read our blogs and follow our yarn and other stories online. We all love making things.

I didn’t know what to expect for my first meeting, I knew the bloggers, as you do, by reading their stories online, or having briefly met them at shows like Yarndale or the Edinburgh Yarn Festival. I was really looking forward to the weekend, but I also had a certain degree of apprehension being the last to have joined the group.  The apprehension went out of the window in 2 seconds!  As they couldn’t have made me more welcome, it felt like catching up with some old friends.

So if I could summarize what I liked most of the weekend I would say sitting together chatting about not only crochet related issues, but also the quotidian,  lots of little windows opened on ordinary lives, with family, work, pets, hobbies, travel, food, likes and dislikes. You name it.

Then I  had a Eureka moment as I  found out that the main reason why I like making things, and talking about it, it is because I love the social side of it.

A sort of déjà vu moment where I  remembered when I was a little girl under the fig tree with my grandmothers and their friends. It is hard not to see a common theme: friendship. That doesn’t matter where you are, or what language you speak; all that matter is that you take TIME  to make something and been creative. It is a bit like being an artist or a poet or a musician, you make things that make you happy and also creating things that make others happy because they understand what you are doing and why you are doing it.

That applies to many of the bloggers and also to the ladies that look after the archive of the knitting and crochet guild which, some of us visited on Friday afternoon. It was a warehouse-like building which sat unassumingly in a back street in  Scholes, near Huddersfield, in Yorkshire.  I wish I had taken a picture of the door because I had to bend down ( and I m not a giant ..) to get in and there I was in Aladdin’s cave!!!

There I was, amidst rows upon rows of shelves with boxes. Each box with details of the contents. The most amazing collection of EVERY single pattern ever published for both knitting and crochet, and also yarn samples and lots of crochet and knitted items. All of which I wish I could’ve examined and enjoyed for hours and hours.

I have been a member of the knitting and crochet guild for few months, but I had no concept of the amazing work that these ladies, which are all volunteers,  do to preserve this extraordinary archive of creativity and also to promote the craft!

For a very small fee you can support them and become a member it makes a huge difference to their work, so  please have a look at their page:

http://kcguild.org.uk/


One of the things I liked most is that the work of cataloging the items and the patterns it is also a research of the origin of the items and the story behind them. Who made it, when, where and why.  How amazing is that?

This is one of the lovely items we saw a bed cover donated to the Guild and the original pattern that had been used.


Well, that is a snippet of my visit, I m sure I will think of something I forgot and write some more as it comes back to me. Hope you are all having a lovely week,

many thanks,

Lucia xx


NEW YEAR NEW ADVENTURES

Hello everyone and the first blog’s entry for 2017!

Firstly I would like to wish to all of you, out there, may you have hope, peace, joy, good health and more during this coming year.

Second, now that it is official, I can let you all know I am an STYLECRAFT BLOGSTAR!!!

How exciting is that???

I have to thank not only Stylecraft to invite me to be part of their group, but more so I have to thank you all for liking my page,  sharing what I do and supporting me and my crochet adventures !!

It still amazes me  that I got the opportunity to write and share my experience with you all, simply because crochet doesn’t have borders, crochet it is what we all got in common, and it links all of us together regardless nationality, culture, language and social background and I think, you will agree with me ,

it is a beautiful thing.

So you might wonder how did I become a Blogstar… well actually I m a bit surprised myself!

It all started with Lucy’s blog Attic24. I just stumbled on it a couple of years ago, while looking at crochet projects, and chatting to a friend of mine, Yvonne, who loves crochet as much as I do.

Lucy ‘s blog was, and still is, amazing! Full of colours, beautiful images, advice, lovely projects and tutorials, to the point that I decided to buy a kit for her cottage ripple blanket and give it a go. The price was very reasonable, the colours looked amazing BUT….

big, BUT, it was…ACRYLIC!

My memory of acrylic yarn was  of an unpleasant,scratching ,shining  fibre, which, if you rub it on, will make your hair standing like a porcupine!!! But it wasn’t the case…  when I opened the pack, I got a soft, squidgy lovely yarn with beautiful hues, exactly how Lucy had described it on her blog!!!

I loved the yarn so much that that year I made LOADS of blankets and I bought every single shade that was available!!

So when STYLECRAFT launched a competition for a new shade, I had to be part of it!

My entry was Lobelia, and I was lucky enough that Lobelia got selected, with other beautiful hues, and became a permanent colour in their special DK range.

From there it is all history… emails, a visit to their HQ in Yorkshire,  I met Sue Pinner at Edinburgh yarn festival last year, more blankets, more designs and here I am a blogstar…😊So  this year is going to be a BIG one, and I will try my best to bring you lots of colours and projects, to share my journey and last but not least to HAVE FUN!!!


FOR THE NEW YEAR ALL WE NEED IS SOME GREEN!!

FOR 2017 ALL WE NEED IS SOME GREEN !!!

As I bet you are all busy getting organised for the festive season I thought I share with you some ‘colour’s love’. This weekend Pantone, the  market leader in colour communication and colour technology,has released their new colour of the year 2017 and it is FABULOUS !!

It is called GREENERY .

It might seems a bit silly getting excited about a  release of a new colour ,but colours trends are quite important for my job , so I keep always a close eye on them because they can have a substantial impact on  the industry.

The other reason it is because I LOVE anything about colours anyway!

So ,if you are not familiar with,what  is the PANTONE Colour of the Year?

It is a symbolic colour selection; a colour snapshot of what we see taking place in our global culture that serves as an expression of a mood and an attitude.

So even the colours industry seems to send a message of hope ,regeneration , environment issues ,etc  and all the above is very relevant  with the choice as Greenery is symbolic of new beginnings.

So what do you think? You like it?

I do. I think greenery is much better then last year choice of a dusty blue n a pale fleshy pink, and has a much better vibe too.

Back to crochet….

I know that some people find green difficult to use in crochet but ,trust me,  green can be really effective and just lovely!

One of the projects I did last February was a multi-green wrap. I have been wearing it quite a lot because greens are one of those colours that goes with everything and it does compliment not only most wardrobes but also skin tones and complexions .

The idea came from an amazing blanket I saw  quite a while ago on a blog called ‘according to Matt’ the blog has now been revamped , renamed and it  looks fantastic is called : ‘Boys&bunting’

http://boysandbunting.blogspot.co.uk/

Please Have a look because there are a lot of really nice projects, tutorials,reviews and amazing photography too.

This is the link to the blanket: http://boysandbunting.blogspot.co.uk/p/according-to-matt-archives-japanese.html

From there I got redirected to Lucy ‘s at Attic24, as she used the pattern for the Japanese flower on a lovely wrap in 2011! ( good patterns never get old)

Http://attic24.typepad.com/weblog/2011/03/japanese-flower-scarf-ta-dah.htmlo,

So , well, I had to make one too!!

Mine is all green, made with a lot of left overs , great for your stash and really easy to do too. The pattern I used is the same that Lucy used on the original entry and it is from   a Japanese book , that I believe it might be still available on Amazon https://www.amazon.com/MOTIF-BOOK-VOL-Japanese-Crochet/dp/4529044424

But  don’t worry  if you can’t get your hands on the book  , it is not that crucial as there are so many very similar versions  of the pattern on pin-interest so just put Japanese crochet flower on your search engine and see which one you like best .

That is all for today,

2017 is going to be the GREEN YEAR  so TRY  SOME GREENS!

Lucia x

P.S. The sample is made with Stylecraft special dk in : bottle,meadow,cypress and pistachio.

so where to start?

After my all singing and dancing introduction, I thought better I start with something easy …
If you follow me on Facebook, you probably have seen my round cushions that I made a few months ago. A lovely lady called Pamela asked me the other day how I did my blue denim one and if I had the pattern for it.
It is very simple to make, and it is 2 flat round circles, joined with some lovely little flowers and leafs as decorations.
The pattern I followed for the circle can be found on several blogs, and books but I like Lucy,s one at @attic 24: http://attic24.typepad.com/weblog/crocheting-a-flat-circle.html there is a photo tutorial too.

another blog you might want to have a look to it , if already you are not familiar with is Sandra @cherryheart http://sandra-cherryheart.blogspot.co.uk/

http://sandra-cherryheart.blogspot.co.uk/ she posted two new cushions just yesterday!
The yarn I used it is STYLECRAFT SPECIAL DK in denim. My circle is 22 rounds wide, and it measures 45cm (18in) in diameter.
I used a 3.5 hook because I wanted a dense fabric, so please do a little swatch with your yarn of choice, so you are happy with the results.img_3151

FLOWERS….
There are hundreds of amazing flowers out there to be inspired with! You can source some on the internet on Pinterest, just type crochet flower, on the search engine, or you might have some books in your library.

I love books because I love something tangible to hold, but they can be pricey, so I buy mine mostly second hand from Amazon, charity shops, bargain bookshops, TK Maxx.., etc. so when you go shopping for other goods spare a moment to find a hidden-gem! Another source for free publications it is Danish electronic publishing platform for magazines, catalogues, and newspapers called
@ISSUU
https://issuu.com/
ISSUU has a tool, CLIP, that allows readers to take a snapshot of any part of a publication and share that on social media or through email.
Under’crochet’ you can find lots of magazines from around the world, books and articles. It is especially useful if you, like me, love Japanese crochet books.
One note about Issuu, I read some controversy about infringing copyrights, so if you are unsure about it, please accept my apologies, as, I assume, having over 100 million active readers all over the world, it is a legit site.
Back to Japanese books, I love them as they are made with lots of care, they have lovely pictures and great diagrams, the only downside is the price especially when you add the delivery costs to the UK. So  I always have a look on Issuu first, and check if they got a digital version of it, and if I like it I might buy it otherwise I just pick a couple of patterns that might be useful.
If you want to buy Japanese crochet books and are in the UK the best platform it is Etsy. I get mine from:
https://www.etsy.com/uk/shop/pomadour24
Pomadour24 is a very reliable company so far, I bought books from them few times, they come beautifully packed, via airmail, in about a week. I am waiting for delivery in the next few days …
a note:
I might mention in my blog websites and links where I buy materials or patterns I would like to say that any of those companies does NOT sponsor me, I just provide you with some information that you might find useful. In the eventuality that I get asked to try or test something, I will make that very clear to you all.
Besides If I want to sell something I have a shop here, at the moment it is empty, but I might use to sell blankets or whatsoever in the future.
The blog is a platform for me to share my experience and my unbias view only.

the pattern for the flowers on my cushion is:img_3153

FLOWER

1st round: make a magic loop,2ch (to make the first dc),11dc in the ring, pull the ring tightly close n ss on the top of the 2ch. (12dc)

2nd round: change colour,2ch , dc at the base of the first ch,*3ch, skip a dc from the previous round,1dc on the next dc,* repeat **6times, close the round with a ss.( 6dc, six ch3 spaces) do not cut the yarn

3rd round: in the three ch-space work: 1htr-3tr-1htr,1ss on the dc of the previous round, repeat all around; fast off the yarn.

4th round: new yarn, fold the petals of round 3 as we are working on the back of the flower, one dc around the dc of the 2nd round,5 ch; repeat all around do not fasten off the yarn,

5th round: ss on the dc of the previous round, in all the ch5 spaces, work as follow: 1htr,5tr,1htr. ss on the last dc and there you go you got a flower!

LEAF

a little basic leaf:

Ch 8, start on the second ch n work as follow: 1dc,1htr,3tr,1htr,1dc on the last dc work 3 dc together. This makes one side of the leaf.
Now turn, we are working on the foundation chain row as follow: 1dc,1htr,3tr,1htr, 3 dc in the last ch. That makes a little comma that looks quite lovely n very ‘leaf-like’.
As I said, please experiment and see how you like your leaf, there are so many of them to choose from all easy n VERY quick.

for some extra decoration, you can add a little embroidery of chains in the centre of the leaf.

leave a long tail so you can sew your leafs n flowers on your circle!

flower1  flower2flower3


FILLING YOUR CUSHION
I like to use feathers pads because I like how they ‘sit’.Normally I have no issue with the squares ones, but I tried to buy some round feathers pads on the internet, but they have been of poor quality, I ended up returning them n tried a different source, still not so good either. So be aware of that. Another point is if your cushion measures 18 inches consider to buy a bigger pad. Especially if you have used acrylic yarn (like I did), it stretches quite a bit, and you want your cushion to look nice and plumpy.

HAPPY HOOKING!!!


img_3756


X