Some overdue details for the Indigo blanket.
Hello everyone,
This entry is well overdue, but as I said on facebook I have been really busy with family, work, a commissioned crochet project, that I can’t wait to share with you all, magazine articles, June’s blanket…and the giveaway too!!
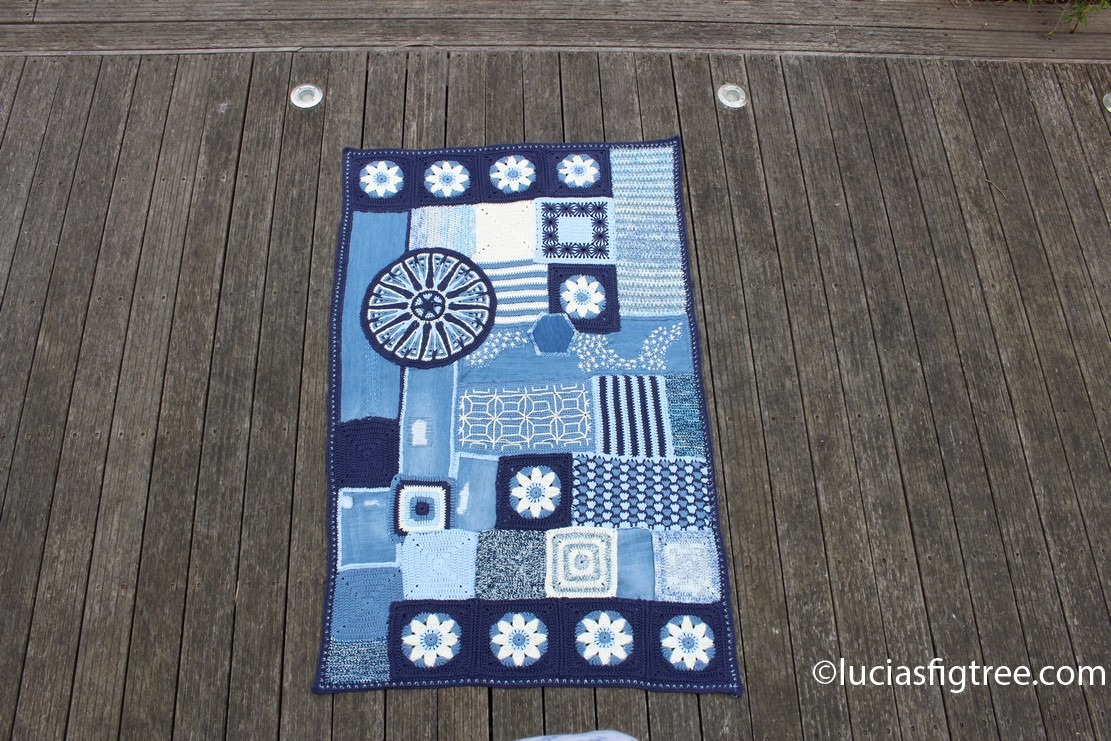
Having said that, I have been putting together some close-up pictures of the Indigo blanket and a few notes about the patterns for the different squares, the stitches used and some links online for them.

Firstly I would like to start saying that the peculiarity of this blanket is to be a bit random, so please do not feel stressed about sizes of the squares, how many rounds etc. it is after all it is all about scraps, recycling and random motifs pieced together, wanting to perfectly recreate what I have done defeats the purpose of the concept of ‘boro’.
Use my blanket and the details I have posted here as a guideline to create your own indigo blanket!
In my previous post I gave you the details of the yarn and materials I used:

and the link to the overlay mandala from CARO that is the focal point of the blanket. As I have said, anything round that you like will do. I wanted to try one of her mandalas and that is why I bought the pattern.

besides, it is SO IMPORTANT to support the designers by buying some of their patterns when you can. I know that everyone prefers free patterns but please sometimes spare a moment for the designers.. after all the patterns will cost as much as a fancy coffee out of your favourite chain, or a magazine; and the point is those 3, of 4 pounds you spend will give you hours of pleasure and entertainment and will help one of those talented ladies to find the time to dedicate to create some more patterns for all of us to enjoy!
I had no idea what an arduous task it is to write a pattern until I attempted to do it ‘properly’myself. It takes hours upon hours, then you got to have it tested for mistakes by some other crocheter, then you have to photograph the different stages, maybe make a chart and also you have to set it up on a template!
I am doing all of that for the Norian…So far I had to pay for someone to make me a template to use, because I do not have the IT skills to create one from scratch by myself, also often it is a good idea to use a professional pattern corrector to make sure that your pattern is absolutely foolproof and making sure that each comma and hyphen is in the right place so anyone can understand and follow your instructions, that doesn’t come for free either….
well …sorry for the rant!
Anyway, back to the Indigo blanket.
let’s start at the top with the cherry blossom squares.
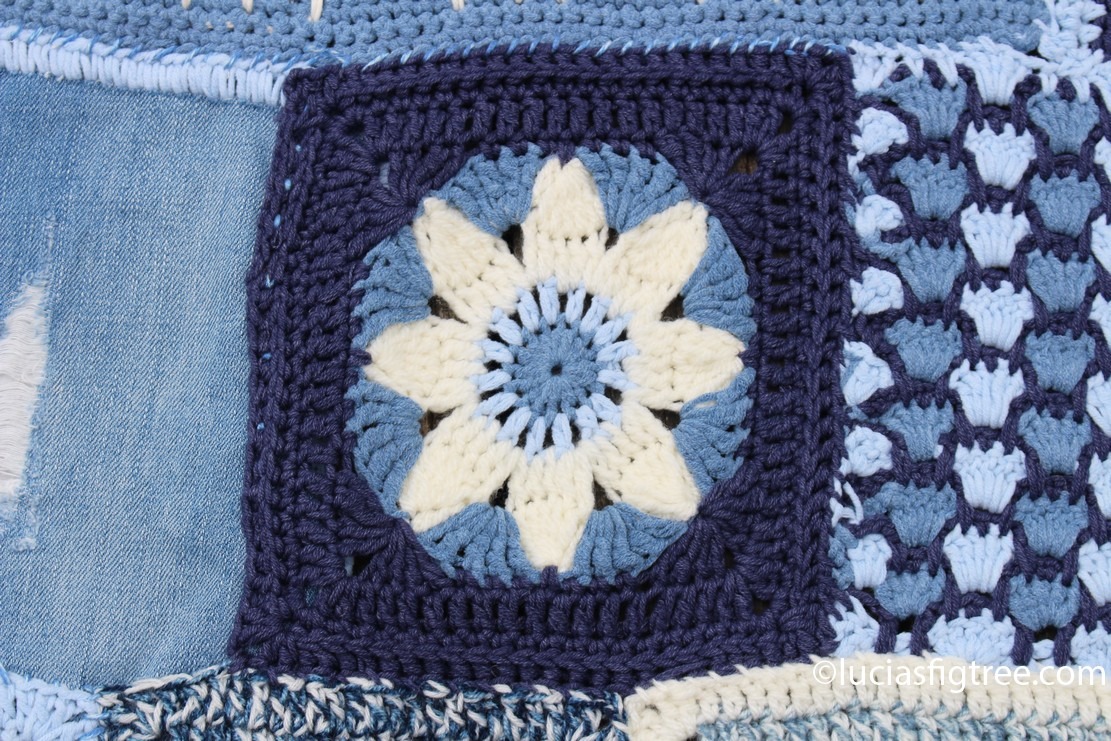
There are 10 of them, they measure 19cm square ( just over 7 inches square) I used a size 4 1/2 hook and one strand of Jeanie yarn in Memphis/Dixie/Delta. Also, the petals are in StylecrafAran in cream. This is the pattern I used.

I am sorry the chart is not good quality but it is a zoomed screenshot from Postila Ru and I can’t find the original link.
After round 7 I added another round of front post trebles to increase the size of the square and give some tridimensionality.
The squares are joined together on the right side with a simple dc round. Again I loved the 3D effect.
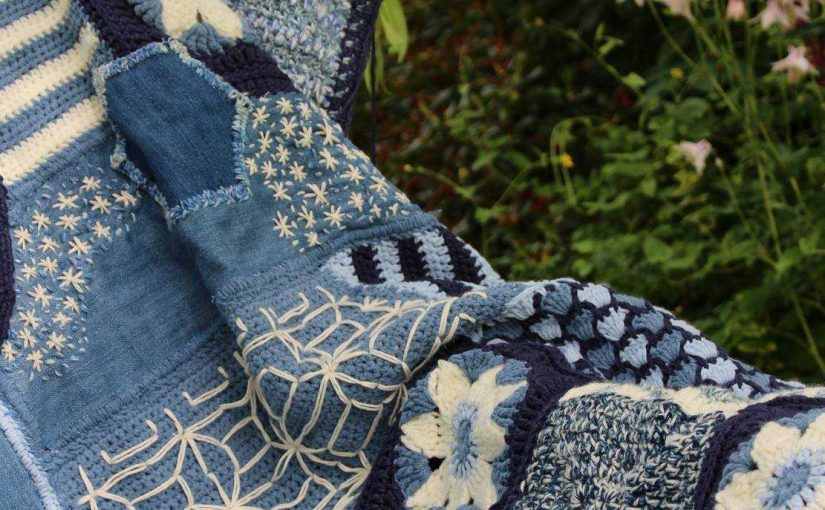
The long rectangle on the right of the cherry blossom square is made up with rows of long double crochet linen stitch a fabulous textured stitch here is a link to the pattern:
It is made of alternate rounds: one round is a strand of 4ply
one round is a strand of 4ply Stylecraft yarn in cream with a strand of Sundae dk in blueberry sorbet.
2nd round is one strand of Batik storm.
The rectangle measure 58cm/18 cm. and I started with a 28 chains and 78 rounds.

the first block with the embroidery the pattern is of a pot holder. I liked the look of it and this is the link to the embroidery aspect:
https://uk.pinterest.com/pin/506373551838477528/

there are 8 solid granny squares all made of 7 rounds. This is the pattern I used : http://www.craftpassion.com/solid-granny-square-crochet-pattern/
one of each in : cream/Memphis/dixie/delta
one in a alternate rows in delta/menphis/dixie/cream/ delta/Memphis.
one in alternate rounds of a strand of 4ply in cream and storm together and a round of cream
one in a strand of 4 ply cream and blueberry sorbet together
one in a strand of batik indigo and 4ply cream
they all measure 19 cm square.

there are 2 squares of half trebles alternate 2 rows of each in dixie and delta and the other one is memphis and cream
a large rectangle in Memphis with some embroidery in cotton classique dk ivory . This is the diagram , again from postila. no idea of the source.

The one that I haven’t been able to source again is, unfortunately, my favorite square. I think has been taken down from online because it must have breached copyrights. I have no idea. All I know is that it has disappeared…But there are loads of alternative of very similar shell patterns on my picot. here is a couple of links you might want to consider:

There are some denim squares, rectangles, and 1 hexagon. I tried to salvage as much as I could out of the jeans I cut. The size is not relevant but make sure your corners are 90 degrees, it make easier to crochet around !
I cut my pieces with a rotary cutter, it came with 3 types of blades: a straight one, a wave one, and a perforating blade. this is the Amazon link : https://www.amazon.co.uk/gp/product/B005DQ90UM/ref=oh_aui_detailpage_o05_s00?ie=UTF8&psc=1 .
I cut the pieces to the shapes I wanted with the straight blade, then I ran the perforated one about 5 millimeters from the edge of the piece. That creates the holes that allow you to go through with a crochet hook and make the border ( I just did a sort of elongated DC (UK terms) ). 2 points of advice. if the fabric ( like mine was ), is a bit frail and old you might end up ripping the space between the holes…as there isn’t much space, my blade created probably a 2/3 millimeters bridge between holes, so when you try to join 2 pieces of fabric that have a crochet edge, it is not strong enough to hold. Hence why I often overlapped the pieces to not create a point of tension and rip the border. But if you use a stronger fabric I think it will hold much better. It all depends. Another way to do it it is making single holes with the crochet head..now I did that on the hexagons, again it is a bit of a pain, to be honest…I know that the correct way should be using a needle and thread and create a border where you can attach the crochet, but I felt it was a bit of a palaver and I always try to find out the quickest route. ( after all the blanket was an experiment). so to summarize: perforating blades are a great choice but you must have a reasonably strong fabric, and a steady hand to run the holes; individual holes, again great if the fabric is thinner but a bit labour intensive if otherwise; 3 the thread and needle one: most likely the best if you want something really neat but it will take a great deal of time. You will have to make a sample with the fabric of your choice and see how you feel about it.
The piecing together it is really a bit of a try and miss!! I just overlayed some and but together others….the only important thing is that you try to come up with a blanket that is as rectangular as possible with straight sides! If your squares are too big and do not fit, once you have decided the frame of the blanket just overlay them to fit! After all, that is what Boro is about, overlaying and just stitch together.
If you are more skilled and patient than I am let your creativity run riot and decorate your blanket with some lovely embroidery! Get inspiration from sashiko work, some is incredibly beautiful and complex but some are just simple run of single small stitches together..I tried a bit of this and that but I am definitely NOT skilled at all.Having said that I love it because it is not perfect!

I hope the guidelines above are of some use to you all,
happy crocheting,
Lucia x
Wooow, I am so absolutely impressed by your explanations. I love this blanket the longer I look at it. Thank you so much for it, dear Lucia.
I think that this is my favourite blanket of your 1 a month challenge. I would never have thought of incorporating material and embroidery and overlaying squares. This is now my next project. I’ll be sure to post my pictures. Now, which squares should I buy? Off to trawl revelry I go
fantastic! xxx
I absolutely love the blankets youre doing and amazed youre doing one every month was wondering what you did for the border on the indigo blanket thanks fiona