The EASTERN JEWELS is finally LIVE !


The September blanket is a bit of an unusual one…because I start making it 7 months ago…it took ages ( but I am going to tell you why) but I finally can share  it  with you and I never been so eager to write about a project as much as I have been for this  blanket.

So here is the story behind this latest collaboration between Jane Crowfoot,  https://janiecrow.co.uk/presta/Stylecraft https://www.stylecraft-yarns.co.uk/ and myself.

I will start with a bold statement:

THIS IS THE BEST BLANKET I CROCHETED SO FAR!!!

…and let me tell you I have crocheted quite a few of them!

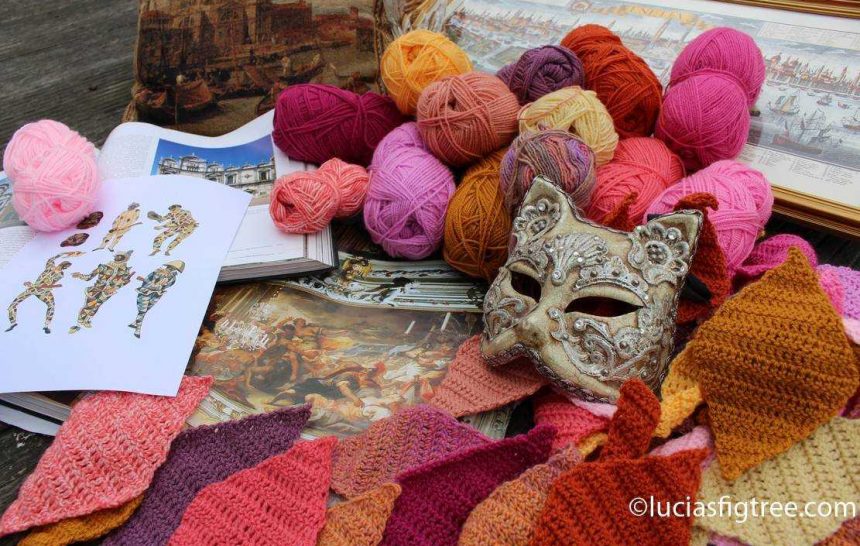
It has been a real labor of love and,considering that it is not such a big blanket, it has also taken me ages to come up with the final color selection. I have been through several balls of yarn and I have a big basket of failed attempts sitting in my studio!!!!

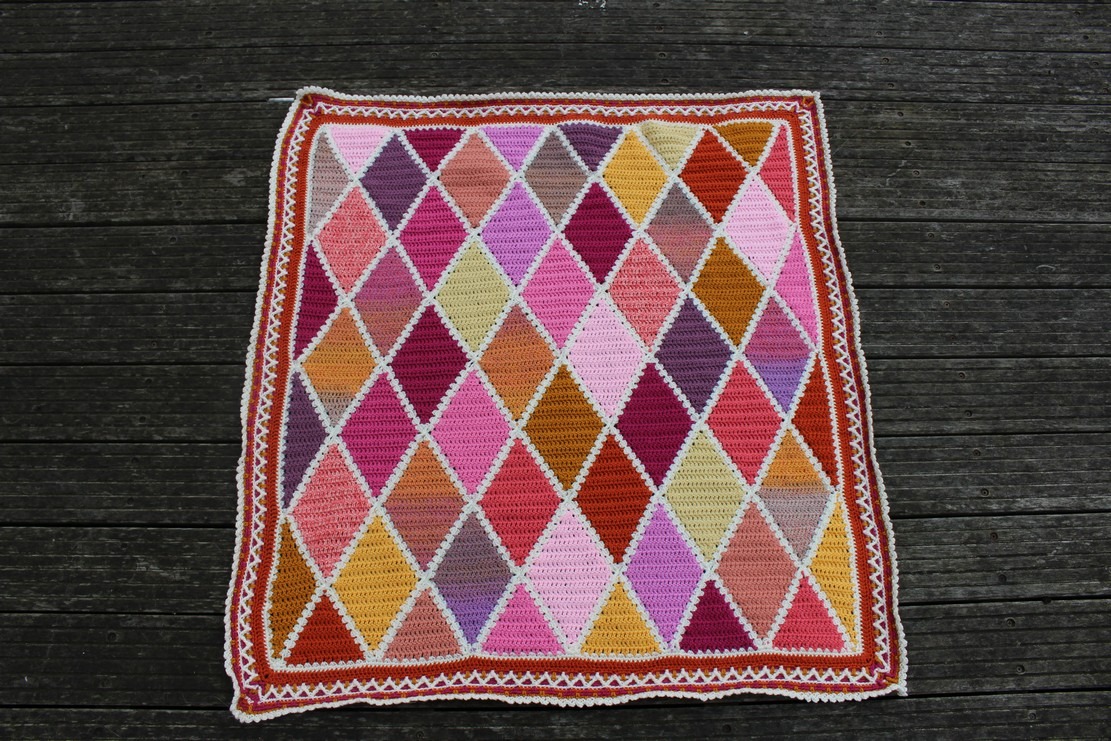
Look at this “baby”…how lovely is she????


So grab a coffee or a tea, sit comfortably so I can tell you the story of the latest creation I have been working on, behind the scenes, for the past few months.

It all started back at the beginning of the year with another recoloring project: the Frida Primavera which I am sure many of you have seen it.

I enjoyed the challenge very much, I knew the blanket as I had taken part to the CAL that Jane ran for Stylecraft the previous year.

And, I am taking the opportunity to say that I am so happy that the new colorway was well received by many of you, thank you again for all your lovely messages!!.

On that wave, Annabelle from Stylecraft and Jane asked me, back in March, if I would consider doing the same for the Persian Tiles.

and by now you know me so I said …

YES!!!!

I knew the original pattern as I had bought a copy from Jane when it got released but I never got around making it…

Hence I got quite excited about the prospect of working on something new. The Persian tiles was another chance to unplug, look away from the screens and my day job, let the liminal brain take over and unleash creativity.

Doing that for an already existing pattern is an added bonus as I feel like it is a bit like coloring between the lines, in a way, quite a safe exercise,  as all I have to do is focus on the colors which are my favorite part of the process.

Where did I start from?

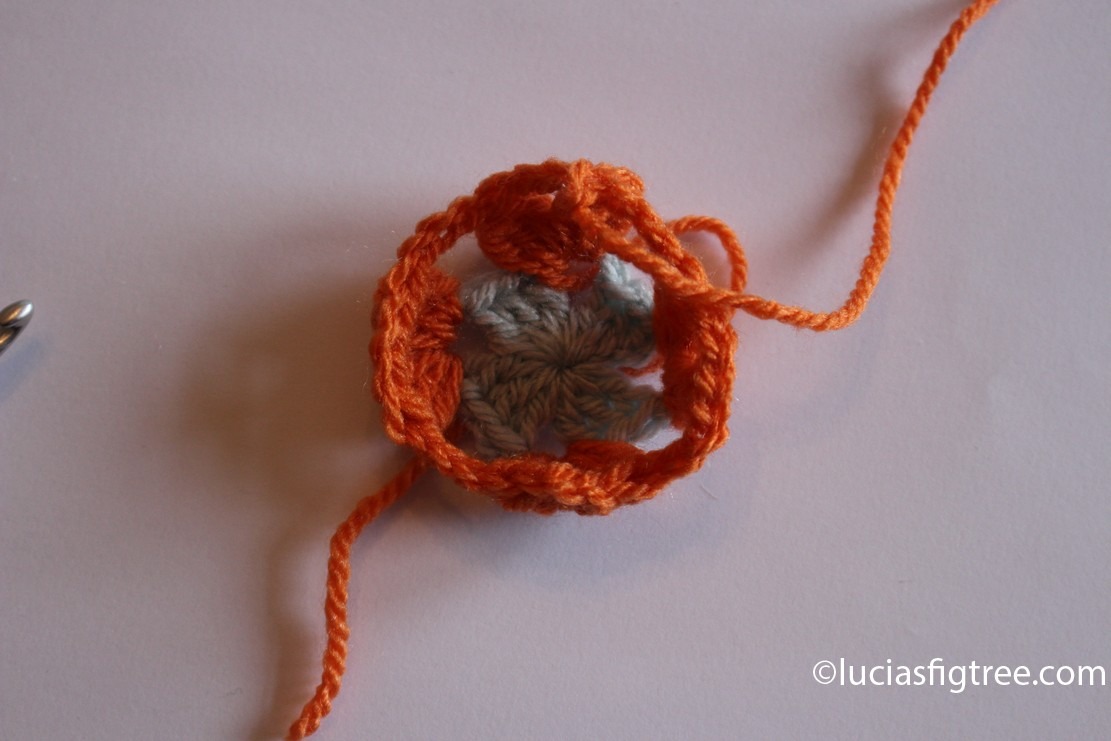
I always start, like I do for all my blankets, by making a sample of the motif with some random yarn as long as it is the same composition and gauge. It might seem a waste of time but it is the opposite.   Making a sample helps you to familiarise yourself with the pattern. It helps you to solve some possible “tricky” parts and it gives you an idea of tension and size of the final motive. It also allows you to see if you need to adjust or not the size of your hook and finally it is a record of your work to keep as future reference, especially if you are making the blanket for someone else.

this is a picture of one of the ‘trial’ motifs I made as said, it is random yarn to start with….


Once I got the motif right then is when the fun starts as it is COLOUR TIME!

So this is the original Persian Tiles. The picture is from Michelle and Anne’s page  crochetbetweenworlds.net    Michelle and Anne are also  Blogstars for Stylecraft, they are amazing and you should check their page! I believe this blanket was made by Michelle

what catches your eye first?

For me was the geometry of the pattern and how the original colors emphasized this aspect, so my first thought was that in order to make something that looked different and was a real alternative to the original, I needed to do something more than merely changing the original seven colors. I needed to come up with a different way to use colors and keep the geometry but in a more relax and loose manner. I show you what I mean with an example of actual tiles…

Here you have a collage of different way to use the colors in tiles that are very similar in style and all retain the same strong geometry feel. As you can see just changing how the colors are used it changes quite dramatically the overall look.

Using the tiles above as a reference, I thought that Jane’s original color selection was similar to square N.1.  What caught my attention was square N.3

I liked how the geometry aspect was a bit diluted by the apparent randomness of the colors.

So let’s have a close-up look at the Eastern jewels…

Can you see where I am coming from?  By not repeating the same sequence of colors for each motif it makes the blanket looks more ‘random’. In reality, it is not random at all, Every single color and its position have been chosen.

I used just 12 colors to start with including the buttermilk which is my “neutral”.

The buttermilk is actually the most important hue in all blanket. I was so pleased when Annabelle at Stylecraft accepted my proposal and introduced this new color in their range! I was so determined to convince her that it was a must! now you can see why…


these are the “neutrals” on the Stylecraft range…so you have:

white, cream, parchment, and buttermilk.

I apologize as the white is not in the picture but ..I run out of it!

Said that it doesn’t really matter because what I want to show you is not the actual hue but how they work with the other colors.

So now look how these neutrals behave in blankets….

WHITE:


CREAM:


PARCHMENT:


and finally the BUTTERMILK:


you will agree with me that if we are looking at:

PICTURE 1:

just ONE round of white in a very bright blanket still makes a huge impact.

PICTURE2 :

even if the percentage of the use of cream is much higher than in picture 1  it is still predominant but not as stark.:

PICTURE3:

there is a LOT of parchment…but it blends more with the colors and the impact is quite subdued.

finally PICTURE 4:


in the Eastern the buttermilk it is completely blended and helps the other colors to keep the geometry!

I know it might sound a bit too technical and boring but I want to give you the tools to see how colors behave so you can make your own combinations.

Another bit of theory and then I promise  I stop..

the blanket uses as I said 12 colors. I needed to keep the number of colors down to keep the cost of the blanket ‘s kit down and also to avoid to have a lot of left-overs.


To create the illusion of LOADS of colors EVERY motif has a DIFFERENT colors combination, BUT even if there are 12 colors and 14 rounds on each of the hexagons, I  used just an average of 7/8 colors for each Hexagon. The result is that each hexagon has a color which is more predominant and that is what creates the effect you see. Ironically if I had used all 12 hues for each hexagon  ( considering that there are 14 rounds you could, in theory, use all the hues for each motif) I would have a much more uniform looking blanket than what you see.

how did I decide what colors to use and when? very, very simple:

I wanted a “HAPPY” blanket, and I started by selecting colors that I identify with that. Colors that remind me of the past, of happy holidays, beautiful landscapes, the Mediterranean sea, but also the colors of food, spices, and even, why not, …smells.

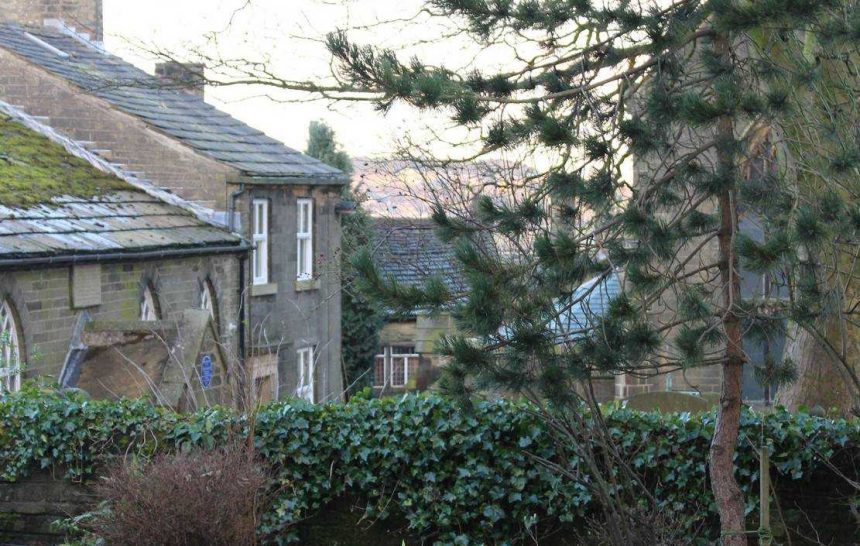
As an example of colors reference how about this picture of the Cinque Terre,  five small villages on the Ligurian Coast of Italy called Monterosso, Vernazza, Corniglia, Manarola and Riomaggiore…beautiful places so worth a visit if you are touring Italy.

Someone once asked me what computer program I use to choose and select the position of my colors…I actually laughed!!!  because if you knew me in person you would know that my relationship with technology certainly is one of “LOVE-HATE”!

I love computers as they allow me to communicate with you, but at the same time, every single task doesn’t seem to come ‘naturally ‘ to me. I always struggle and forget the sequence of steps  I have to take even in simple tasks as transforming an HR picture in a more manageable format so not to take all my allowance of data for the blog…so the idea of me mastering complex technologies and using some amazing gizmo of a color program is totally ludicrous!!

I use a large table crammed with pencils,  balls of yarn, color swatches,  and most of all my eyes…that is all there is to. No magic formulas in operation here!

Same goes to balance the blanket and choose the next round.

I always make one round at a time for each of the main motifs then I place them on the floor, the best place is outside if its not raining… as I get a real feel for the colors in natural light.   Here is a  couple of pictures of the blanket starting taking shape.


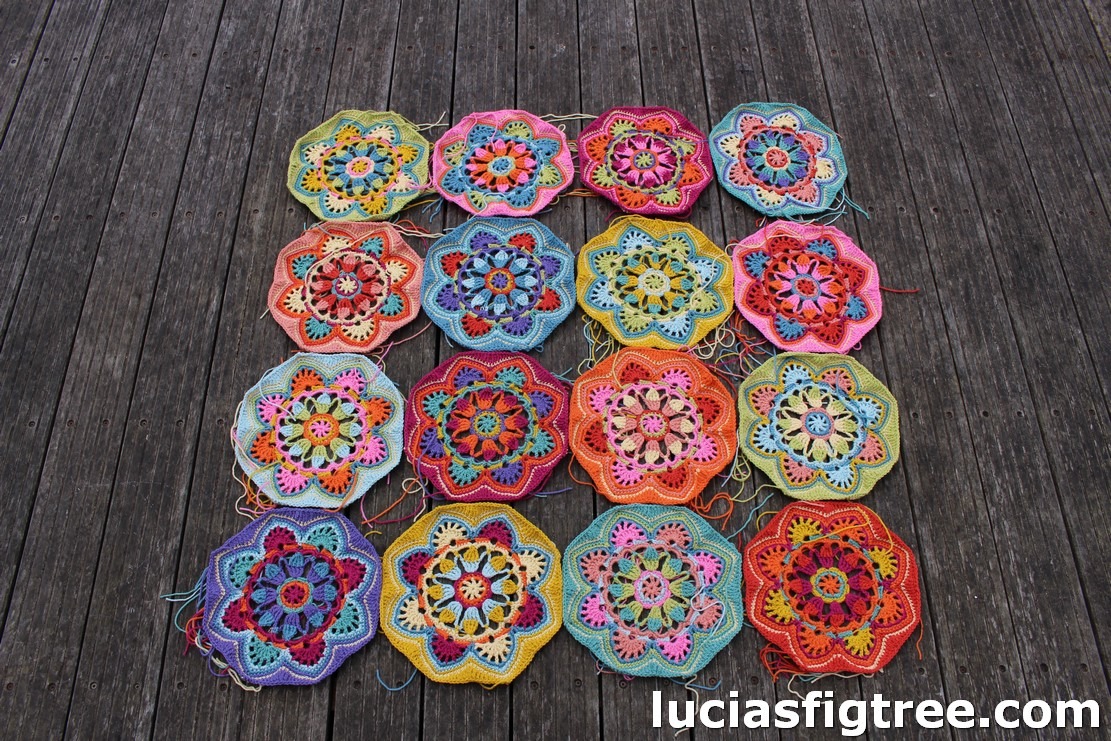
I wanted to share the creative process with you because it gives you an idea what takes making a blanket .. and that is just one part of it.

After the blanket is done, then the long and a bit tedious, process to record and translate my scribbles on my copybook into something that can be used starts…

I have to say I am not a fan of this particular stage of “blanket making” because you got to be precise and make sure that everything is correct and make sense, and I find all the above quite boring! I like playing with colors and making things..I do not like papers!  but at the end of the day that is of no use if it is not shareable…after all it is like a cooking recipe: you cant say ‘Oh there is a bit of this and a pinch of that..’ if you want someone else to make it!

That is all there is about it, my dear fellow crocheters!!

I want to thank Jane once again for letting me play with her patterns, and Annabelle plus all her team at Stylecraft for their hospitality and making me feel part of the team, for checking and re-checking my notes …. for   the  copious amounts of yarn they send me on a regular basis and the platform they have offered me to share my work with all of you out there!

I leave you with a couple of pictures I took in July at Stylecraft’s HQ…


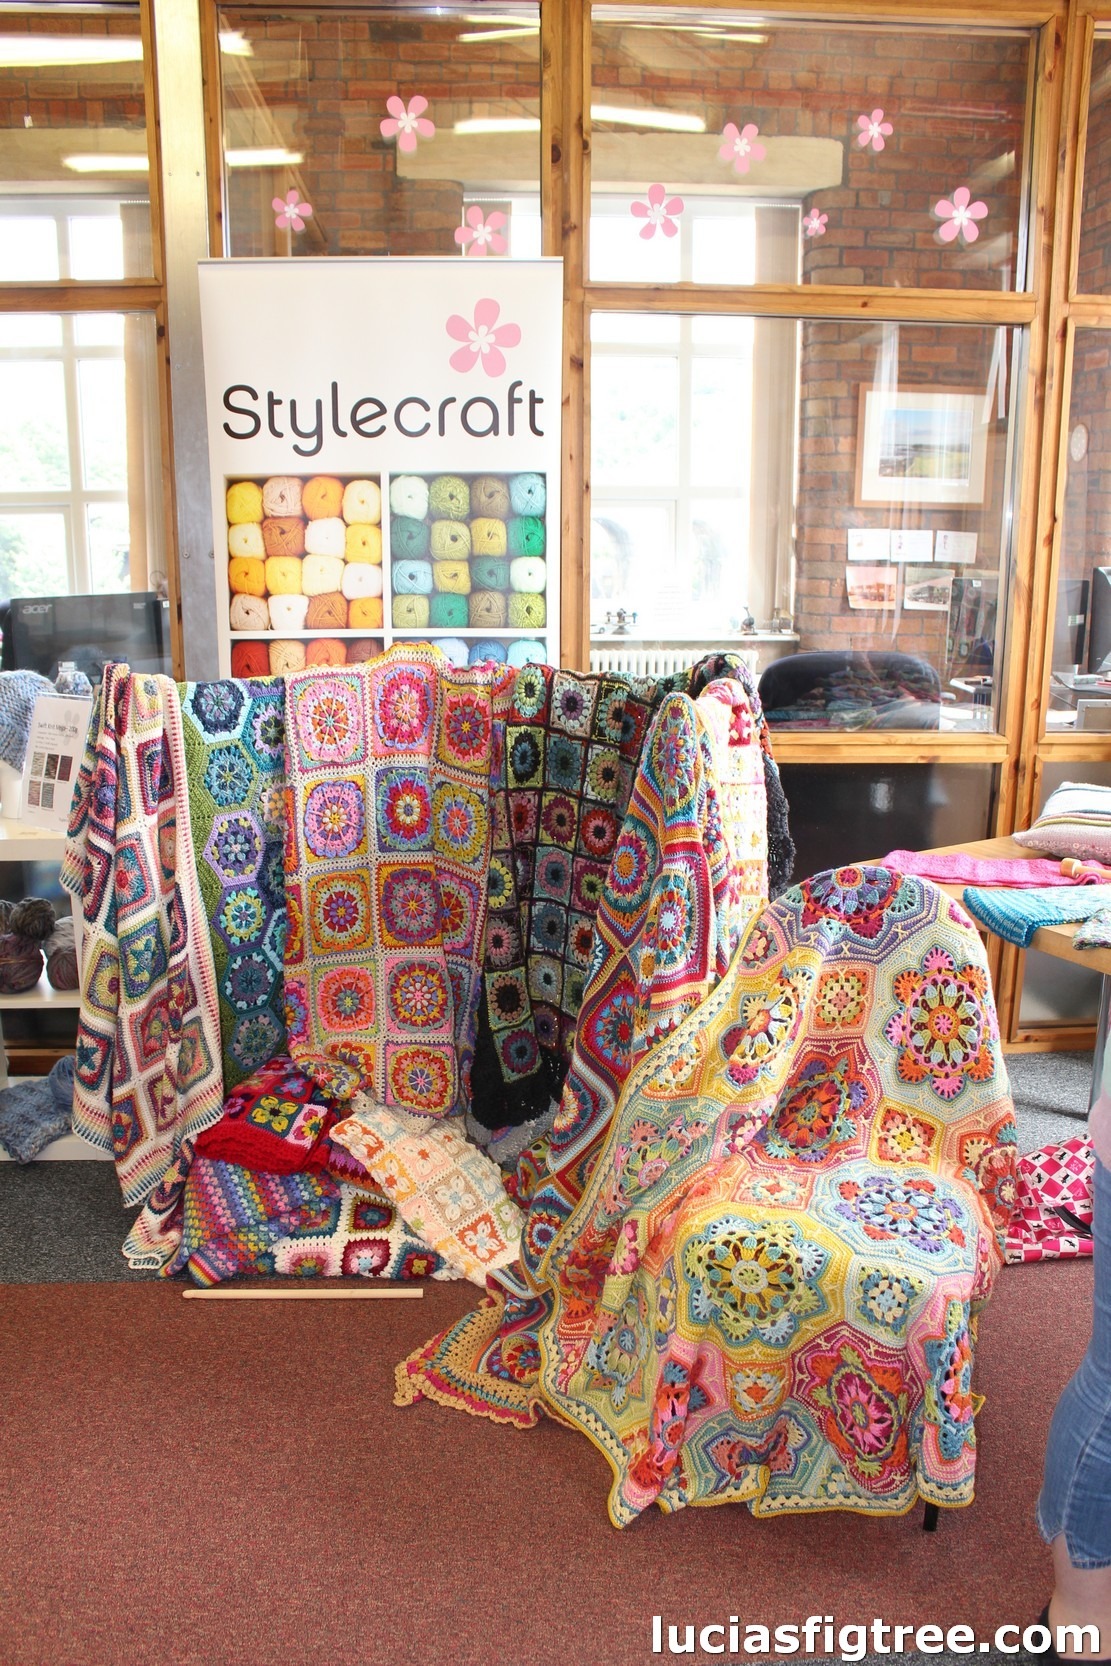
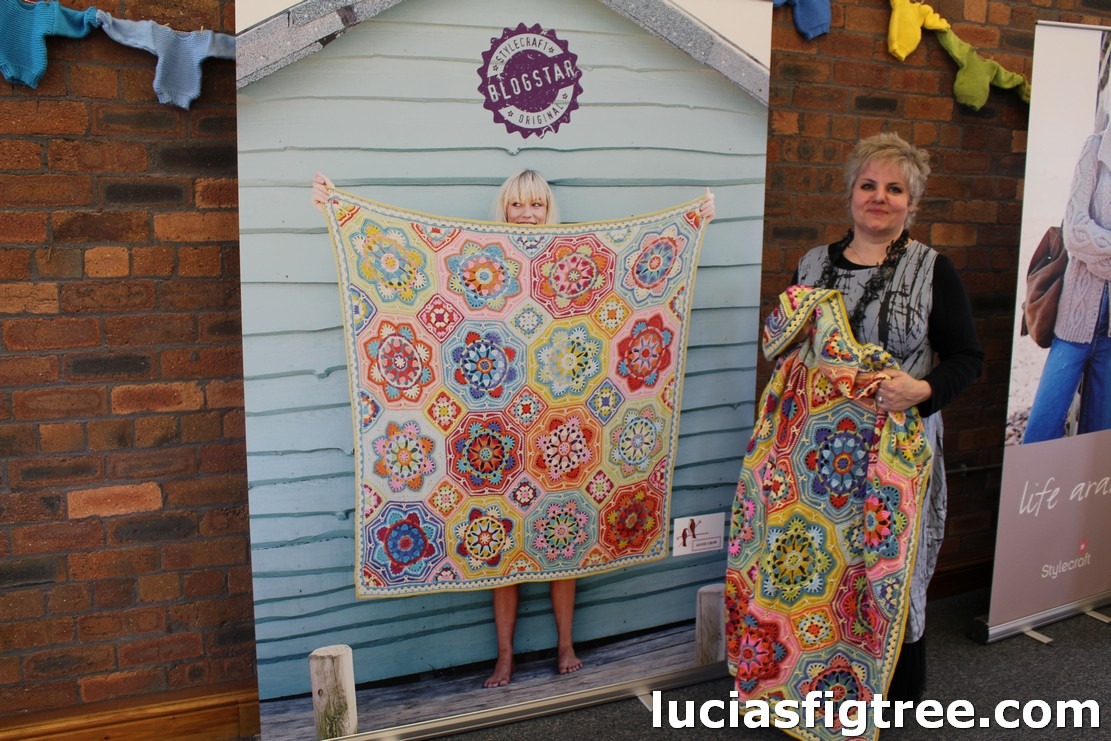
and… I know the Model on the billboard looks much better than me holding the blanket… but please indulge me a little. lol!!.. after all I do love the Eastern very much and

I hope you will love it too!


thank you for reading

love lucia xx

JULY IS NEARLY OVER…THE HARLEQUIN BLANKET’S DETAILS

Hello everyone,

This month I am very ahead of myself! It has been a really busy month, I had a lot of deadlines and also I went to the Blogstar’s summer meeting last weekend which was absolutely fantastic! I came back with a bag full of new yarns and shades!! I met several of Stylecraft’s retailers too which was very interesting but I will tell you all about in another entry because the purpose of this one is to give you the details of the ‘Harlequin’. Having said that, I have been messing around in my studio all week clearing up yarn and upgrading the space, those of you that follow me on facebook will have seen some of the pictures…the purpose of the clear up was to be able to play with all that squishy, colorful new yarn!

I can’t wait to show you some of the new shades !!!!

I will update the blog and the Facebook once I start to make some samples and decide what to do with the haul….I am also going camping next week just for five days near Gloucester, with my daughter Francesca, and my friend Yvonne, another fabulous crocheter, so guess what get put in the boot of the car before anything else:

I bet you already know… YARN, YARN, YARN !!!!!

But as usual, I m going on a tangent… back to the ‘HARLEQUIN’:

I haven’t had a chance block the blanket yet as you can see the weather is really poor and I had no chance to do it properly as I  can’t dry it outside, so apologies if the border looks a bit “curly” it is actually perfectly flat.


first the PATTERN:

As said on facebook it is not mine but I found it free on the internet. It is the work of Solveig Grimstad , a very talented  Norwegian crocheter. This is her page :https://www.facebook.com/Solstrikke/.

She has fabulous projects, some are translated in English too, there are charts ( I followed the chart for my Harlequin)   and this is the link to the harlequin blanket which I used for my version:

http://www.ravelry.com/patterns/library/harlequin-blanket-5

I followed her pattern and my blanket measures: 92 cm x 102cm including the border. ( the original one is 75 x 80 cm.) I think the discrepancy between sizes is due to the yarn used, and the fact that  I made a different border.

As in the original version, there are:

38 full diamonds motifs,8 half diamonds

8 half diamonds  (vertical),

12 half diamonds ( horizontal).

The joining method is a JAYGO and again she has a lovely very clear photo tutorial on her blog’s entry I  gave you the link to, which I have followed.


BORDER:

I wanted a border a little bit more substantial so I opted for a different one:

Many of you I am sure are aware of the fabulous CAL called: NUTS ABOUT SQUARES. sponsored by Scheepjes. http://www.scheepjes.com/en/

It is free on Ravelry: http://www.ravelry.com/patterns/library/nuts-about-squares-cal  and also comes with Esther Dijkstra ‘s fantastic video tutorials too!!!

Nuts about Squares CAL


I really wanted to make the Nuts about squares blanket but sadly I have not enough time to squeeze another project in! I have still followed the different squares’ entries online as many of my favorite designers have participated designing one of the squares.

The border I used is week 15 of the CAL ,  it has been designed by Tatiana Kupryjanchyk    here is the link:

http://www.lillabjorncrochet.com/2017/07/nuts-about-squares-cal-border.html

the only thing I have added is a row of trebles all around to adjust the number of stitches to the requirement of Tatiana’s pattern repeat.

and a final row of: 1dc,3ch,1dc on he same dc of the precedent row, skip one dc and repeat. It is my mini shell finishing that I use in most of my blankets.

The joining color is CREAM  ( 2 balls)


crochet hook: 3,5 ( normally I use a 4,0 for the Stylecraft’s dk but I wanted a more tight fabric hence the 3,5. please do a swatch if you want to crochet the blanket and see what you like best).

YARN USED:  STYLECRAFT SPECIAL DK

STYLECRAFT SPECIAL DK in:

GOLD/GRAPE/VINTAGE PEACH/SPICE/FONDANT/CANDYFLOSS/BUTTERMILK/CREAM;

FONDANT/CANDYFLOSS/BUTTERMILK/CREAM;

STYLECRAFT  LIFE DK in:

DAFFODIL/MELON/CLOVER/LILY/FUCHSIA;

BATIK:

CORAL.

with the option of one ball of  KING COLE  SPRITE shade KOS.

I said option because you really don’t need it as there is plenty of yarn left from the Stylecraft to finish the project.


The reason I used the Sprite is that I wanted to create the effect of the crumbling walls of many of Venice’s buildings and the variegated effects of the Sprite did the job.

Here is a picture that let you understand what I mean with crumbling walls if you never visited Venice in person…they have a wonderful color/texture. the image is the House of the Rennaissance painter Tintoretto :

I love the colors not only of his house but of his paintings too. Look at this is called “Christ in the house of Mary and Martha” painted in 1580.

The warm oranges gold and pink are very common in the Rennaissance art, especially when linked to Venice.  I got another painting for you: this is a portrait of the Doge Andrea Gritti ( the Dogi were the rulers of Venice )  painted by Titian in 1545.  Just magnificent!


Anyway back to the Sprite …I got my ball as a sample from Linda at Threads…( she always tempts me with something new to try!!)  Now the Sprite looks lovely but I haven’t tested it.  I am saying this because I noticed it has an ever so slightly fuzz that I am not so sure how it will behave after several washes and use. I am very thorough with my testing, especially if I am going to recommend a yarn to you I feel the responsibility to make sure it behaves as it should as there is nothing more disappointing than spending loads of hours on a project and then ruining it through washing or use.

All the blankets I make are not just made to be PRETTY they are also made to be USEFUL, dragged by children, family pets, back of your sofa, car, taken on family holidays,  or simply used when you want something comfortable to wrap yourself in.

every yarn I use, regardless of the brand,  goes under the same process: I make a sample and then I hand wash it first to see the color fastness, then I put it in the washing machine and tumble dryer several times before using it for my projects. I didn’t have time to do all the above for the Sprite, so fingers crossed.

QUANTITY:

the blanket weight just 560 grams. I used probably about 45 grams of each colour…some more some less, plus 150 grams of cream again the quantities are approximate. But , as I said before, you can really decide if you want more motifs in one color instead than the other. I did about 3 motifs for each color to distribute the hues  evenly.


So this is all for today, I leave you with a picture of oranges and pinks in my garden…have a wonderful weekend and thank you for reading,

Lucia xxx


Odinella..the Icelandic Blanket.

Another blog entry…two in two days!  I love weekends because no work mean more time to write stories!  So some more about the June blanket:


Despite the heat, I finished the June blanket just a few days later then envisage.


I was so close to put the blanket in the WIP’s pile …as I didn’t consider the possibility that Scotland could get hot too, but I loved the yarn and the pattern I designed for the blanket so much that I persevered regardless of the temperature.

So now it still needs a  very simple border of some sort of type but I have run out of yarn and while I am waiting for it I started my July new adventure.

I might postpone the border to September I see how things go.

I was on the Ayrshire coast last weekend with my daughter Olympia and three of her friends,  so I took a few pictures of the blanket and the lovely coast.

The blanket is beautiful both sides! I still cant make up my mind which one I like the best…


The original idea for the pattern was to emulate the colors of Bifröst, the burning rainbow bridge that reaches between Asgard and Midgard,  a tribute to yet another of the books I love and I mentioned before: ‘the Prose Edda’.

I thought I was going to make some sort of stepping stones like large pebbles, colorful paving stones for the bridge, but as always happens with things that are made as you go, the ‘pebbles ‘ looked more like a starfish then anything else!

more so when I photographed the blanket on the Beach…

So yeah…no paving stones, sorry Heimdallr,


On the matters of lore, traditions, and stories I was going to mention elves and trolls and more so some really amusing little books written by a blogger and journalist called Alda Sigmundsdóttir. She has written several “Little Book” . they are a series of short essays that tell the story of the Icelanders,  now and in the past, some of the how they live, how they eat, how they deal with the beautiful but challenging Icelandic landscape.

Some of the topics include early superstitions, cultural anecdotes, and stories of the elves. (Do modern Icelanders really believe in elves? The answer may surprise you!)

Back to the blanket. I gave it a new name is called Odinella. you will find out why …

I realized that looks more like a  coterie of starfish, but as they are technically not fish… I am calling them sea stars.

While looking at images of sea star to use for this blog entry I stumbled on this beauty…is called Odinella and belongs to the family of the Brisingids.


The sea star’s family  is named after the Brisingamen, Old Norse for “glowing jewellery”,  ‘fire torc’ , the most beautiful necklace worn by the goddess Freyja so we still have  after all a Norse mythology connection, and Heimdallr is back too, as in the Prose of Edda, Loki steals the necklace, to avoid been found  he disguises  himself into a seal. Heimdallr turns into a seal as well and fights Loki. Heimdallr wins and returns Brísingamen to Freyja….great fun indeed.

Now this might be a bit controversial, as the Prose of Edda is a phenomenal extraordinary scholarly book, but…if you have no time to read it or you want something ‘lighter’ to share with your children you should have a look at  Neil Gaiman’s book :’Norse Mythology’. I found it witty and very enjoyable,  for me the added bonus,  is that it is available on Audible too, and the reader is Neil Gaiman himself!

back to the blankets some lovely shots of Turnberry’s lighthouse…( I walked over the golf course, not with a set of clubs but with a basket, a blanket, and a camera..and few puzzled looks)


the details of the pattern are still in a jumble in my scrapbook. I will ( don’t I always say that?! …) write it  down, but ,as I have been asked for the yarn I used, here is the list of the colors:

The yarn is LETT-LOPI  , a DK weight  100% wool. it comes on a 50 grams ball,100metres.

0867/9427/9426/9423/9421/1404/9418/9419/9432

/1414/9417/9431/9429/9428/9414/9434/1408.

I used 2 balls of all the above, besides 1408 (light red heather)  which I used just 1 ball as it is a very powerful hue.


the joining was done with 6 ( so far ) balls of 0058 (dark gray heather) I  am saying so far because I haven’t finished the border yet. I reckon I will need probably another 4..I am not sure.

More warnings…they yarn is FABULOUS BUT….if you are accustomed to the feel of acrylic, cotton, or merino please note that this is different. Lopi Lettlopi Wool is a breathable and water-repellent Aran weight roving yarn.

I love it and it is my favorite 100% wool yarn! it is the best for garments for the Scottish weather as it is rustic but so warm you will be pleasantly surprised! also, it is handwash only.

my advice? if you want to make the blanket before embarking in buying the full amount yarn just try a ball and see how you feel about it…

that is all for today,

happy crocheting,

lucia xxx


July’s blanket: A white rabbit, Venice,brocade and Arlecchino…..

July is already here!!! and to quote a very special white rabbit from one of my favorite books, ‘Alice in Wonderland’:

“the hurrier a go the behinder I get”!!


Besides me  chasing my tail for the past few weeks trying to fit everything in , Alice in wonderland’s  little white rabbit is not just going to remind me that I seem to be always behind with things, his tabard with the playing cards, is also going to be one of the sources of inspiration for my July blanket.

The July blanket is also a place that is very dear to me and where I have lived for 7 years while studying Architecture…

VENICE !

I know, how lucky is that?? I loved every single minute of those 7 years!


There are so many things I love  about Venice, to fill several blog entries, but for today I m going to focus on colors…( just for a change!) I am going to show you what has inspired not only the palette for  July’s blanket but also the pattern too.

So where to start….some shots of fabrics, buildings, interiors…  a riot of warm colors that summarize Venice for me…

how about the ‘coral room’ at Palazzo Brandolini,


or the interiors with their brocade’s dressed columns of St Brigida Church…


Some amazing fabrics…  Rubelli’s ‘ silk brocade with strawberries’

When coming to fabrics Venice for me is Rubelli and Mariano Fortuny….

From the historic Venice location of Palazzo Corner Spinelli , Rubelli , a 200 year old textile company, produces in their own weaving mills, an extraordinary quality of damask, silk, two-pile velvet, soprarizzo, lampas, and brocade.  they also have very modern and contemporary designs but what I am focusing on, is their traditional cloths.


and with Rubelli I also have to mention Mariano Fortuny.

Fortuny was a talented artist with a  passion for textiles.

He was an extraordinary man,  an inventor, painter,  sculptor, photographer, he was interested in architecture, and theater staging and lighting. But most of all  Fortuny was a fashion designer and  Palazzo Fortuny is the place where this extraordinary eclectic artist lived and worked and it is now a Museum well worth a visit.

Fortuny ‘s dresses were so legendary that if you like Proust you will remember Albertine been bribed to stay  by buying her Fortuny gowns that “swarmed with Arabic ornaments, like the Venetian palaces hidden like sultanas behind a screen of pierced stone.”


When it came to fabrics and fashion, he not only created extraordinary garments but he also manufactured his own dyes and pigments for his fabrics, with these dyes he began printing on velvets and silks and dyed them using a press that he invented with wooden blocks that he engraved the pattern onto. His dresses are seen as fine works of art today and many survive, in museums and many people’s personal collections.


Well, what can I say?, every corner of Venice is truly remarkable

to go back to the blanket now can you see where the colors come from….and the shape of the pattern?

the shape of the pattern is  not only from the playing cards’ tabard of the white rabbit , it is also from  the outfit of a very famous character of ‘la Commedia dell’Arte’ : Arlecchino ( Harlequin)


here a bit more of ‘Venice’…


Guess is enough for today, I m going and see how I assemble this little blanket of mine….

happy crocheting  !

Lucia xxx


Some overdue details for the Indigo blanket.

Hello everyone,

This entry is well overdue, but as I said on facebook I have been really busy with family, work, a commissioned crochet project, that I can’t wait to share with you all,  magazine articles, June’s blanket…and the giveaway too!!

Having said that, I have been putting together some close-up pictures of the Indigo blanket and a few notes about the patterns for the different squares,  the stitches used and some links online for them.


Firstly I would like to start saying that the peculiarity of this blanket is to be a  bit random, so please do not feel stressed about sizes of the squares, how many rounds etc. it is after all  it is all about scraps, recycling and  random  motifs  pieced  together, wanting to perfectly recreate what I have done defeats the purpose of the concept of ‘boro’.

Use my blanket and the details I have posted here as a guideline to create your own indigo blanket!

In my previous post I gave you the details of the yarn and materials  I used:


and the link to the overlay mandala from CARO that is the focal point of the blanket. As I have said, anything round that you like will do. I wanted to try one of her mandalas and that is why I bought the pattern.

besides, it is SO IMPORTANT to support the designers by buying some of their patterns when you can. I know that everyone prefers free patterns but please sometimes spare a moment for the designers.. after all the patterns will  cost as much as a fancy coffee out of your favourite chain, or  a magazine; and the point is those 3, of 4 pounds you spend  will give you hours of pleasure and entertainment and will help one of those talented ladies to find the time to dedicate to create some more patterns for all of us to enjoy!

I had no idea what an arduous task it is to write a pattern until I attempted to do it  ‘properly’myself. It takes hours upon hours, then you got to have it tested for mistakes by some other crocheter, then you have to photograph the different stages, maybe make a chart and also you have to set it up on a template!

I am doing all of that for the Norian…So far I had to pay for someone to make me a template to use, because I do not have the IT skills to create one from scratch by myself,  also often it is a good idea to use a  professional pattern corrector to make sure that your pattern is absolutely foolproof  and making sure that each comma and hyphen is in the right place so anyone can understand and follow your instructions, that doesn’t come for free either….

well …sorry for the rant!


Anyway, back to the Indigo blanket.


let’s start at the top with the cherry blossom squares.

There are 10 of them, they measure 19cm square ( just over 7 inches square) I used a size 4 1/2 hook and one strand of Jeanie yarn in Memphis/Dixie/Delta. Also, the petals are in StylecrafAran in cream. This is the pattern I used.

I am sorry the chart is not good quality but it is a zoomed screenshot from Postila Ru and I can’t find the original link.

After round 7 I added another round of front post trebles to increase the size of the square and give some tridimensionality.

The squares are joined together on the right side with a simple dc round. Again I loved the 3D effect.


The long rectangle on the right of the  cherry blossom square is made up with rows of  long double crochet linen stitch  a fabulous textured stitch here is a link to the pattern:


Long Double Crochet Linen Stitch Pattern

It is made of alternate rounds: one round is a strand of 4ply

one round is a strand of 4ply Stylecraft  yarn in cream with a strand of Sundae dk in blueberry sorbet.

2nd round is one strand of Batik  storm.

The rectangle measure 58cm/18 cm.  and I started with a 28 chains and 78 rounds.

the first block with the embroidery the pattern is of a pot holder. I liked the look of it and this is the link to the embroidery aspect:

https://uk.pinterest.com/pin/506373551838477528/

there are 8 solid granny squares all made of 7 rounds. This is the pattern  I used : http://www.craftpassion.com/solid-granny-square-crochet-pattern/

one of each in : cream/Memphis/dixie/delta

one in a alternate rows in delta/menphis/dixie/cream/ delta/Memphis.

one in alternate rounds of  a strand of 4ply in cream and storm together and a round of cream

one in a strand of 4 ply cream and blueberry sorbet together

one in a strand of batik indigo and 4ply cream

they all measure 19 cm square.

there are  2 squares of half trebles alternate 2 rows of each in dixie and delta and the other one is memphis and cream

a large rectangle in Memphis with some embroidery in cotton classique dk ivory . This is the diagram , again from postila. no idea of the source.

The one that I haven’t been able to source again is, unfortunately, my favorite square. I think has been taken down from online because it must have breached copyrights. I have no idea. All I know is that it has disappeared…But there are loads of alternative of  very similar shell patterns on my picot. here is a couple of links you might want to consider:


http://mypicot.com/0031.html

http://mypicot.com/0037.html

There are some denim squares, rectangles, and 1 hexagon. I tried to salvage as much as I could out of the jeans I cut. The size is not relevant but make sure your corners are 90 degrees, it make easier to crochet around !

I cut my pieces with a rotary cutter, it came with 3 types of blades: a straight one, a wave one, and a perforating blade. this is the Amazon link : https://www.amazon.co.uk/gp/product/B005DQ90UM/ref=oh_aui_detailpage_o05_s00?ie=UTF8&psc=1 .

I cut the pieces to the shapes I wanted with the straight blade, then I ran the perforated one about 5 millimeters from the edge of the piece. That creates the holes that allow you to go through with a crochet hook and make the border ( I just did a sort of elongated DC (UK terms) ). 2 points of advice. if the fabric ( like mine was ), is a bit frail and old you might end up ripping the space between the holes…as there isn’t much space, my blade created probably a 2/3 millimeters bridge between holes, so when you try to join 2 pieces of fabric that have a crochet edge, it is not strong enough to hold. Hence why I often overlapped the pieces to not create a point of tension and rip the border. But if you use a stronger fabric I think it will hold much better. It all depends. Another way to do it it is making single holes with the crochet head..now I did that on the hexagons, again it is a bit of a pain, to be honest…I know that the correct way should be using a needle and thread and create a border where you can attach the crochet, but I felt it was a bit of a palaver and I always try to find out the quickest route. ( after all the blanket was an experiment). so to summarize: perforating blades are a great choice but you must have a reasonably strong fabric, and a steady hand to run the holes; individual holes, again great if the fabric is thinner but a bit labour intensive if otherwise; 3 the thread and needle one: most likely the best if you want something really neat but it will take a great deal of time. You will have to make a sample with the fabric of your choice and see how you feel about it.

The piecing together it is really a bit of a try and miss!! I just overlayed some and but together others….the only important thing is that you try to come up with a blanket that is as rectangular as possible with straight sides!  If your squares are too big and do not fit, once you have decided the frame of the blanket just overlay them to fit! After all, that is what Boro is about, overlaying and just stitch together.

If you are more skilled and patient than I am let your creativity run riot and decorate your blanket with some lovely embroidery!  Get inspiration from sashiko work, some is incredibly beautiful and complex but some are just simple run of single small stitches together..I tried a bit of this and that but I am definitely NOT skilled at all.Having said that I love it because it is not perfect!


I hope the guidelines above are of some use to you all,

happy crocheting,

Lucia x


June’s blanket, bucket-list and Iceland…

Hi Everyone… it is June and time for another blanket….

this one is about my bucket-list.

I have a few thing on that list, one of them is traveling and visiting/living in new places. the top of the list for the places is ICELAND, and that is what this blanket is dedicated to Iceland.

I always knew since I was a small girl that I wanted to live ‘up North’ well before  Hygge or  “Scandi style”  became so popular.

I made it just 2000 miles up north!  from Italy to Scotland… but I always wanted to hop another little bit..Shetland, Faroe Islands, and then Iceland!

If I wasn’t 53 and had a family, I probably would pack my bags and head for Iceland. In the back of my mind there is still a small flicker  of light which says I could  still do it …my kids are starting flying the nest; Francesca my oldest, she got her master in fine art, Valentina has just graduated this May in Law, Giuseppe is off to Edinburgh University next September, and I just got left Olympia that has still 4/5 years of High school…mmm never say never! ( mind you does Iceland needs a middle age woman that is obsessed with  wool/yarn /colours and books??? )

I could start with visiting Iceland first! I have never been… BUT it is on the top of my list hopefully in the next few months.

So why do I love Iceland?

the most obvious reason is that Iceland is beautiful, There are breathtaking mountains, volcanoes, highlands, glaciers, waterfalls, fjords, geysers, lava fields, and a variety of coastlines.

but what attracts me most  are the Icelanders and their way of life and their values.

Icelanders are highly educated and the society is progressive.They have a literacy rate of 99% and most of the population has experienced higher education, they publish more books per capita than any other country. The have topped up the gender gap index Economist recently named Iceland the world’s best place for working women – in comparison, the UK came in at No. 24.Iceland was the first nation to elect a female president; Vigdís Finnbogadóttir was elected in 1980 and stayed in office for 16 years. Jóhanna Sigurðardóttir was Iceland’s first female prime minister and the world’s first openly gay female head of state.

Climate change is on the news every day and I believe it is a real issue for our planet. Fossil fuels are NOT the way forward. Iceland is the only country in the world which obtains 100% of its electricity and heat from renewable sources. 87% of its electricity comes from hydropower, and the remaining 13% from geothermal power. Oil-powered fossil fuel power stations are only used as backups to the renewable sources.

I could go on and add 20 pages of facts. and you are wondering if  I am a serious case of “The grass is always greener…. …..in your neighbor’s field” !!!

So what is really my tangible experience about Iceland and why I like it so much?? and here is where the creative side kicks in and the relevance to the blog…

LOPI YARN!!!!!

and in particular.

Icelandic Lopapeysa!

I made LOADS of them over the years…lopi yarn  is made from the wool of the Icelandic sheep.


It is unique in its composition and together, the distinctive fibers create wool that is warm, lightweight, water-repellent and breathable.


OK, it is  a little itchy ,but once you have worn a few times and washed too, it becomes really lovely. I can tell you this from experience as some of the jumpers  I knitted are 10 years old, they have a few holes but they are as much loved as they were once new!! those are few of them I have here at home…

also some of the books ( that is my other vice…books) I love about Iceland:


So I never attempted using Lopi Yarn for crochet but I m going to give it a go and the next blanket is going to be made entirely with Lopi . another experiment then…

Next time I will  tell you all about how I have chosen the colors and about Snorri Sturluson’s Prose Edda. I read a simplified version of it when I was 12 . and it is still now my favorite book.

I am also going to tell you about Hávamál, probably one of the most important poem in the book , which tells the story of Odin and the tree Yggdrasil.

and  Bivröst (“Moving Way” in Old Norse),The Bridge of the Gods:

Gvðín gerþu bru af iorþu til himins, er heitir Bifravst: “The gods made a bridge from earth to the heavens which is called Bifravst”

and about some amazing music I  I was so lucky to see live last night: Eivør Pálsdóttir.

Eivor is not an Icelander, she is a Faroese singer-songwriter with the most amazing voice ever! totally mesmerizing here is a link to youtube.


Thorin, our cat, loves Iceland too….

To the next time, Happy crochet,

Lucia x


May’s Blanket: an old pair of jeans and a journey.

If you have been following my blog, you are by now aware that what I am aiming to do with this crochet journey is to experiment how you can use crochet as a medium to weave a story into the fabric of a blanket.

Furthermore, I would like to encourage all of you out there to do the same and to create your little piece of history.

Today I want  to introduce something else that it is very important to me:

“Nothing lasts, nothing is finished, and nothing is perfect”.

It is a Buddhist concept called wabi-sabi  “the wisdom and beauty of imperfection.” it can be applied to virtually anything but in this case it  is about  taking the time to create something really unique  as a beautiful way of connecting with a garment or textile, and making a feature of an old scrap of fabric, recycling  old yarn or mixing oddballs,  given as a present, out of a sale basket or an impulse buy..( we all have been there…) , old yarn from the bottom of your stash.

With the assumption  that beauty is in an object’s impermanence and imperfection that means that  mistakes, maybe some wonky stitching or different textures can be embraced, and you do not need to be a confident crocheter you just need to be able to hold a hook and have some yarn, so this is also a perfect project for a beginner.

What has inspired me are traditional Japanese boro cloths.


They have a beauty like no other. Each cloth tells a unique story of its journey through life with patches carefully sewed on and reinforced with stitching, often over generations of a single family.

Although beautiful, boro cloths came about through pure necessity. During the 18th and 19th centuries cotton,in Japan, was a luxury afforded only to the nobility. The lower classes had homespun fibers, like hemp, which were more difficult to make into a fabric and didn’t last as well. By patching and stitching, the fabric could be strengthened and its life could be extended. During the Edo era, there were also laws that restricted lower classes from wearing bright colors which is why the cloths are indigo blue and brown.


During these times pieces of cloth were re-purposed in various forms. Often starting off as a kimono then becoming everyday clothing, a piece of sleepwear, a futon cover, a bag then finally a dusting cloth. Every scrap was used until it wore out.

Boro textiles are now highly sought after collectibles. I am not so sure about the ethical side of that and the fact that now they  fetch thousands of pounds and adorn the lounges of affluent people, to me it defies the purpose in the first place, but I am grateful for the opportunity to see them in exhibitions n museums as a tangible piece of history and a lesson too.


Boro celebrate the beauty of something frayed, decaying or repaired and also conveys a deep sense of regret concerning waste, as Earth’s resources are limited and it is important to search for new and creative ways to recycle and reuse.

So back to the blanket…

What am I going to do? I have no plan really. I  have been collecting bits and pieces: some Japanese bowls I use every day, I love the colors and patterns, some yarn I have been given to try at the last Blogstar’s meeting and  some crochet samples I made.


All I know I want to use my old jeans. I bought them years ago. It must have been a bit of a ‘middle life crisis’ as I never wear jeans and I thought they looked ‘trendy’.

Then I gained some substantial amount of weight and they lingered at the bottom of my wardrobe for ages as I couldn’t wear them anymore, but since Christmas I have been shedding the weight once again and now they are far too big for me to wear. I wore them to go camping for Beltane’s celebrations  last weekend and I had to keep pulling them up which was really annoying.They are not good enough to go to a charity shop but they are precious to me as they remind me of my weight loss journey. So they are going to become a blanket!

I am going to see if I can introduce some sashiko to join the pieces together,

Sashiko is a traditional form of Japanese hand sewing that uses a simple running stitch sewn in repeating or interlocking patterns, usually piercing through several layers of fabric.

wish me luck…I will keep you updated on it’s progress,

love to you all,

Lucia xx


Voilà ! the macaroons blanket.

31stof March! just in time….

You probably have already seen some previews on my  Instagram. I finished the macaroon blanket last week, but I have been so busy trying to finalise the last details of the ” secret project” plus I had a few deadlines at work . However, I am now finally sitting down, writing the recipe for the macaroons blanket, so you can all make one for yourselves!

Firstly let me tell you,  it will take a degree of patience! The squares are very easy to make but there are 280 of them!  Saying that… I actually really enjoyed the journey and seeing all of these little bundles of colours growing in my basket… a bit of frustation  at times with the ends to be sewn in BUT it will be worth it in the end as the blanket came out really beautiful !! Like baking, it is with no doubt, a labour of love.

If I can make a suggestion, as often happens to me with any granny square blanket, I find it much easier to make it if the project is running along side  with something else, and most important, sew in your ends as you go! or it will be a nightmare!

THE SQUARE: it is my design. I made a small photo gallery so it is even easier for you to make your own:

FOUNDATION : magic circle


ROUND1:

3 ch( makes the first treble),2 trebles,  *3 ch, 3 trebles* repeat ** 2 more times., ss on the 3chs ( which act as  your first treble)  and fasten off.

(12 trebles and 4 ch3 spaces)

ROUND2:

start with a new colour in one of the 3 chs spaces and work  a cluster of 3 trebles together,3chs and another cluster; 3ch and in the next 3 chspace of round 1 repeat * cluster,3chs cluster 3 chs*  ss and fasten off. [ 8 clusters, 8  3chs spaces]

please note as from the photos your squares will curl! do not worry as the final round will straighten down the square.


ROUND3:

Start a new colour in any  3 chs space  between 2 clusters and work the angle as follow:* 3 chs ( act as 1st treble) 2 trebles, 3chs,  3trebles.

In the next 3 chs space work 2 trebles, 1 puff stitch in the centre of the 3 trebles of  ROUND 1 , 2 more  trebles*; and repeat **


so that is the little mini granny square. it looks lovely both sides


Next the yarn used and colours:

STYLECRAFT SPECIAL DK

  • CLARET
  • LIPSTICK
  • POMEGRANATE
  • GOLD
  • SPICE
  • FONDANT
  • APRICOT
  • SAFFRON
  • LEMON
  • CLEMATIS
  • LAVANDER
  • DUCK EGG
  • SPRING GREEN
  • PISTACHIO
  • MEADOW
  • one ball for each of the shades  EXCEPT for the PISTACHIO where you will need three balls in total.

the squares are 280, they measure 7,5 cm and are  organised in 14 columns of 20 squares each.the border is 15 cm deep.

The joining method is a simple row of dcs . I changed colours every time , that has made a lovely “multicolours grid” effect, which makes the blanket interesting both sides!.  the all blanket is 120×180 in total and the border is 15 cm deep.


THE BORDER:

the border is an adaptation of border number 72 from the new Edie Eckman’s book : ‘every which way crochet border.’ I said an adaptation because I repeated round 1 and 2 several times to make the border more substantial, and as consequence, I had to change the corners too, as I like my borders to be perfectly flat.


I know it is a nuisance but I can’t post even a partial picture of Edie’s border as that would infringe the copyrights . all I am saying just look at the closeups,  or use another border that is a multiple of 10 stitches.

I hope you will enjoy making the macaroon blanket and thank you for all the lovely likes and messages I received!

Bring on APRIL!!!!!!!

love as always,

Lucia x

Yarn,friends,more yarn,macaroons and a family’s ceilidh…part one

Let’s start with a question:

Do I need more yarn? ABSOLUTELY NOT !!!

Do I WANT  more yarn? ALWAYS!!!

Saying that let me start telling you about my weekend.

Every year I go to two yarn exhibitions: Yarndale and the Edinburgh Yarn Festival.

The reason why is because I like the spirit behind them. They both are a gathering of mainly independent producers, dyers and designers. And they are so worth going to because of the amazing talent and creativity behind those stalls.

On Friday morning my daughter Valentina and I took an early train from Glasgow to Edinburgh, Valentina had a dissertation meeting at University, and I went  to the Corn Exchange where EYF is held.

I met my friend Julia from http://handknittedthings.blogspot.co.uk/  in the queue outside the building amongst many very enthusiastic and chatting ladies! It didn’t rain which was a major plus, and it wasn’t too cold either so the hour and a bit waiting outside flew by in a flurry of yarn chats!

Julia and I  we went inside and we met Janehttp://janiecrow.co.uk/presta/ who was one of the exhibitors. and Sandra http://sandra-cherryheart.blogspot.co.uk/   then I just I wondered off admiring all the goodness in the show. Highlights? Far too many to mention but I especially loved Marie Wallin’s   tiny stand with her jumpers with the most exquisite colour combinations,


Amanda Perkins crochet blankets  http://www.amandascrochetblankets.com/home-page

The knitting Goddess http://www.theknittinggoddess.co.uk/,  Eden Cottage Yarns and my friend Zoe, which was exhibiting too and  has a lovely shop in Glasgow where I buy all my natural yarns. Zoe has a great selection of small independent producers, plus she dyes her on yarn also.  http://www.thequeenofpurls.com/

But let me tell u what made my day…

It wasn’t the yarn; it was those ladies that somehow recognised me and stopped to say hi and to tell me that they read and love my blog, my stories and my 12 blankets in 12-months challenge.

It was so overwhelming and humbling to get tangible recognition that my rumblings online are enjoyed by you out there .!

So a MASSIVE THANK YOU FOR YOUR SUPPORT!!!!

I am not taking the time you are spending reading my blog for granted it is totally appreciated.

So what did I brought back with me? I already posted a couple of photos on Instagram; I bought some lovely hand dyed yarn from the Knitting Goddess, three skeins from Eden Cottage and a VERY expensive cake from this new Hungarian supplier of gradients yarn called Bilum

B .


Amanda’s new blankets book, small pamphlets on crochet shawls that look very promising and a book on knitted toys because I couldn’t resist all those mini dresses and cute animals!

Out of the show, I shared a taxi with a lovely lady from Hampshire which very kindly gave me a lift to Edinburgh centre. I went to Mademoiselle Macaroon! https://mademoisellemacaron.co.uk/

Because I haven’t forgotten about my blanket and because they have THE BEST MACAROONS IN SCOTLAND!!!!  Gosh, I wish you could try them! They are delicious, and the small bakery/cafe is so quaint, you can see Edinburgh castle while sitting sipping your coffee and ejoying your macaroons and the staff couldn’t be more helpful.

yeah, as we say in Scotland: ‘PURE MAGIC!!’

and look what we got here…..can you spot the macaroon and the new squares??


More Edinburgh news tomorrow as my weekend is not over yet and I have a family Ceilidh tonight.

love to you all,

Luciaxx

‘Emily’ my February blanket: a humble homage to the Brontë sisters.

As you probably knew already,  last weekend, I went to my first STYLECRAFT’S BLOGSTARS  meeting.

It will take all week for the experience to sink in and  I am still in the process to write a blog entry about what I saw , who I met and millions of ideas and exciting new projects, but today I am going to give you an update on my plans for the February blanket.

Stylecraft’s HQ is in Yorkshire in the north east of England, a wonderful rugged landscape well worth a visit if you got the chance.

While I was there for the weekend, I  decided to stay an extra day and fulfil a wish  that I had  wanted for ages.

I went to Haworth to see the Brontë Parsonage.

As with all the things that you put up off for a long time, I had developed some sort of concern that there was a possibility of disappointment. And that  my experience wasn’t going to be what I expected. But I m very pleased to say that it was not  the case for this visit.

I wanted to see the house in winter, and also I wanted to see it when it wasn’t too crowded because in a very selfish way it was quite an important pilgrimage for me.

I was very fortunate, I arrived there at  twilight ,just before closing, beautifully quiet, as the museum had just reopened last week and many are not aware of it.

It was wonderful to be standing in solitude  in their very  front garden.

You are wondering why a 50 something year old  woman is so fascinated by the Brontë sisters?

Well I, have been fascinated by them for most of my life, since I read their novels and poems when I was a teenager, I  never  saw them as a  gloomy trio of unmarried women in a  isolated village in the Yorkshire’s moors  telling tales of love , despair and sometimes  happy endings.

I thought of them as witty , intelligent and also quite troubled women, well ahead of their time, raising topics that are still pertinent today , 200 years later. Drawing attention with their novels on subjects such as; choosing  your own path,  independence and being true to yourself .

The Brontë sisters have all an extraordinary ability to express their emotions so intensely about, not just love , loss, and  passion; but also about rage, madness, and domestic abuse, and  the reality of working just with the sole purpose to survive.

What also appeals to me a great deal is the fact that you can  be an extraordinary individual  without living a life full of  epic experiences.

So back to my visit…

I was standing at twilight in the front garden of the parsonage and looking at the colours, the light, the moss on the tombstones, the interiors  of the house with their soft dusty blues , greens and purples,  the books, paintings, clothes, kitchen utensils and objects of an ordinary life and I felt so content in being there.

To capture in a tangible way how I felt , I m going to dedicate my February blanket to my favourite Brontë sister, Emily, a blanket to remember my visit to Haworth on a beautiful winter afternoon.

I selected the yarn , a mix of tweeds and solid colours , some soft alpaca mix  for comfort against the gloomy weather, and a  general mood for the blanket.

the tomato looks more like an hot pink in this picture…which is not right but it give you an idea, hopefully in the next few days if it is not raining I will be able to take a better  picture.

The pattern is nearly there too; I am still tweaking with it.  It is going to be different from what I normally make but hopefully will work . more updates as the week progresses.

Love you all Lucia x


X